Endogenous Ubiquitin Western Blot: A Researcher's Guide to Eliminating Background Noise for Clear Results
This comprehensive guide addresses the critical challenge of high background noise in endogenous ubiquitin detection via western blot.
Endogenous Ubiquitin Western Blot: A Researcher's Guide to Eliminating Background Noise for Clear Results
Abstract
This comprehensive guide addresses the critical challenge of high background noise in endogenous ubiquitin detection via western blot. Targeting researchers and drug development professionals, we explore the biological and technical sources of noise, present optimized protocols for sample preparation, electrophoresis, and immunoblotting, and provide a systematic troubleshooting matrix for common issues. We further detail validation strategies, including antibody characterization and the use of knockdown controls, and compare methodological approaches to ensure specific, reproducible detection of free and conjugated ubiquitin in diverse biological samples. The goal is to empower scientists with the knowledge to obtain publication-quality data crucial for ubiquitin-proteasome system research.
Understanding the Ubiquitin Signal: Why Background Noise Plagues Endogenous Detection
Technical Support Center: Troubleshooting Background Noise in Endogenous Ubiquitin Detection
Frequently Asked Questions (FAQs)
Q1: I am getting high background signal across all lanes, including negative controls, in my Western blot for endogenous ubiquitin. What are the primary causes? A: This is typically caused by:
- Antibody Cross-Reactivity: The anti-ubiquitin antibody is binding to non-ubiquitin proteins with similar epitopes.
- Overexposure: The high cellular abundance of free ubiquitin (~10-50 µM intracellular concentration) requires very short exposure times.
- Insufficient Blocking: The use of 5% non-fat dry milk (NFDM) can be problematic as it contains casein, a phosphorylated protein that increases background with phospho-specific antibodies and may not block effectively for ubiquitin. Switch to 5% BSA in TBST.
- Incomplete Washing: Residual primary or secondary antibody remaining on the membrane.
Q2: My antibody detects poly-ubiquitin chains in purified systems but fails in cell lysates, or shows too many non-specific bands. How can I improve specificity? A: This indicates a need for enhanced assay stringency.
- Increase Wash Stringency: Include 0.5M NaCl in your wash buffers to disrupt weak, non-specific ionic interactions.
- Optimize Antibody Dilution: Titrate your primary antibody in a range from 1:500 to 1:5000. High-abundance targets require less antibody.
- Use De-ubiquitinase (DUB) Inhibitors: Include DUB inhibitors (e.g., 10µM PR-619, 1µM Ubistatin) in your lysis buffer to prevent chain disassembly during preparation, which can create smearing.
- Validate with a Positive Control Knockdown: Use siRNA against ubiquitin (e.g., UBB, UBC) to confirm the specificity of your band(s).
Q3: How can I distinguish between mono-ubiquitination and poly-ubiquitination in a noisy background? A: Employ enzymatic treatments alongside your blot.
- Use Recombinant DUBs: Treat lysates with specific DUBs (e.g., USP2 for most chains, OTUB1 for K48-linked preference) prior to SDS-PAGE. A band shift from high molecular weight to ~8-10kDa (free ubiquitin) confirms specificity.
- Lysate Pre-Clearance: Pre-clear your lysate with protein A/G beads before adding the primary antibody to remove proteins that bind the Fc region non-specifically.
Q4: My immunofluorescence for endogenous ubiquitin shows a diffuse, nonspecific nuclear/cytoplasmic stain. How do I optimize? A:
- Fixation is Critical: Avoid over-fixation with paraformaldehyde (>20 minutes at 4% can mask epitopes). Try methanol fixation at -20°C for 10 minutes for better antigen retrieval.
- Permeabilization Optimization: Titrate Triton X-100 (0.1%-0.5%). Higher concentrations can extract too much soluble ubiquitin, leaving only protein-associated signal.
- Include Cross-Linkers (for IF): Use DSP (Dithiobis(succinimidyl propionate)) reversible cross-linker prior to fixation to preserve transient ubiquitination events.
Troubleshooting Guide Table
| Symptom | Likely Cause | Recommended Solution | Expected Outcome |
|---|---|---|---|
| High background in all Western blot lanes | Non-specific antibody binding or overexposure | Switch blocking buffer to 5% BSA; reduce primary antibody incubation time to 1 hour at RT; decrease film/imaging exposure to <5 seconds. | Clean background, specific bands visible. |
| Smear across entire lane | Proteasomal degradation or incomplete DUB inhibition | Add DUB inhibitor cocktail to lysis buffer; perform experiment on ice; use stronger protease inhibitors (e.g., 10µM MG-132 for 6h pre-lysis). | Distinct laddering pattern of poly-Ub chains. |
| Missing high molecular weight poly-Ub signals | Epitope masking or chains too long for gel resolution | Use gradient gels (4-20%); boil samples for 10 min in Laemmli buffer; try different ubiquitin antibodies (linkage-specific vs. pan-Ub). | Improved detection of high MW ubiquitinated proteins. |
| Inconsistent results between replicates | Variable lysis efficiency or Ub pool fluctuation | Normalize to total protein concentration via BCA assay; ensure consistent cell confluence (>80%) at harvest; use standardized lysis protocol. | <15% variance between replicate bands. |
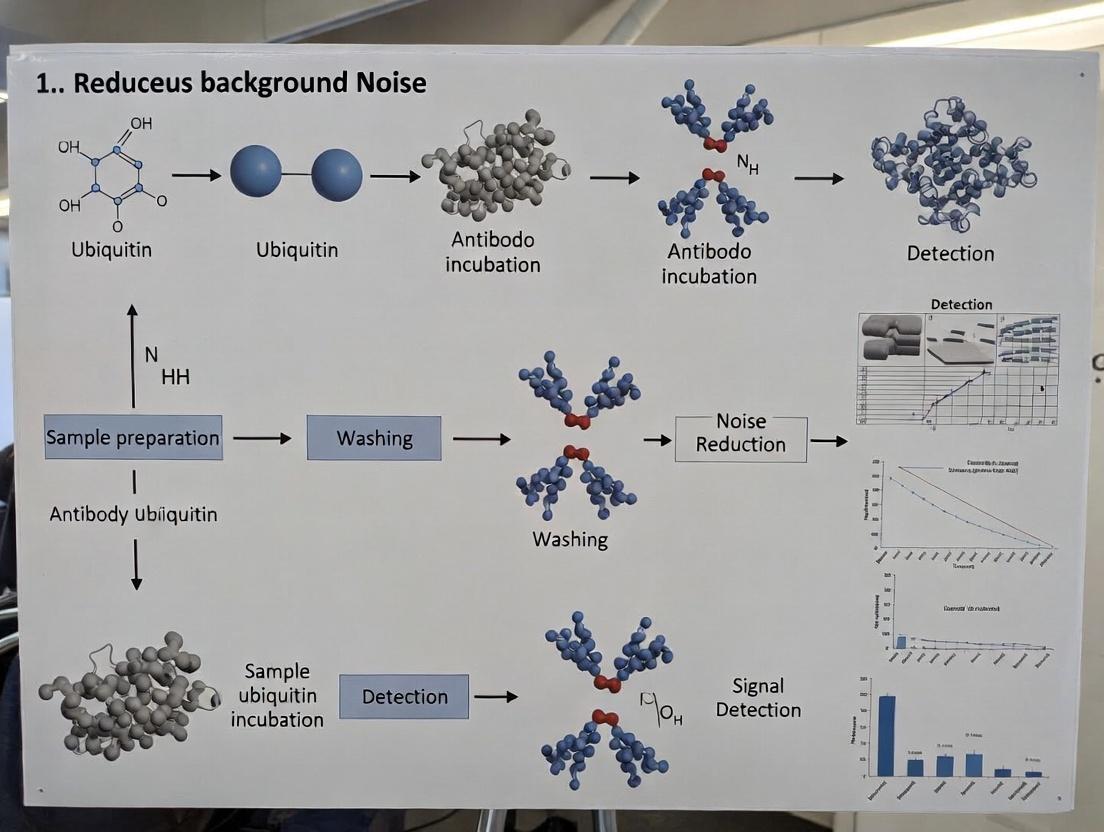
Detailed Experimental Protocols
Protocol 1: Low-Background Western Blot for Endogenous Ubiquitin
- Sample Preparation: Lyse cells in RIPA buffer (150mM NaCl, 1% NP-40, 0.5% DOC, 0.1% SDS, 50mM Tris pH 8.0) supplemented with 10µM PR-619 (DUB inhibitor), 1x EDTA-free protease inhibitor cocktail, and 10mM N-Ethylmaleimide (NEM) to alkylate free cysteine isopeptidases. Incubate 30 min on ice, then centrifuge at 16,000g for 15 min at 4°C.
- Protein Quantification: Use a BCA assay. Load equal masses (20-30 µg) onto a 4-20% gradient SDS-PAGE gel.
- Transfer: Use PVDF membrane. Activate in methanol, then transfer at 100V for 70 min in cold Towbin buffer.
- Blocking: Block membrane in 5% BSA in TBST (0.1% Tween-20) for 1 hour at RT.
- Primary Antibody Incubation: Dilute primary pan-ubiquitin antibody (e.g., P4D1) 1:2000 in 5% BSA/TBST. Incubate for 2 hours at RT (or overnight at 4°C for weaker signals). Wash 3 x 10 min with high-stringency wash buffer (TBST + 0.5M NaCl).
- Secondary Antibody Incubation: Dilute HRP-conjugated secondary antibody 1:5000 in 5% BSA/TBST. Incubate for 1 hour at RT. Wash 3 x 10 min with standard TBST.
- Detection: Use a low-fluorescence ECL substrate. Image with a CCD camera using multiple short exposures (1, 5, 30 seconds).
Protocol 2: DUB Treatment Assay for Specificity Validation
- Prepare cell lysate as in Protocol 1, but split into 3 aliquots (40µg each).
- Treatment: Aliquot 1: No treatment (control). Aliquot 2: Add 1µg of recombinant USP2 (broad-specificity DUB). Aliquot 3: Add 1µg of recombinant OTUB1 (K48-linkage preferring DUB). Incubate all at 37°C for 1 hour.
- Stop reaction by adding 4x Laemmli buffer and boiling for 10 min.
- Run Western blot as per Protocol 1. Specific ubiquitin signals will diminish or shift in DUB-treated samples.
Diagrams
Ubiquitin Detection Optimization Workflow
Ubiquitin Conjugation Cascade Leading to Detection
The Scientist's Toolkit: Research Reagent Solutions
| Item | Function & Rationale |
|---|---|
| DUB Inhibitor Cocktail (e.g., PR-619, NEM) | Broad-spectrum, cell-permeable inhibitors that halt deubiquitinating enzymes during lysis, preserving the native ubiquitination state and preventing smear. |
| Proteasome Inhibitor (MG-132, Bortezomib) | Blocks the 26S proteasome, causing accumulation of poly-ubiquitinated proteins, thereby enhancing signal for degradation-linked ubiquitination. |
| Linkage-Specific Ubiquitin Antibodies (K48, K63) | Antibodies that specifically recognize the topology of poly-ubiquitin chains, allowing differentiation between degradative and signaling functions. |
| Recombinant Deubiquitinases (USP2, OTUB1) | Used as specificity controls in vitro; cleavage of ubiquitin chains from substrates confirms the detected signal is ubiquitin-specific. |
| Cross-linking Reagents (DSP, DTBP) | Cell-permeable, reversible cross-linkers that stabilize weak protein-ubiquitin interactions prior to lysis and immunofluorescence. |
| Ubiquitin Activating Enzyme (E1) Inhibitor (MLN7243/TAK-243) | A specific inhibitor of the initial step of ubiquitination; serves as an excellent negative control to confirm signal specificity. |
| High-Stringency Wash Buffer (TBST + 0.5M NaCl) | Reduces non-specific ionic interactions between the antibody and off-target proteins on the membrane, lowering background. |
| PVDF Membrane (0.2µm pore size) | Preferred over nitrocellulose for better retention of low molecular weight ubiquitin (~8.5 kDa) and poly-ubiquitinated proteins. |
Troubleshooting Guides & FAQs
Q1: My western blot for endogenous ubiquitin shows a high smear across all lanes, including the negative control. What is the most likely cause? A: A uniform high background smear across all lanes typically indicates non-specific antibody binding. The primary culprit is often insufficient blocking or the use of an inappropriate blocking agent. For ubiquitin detection, avoid using milk-based blockers as casein can cross-react with some anti-ubiquitin antibodies. Switch to 5% Bovine Serum Albumin (BSA) or a commercial blocking buffer designed for phospho- or ubiquitin-specific antibodies.
Q2: I see discrete bands within the poly-ubiquitin smear. How can I determine if they are specific? A: Discrete bands can be either specific (e.g., poly-ubiquitinated substrates) or non-specific. To verify specificity, you must perform a key validation experiment: Ubiquitin Protease Treatment. Treat your lysate with a deubiquitylating enzyme (DUB) like USP2 or a broad-spectrum DUB cocktail prior to loading. Specific ubiquitin signals will be eliminated or significantly reduced, while non-specific bands will remain.
Q3: My signal-to-noise ratio is poor. What optimization steps can I take? A: Follow this systematic optimization checklist:
- Titrate your primary antibody. Use a dilution series to find the optimal concentration that maximizes specific signal while minimizing background.
- Increase wash stringency. Add 0.1% Tween-20 to your TBS (TBST) and perform three 10-minute washes after both primary and secondary antibody incubations.
- Optimize sample preparation. Ensure your lysis buffer contains strong denaturants (e.g., 1% SDS) and sufficient protease/deubiquitinase inhibitors (e.g., 10mM N-Ethylmaleimide) to prevent artifact smearing from sample degradation.
Q4: How can I confirm my antibody is detecting poly-ubiquitin chains and not mono-ubiquitin or ubiquitin-like modifiers? A: Employ a Lysine-less Mutant (K0) Ubiquitin Overexpression control. Co-transfect cells with your protein of interest and wild-type (WT) ubiquitin or a mutant where all lysines are mutated to arginine (K0). The K0 mutant can only form mono-ubiquitination. A reduction in high-molecular-weight smearing with the K0 mutant compared to WT confirms the detection of poly-ubiquitin chains.
Q5: What are the best positive and negative controls for endogenous ubiquitin blots? A: The following controls are essential for rigorous interpretation:
| Control Type | Recommended Material | Expected Result | Purpose |
|---|---|---|---|
| Positive Control | Lysate from cells treated with 10µM MG132 (proteasome inhibitor) for 6 hours. | Strong increase in high-molecular-weight poly-ubiquitin smear. | Confirms antibody sensitivity to accumulated poly-Ub proteins. |
| Negative Control (Primary Antibody) | Use an isotype control IgG at same concentration as your anti-ubiquitin Ab. | No or minimal smear. | Identifies background from non-specific IgG binding. |
| Knockdown/Knockout Control | Lysate from cells with siRNA/shRNA-mediated UBB/UBC (ubiquitin genes) knockdown. | Global reduction in ubiquitin signal. | Validates antibody specificity for ubiquitin. |
Detailed Experimental Protocols
Protocol 1: DUB Treatment to Confirm Specificity
Objective: To enzymatically remove ubiquitin conjugates and verify that high-MW smearing is specific.
- Prepare cell lysate in SDS lysis buffer (1% SDS, 50mM Tris pH 7.5) and boil for 5 min.
- Dilute lysate 1:10 in DUB assay buffer (50mM Tris-HCl pH 7.5, 50mM NaCl, 1mM DTT).
- Split the diluted lysate into two aliquots. To one, add 1µg of recombinant USP2 catalytic domain (or 1x DUB cocktail). Add buffer only to the other (untreated control).
- Incubate for 1 hour at 37°C.
- Add 4x Laemmli sample buffer, boil for 5 min, and proceed to western blot.
Protocol 2: Optimized Western Blot for Endogenous Ubiquitin
Objective: Minimize background in ubiquitin immunoblotting.
- Sample Prep: Lysate cells in RIPA buffer supplemented with 10mM NEM, 1x protease inhibitor cocktail, and 5µM PR-619 (DUB inhibitor). Sonicate briefly, boil with sample buffer containing 100mM DTT.
- Gel Electrophoresis: Load 20-50µg total protein on a 4-12% Bis-Tris gradient gel. Use a wide molecular weight marker. Run at 120V for 90 minutes.
- Transfer: Use PVDF membrane. Activate in methanol, then transfer using wet or semi-dry method in standard Tris-Glycine buffer.
- Blocking: Block membrane in 5% BSA in TBST for 1 hour at room temperature. Do not use milk.
- Primary Antibody Incubation: Incubate with anti-ubiquitin monoclonal antibody (e.g., P4D1, FK2) diluted in 5% BSA/TBST (typical range 1:500-1:2000) overnight at 4°C with gentle agitation.
- Washing: Wash 3 x 10 minutes with vigorous agitation in TBST.
- Secondary Antibody Incubation: Incubate with HRP-conjugated anti-mouse secondary (1:5000 in 5% BSA/TBST) for 1 hour at RT.
- Washing: Repeat step 6.
- Detection: Use high-sensitivity ECL reagent and short exposure times (1 sec to 2 min) to avoid saturating the film/sensor.
Diagrams
Title: Specific vs. Non-Specific Ubiquitin Signal Workflow
Title: Key Controls for Poly-Ubiquitin Detection
The Scientist's Toolkit: Research Reagent Solutions
| Reagent | Function/Application in Ubiquitin Research | Key Consideration |
|---|---|---|
| Anti-Ubiquitin Antibody (Clone FK2/P4D1) | Detects mono- and poly-ubiquitinated proteins. Workhorse for endogenous blotting. | FK2 prefers poly-Ub; P4D1 binds both. Titrate to reduce background. |
| USP2 Catalytic Domain (Recombinant) | Deubiquitylating enzyme (DUB) used to treat lysates. Essential control to verify antibody specificity. | Confirm activity prior to use. Treatment should abolish specific smear. |
| N-Ethylmaleimide (NEM) | Irreversible deubiquitylase (DUB) inhibitor. Added to lysis buffer to preserve ubiquitin conjugates. | Must be added fresh. Inactivated by DTT/BME in sample buffer. |
| MG132 (Proteasome Inhibitor) | Positive control reagent. Treatment accumulates poly-ubiquitinated proteins, boosting signal. | Typical use: 10-20µM for 4-6 hours. Can induce cell stress. |
| Ubiquitin Activating Enzyme (E1) Inhibitor (e.g., TAK-243) | Negative control. Globally inhibits ubiquitin conjugation, reducing all ubiquitin signals. | Confirms dependence on active ubiquitination. Can be cytotoxic. |
| BSA (Fraction V), IgG-Free | Preferred blocking agent for ubiquitin blots. Reduces non-specific background vs. milk-based blockers. | Use at 3-5% in TBST. Ensure it's protease-free. |
| siRNA against UBB/UBC | Genetic negative control. Knocking down ubiquitin genes reduces total cellular ubiquitin. | Requires 48-72 hr transfection. Check knockdown efficiency. |
| HA-Ubiquitin (K0) Plasmid | Critical tool to distinguish poly-ubiquitination. K0 mutant (all Lys→Arg) cannot form chains. | Co-transfect with protein of interest. Compare smear to WT-Ub transfection. |
Troubleshooting Guides & FAQs
FAQ 1: Why do I get a high overall background across my entire blot when detecting endogenous ubiquitin?
- Answer: This is often due to non-specific antibody binding. Primary antibodies, especially polyclonals against ubiquitin, can cross-react with many proteins. Inadequate blocking (type, concentration, or time) or using an incompatible blocking buffer for your detection system are primary culprits. Overly high antibody concentrations or excessive exposure times during detection also saturate the membrane.
FAQ 2: Why do I see a smear or multiple bands above my target protein?
- Answer: This is characteristic of ubiquitin biology. Endogenous target proteins exist in various polyubiquitinated states (chains of different lengths) and can be modified at multiple lysine residues, creating a heterogeneous mixture of higher molecular weight species. A discrete band at the expected molecular weight is rare. A high background smear indicates poor antibody specificity or residual enzymatic activity (from HRP or AP) during detection.
FAQ 3: My negative control (e.g., ubiquitin knockdown) still shows a strong background. What does this mean?
- Answer: This confirms significant antibody non-specificity. The signal is not primarily from ubiquitin. You must optimize antibody conditions (see Protocol 1) and validate your antibody's specificity using a positive control (ubiquitin ladder) and a true negative control (e.g., sample from a ubiquitin-deficient cell line).
FAQ 4: What are the key experimental parameters to quantify and compare when optimizing?
- Answer: Critical quantitative parameters are summarized in Table 1.
Table 1: Key Quantitative Parameters for Optimization
| Parameter | Typical Starting Range | Optimized Value (Example) | Purpose |
|---|---|---|---|
| Blocking Buffer Concentration | 3-5% (w/v) BSA or NFDM | 5% BSA in TBST | Reduce non-specific binding |
| Primary Antibody Dilution | 1:500 - 1:2000 | 1:1000 | Balance signal & specificity |
| Primary Incubation Time | Overnight at 4°C | 2 hours at RT | Prevent over-binding |
| Wash Volume & Frequency | 3 x 5 mins, 1x TBST | 3 x 10 mins, large volume TBST | Remove unbound antibody |
| Secondary Antibody Dilution | 1:2000 - 1:10000 | 1:5000 | Minimize background |
| Chemiluminescence Exposure | 1 sec - 5 mins | 30 sec | Avoid membrane saturation |
Detailed Experimental Protocols
Protocol 1: Antibody Titration and Specificity Validation
- Prepare Samples: Load a ubiquitin standard ladder and cell lysates (including a negative control) on an SDS-PAGE gel.
- Transfer: Perform standard wet or semi-dry transfer to a PVDF membrane.
- Block: Incubate membrane in 5% BSA in TBST for 1 hour at room temperature (RT).
- Primary Antibody: Prepare serial dilutions of anti-ubiquitin antibody (e.g., 1:500, 1:1000, 1:2000, 1:5000) in 1% BSA/TBST. Apply to separate membrane strips. Incubate for 2 hours at RT.
- Wash: Wash membranes 3 times for 10 minutes each with ample TBST.
- Secondary Antibody: Incubate with HRP-conjugated secondary antibody (1:5000 in 1% BSA/TBST) for 1 hour at RT.
- Wash: Repeat step 5.
- Detect: Apply chemiluminescent substrate and image. Select the dilution yielding the clearest polyubiquitin pattern with minimal background.
Protocol 2: Enhanced Stringency Washes After primary and secondary antibody incubations, perform a series of stringent washes:
- Wash 1: 1x TBST, 5 minutes, RT.
- Wash 2: 1x TBST + 0.5M NaCl (high salt), 10 minutes, RT. Disrupts weak ionic interactions.
- Wash 3: 1x TBST, 5 minutes, RT.
- Wash 4: 1x TBS (no Tween), 2 minutes, RT. Removes detergent before detection.
Pathways and Workflows
The Scientist's Toolkit: Research Reagent Solutions
| Reagent / Material | Primary Function & Rationale |
|---|---|
| PVDF Membrane | Preferred over nitrocellulose for better retention of ubiquitinated proteins, especially high molecular weight complexes. Requires methanol activation. |
| Protease & Deubiquitinase Inhibitors (e.g., NEM, PR-619) | Added fresh to lysis buffer to prevent degradation and deconjugation of ubiquitin chains during sample preparation. |
| Ubiquitin Standard Ladder | Recombinant polyubiquitin chains of defined lengths. Essential positive control to confirm antibody specificity and identify laddering pattern. |
| BSA (Bovine Serum Albumin) | Preferred blocking agent over non-fat dry milk (NFDM) for ubiquitin and phospho-targets, as NFDM may contain biotin and phosphoproteins causing background. |
| Monoclonal Anti-Ubiquitin Antibody (e.g., FK2, P4D1) | Recognizes mono- and polyubiquitin. Often provides cleaner signal than polyclonals due to single epitope recognition, but may miss some chain linkages. |
| High-Salt Wash Buffer (e.g., TBST + 0.5M NaCl) | Increases stringency of washes by disrupting non-specific ionic interactions between antibody and membrane. |
| HRP Quenching Solution (e.g., Sodium Azide) | To inactivate residual HRP activity on the membrane before re-probing, preventing background in subsequent detections. |
Technical Support Center
Troubleshooting Guides & FAQs
Q1: My endogenous ubiquitin Western blot shows high background across all lanes, even in untreated controls. What could be the cause? A: High background often stems from non-specific antibody binding or incomplete blocking. Sample-specific factors like high endogenous protease activity in certain cell lines (e.g., HeLa, HEK293) can generate ubiquitin-degradation fragments that cross-react. First, verify your blocking solution. Use 5% non-fat dry milk or 3% BSA in TBST, but note that milk contains biotin and phosphoproteins which can interfere in some tissues. For liver or kidney tissue lysates, which are rich in endogenous biotin, switch to a commercial biotin-blocking system (e.g., Avidin/Biotin Blocking Kit) before primary antibody incubation. Re-titer your primary antibody (common working range: 1:500-1:2000) using a positive control lysate from a cell line like A549, which typically expresses moderate ubiquitin levels.
Q2: I observe variable ubiquitin signal intensity between my different cancer cell line models (e.g., MCF7 vs. PC3) under the same treatment. Is this biological or technical? A: This is likely biological variability but must be confirmed technically. Different cell lines have vastly different basal ubiquitin ligase and protease expression. First, ensure equal loading using a total protein stain (e.g., REVERT) rather than just a housekeeping protein, as actin/GAPDH levels can also vary. Follow this protocol:
- Lysate Normalization: Quantify lysates using a Qubit protein assay. Load 20-30 µg per lane.
- Gel Electrophoresis: Use a 4-12% Bis-Tris gel run at constant 150V for 90 minutes in MOPS buffer.
- Transfer: Use low-ethanol (<10%) transfer buffer and a wet transfer system at 100V for 70 minutes. Semi-dry transfer can be inefficient for high MW poly-ubiquitin smears.
- Antibody Incubation: Incubate with anti-ubiquitin monoclonal antibody (P4D1 clone) at 1:1000 in 3% BSA/TBST overnight at 4°C. Wash 3 x 10 minutes with rigorous agitation. If variability persists after confirming technical rigor, it reflects true biological differences in ubiquitin homeostasis.
Q3: My tissue samples (heart vs. brain) yield completely different background levels. How can I standardize this? A: Tissue-specific challenges are common due to differing lipid, collagen, and hemoglobin content. For fibrous tissues (heart, muscle), perform additional mechanical homogenization using a bead mill after standard RIPA lysis. For lipid-rich tissues (brain, adipose), clarify lysates by high-speed centrifugation (16,000 x g, 20 min at 4°C) and consider a delipidation step. Use the following adjusted protocol for tough tissues:
- Homogenize in RIPA + 1% SDS and 25 units/mL Benzonase nuclease to reduce viscosity.
- Sonicate on ice (3 pulses of 10 seconds).
- Heat samples at 95°C for 5 minutes to denature proteases.
- Centrifuge at 16,000 x g for 15 min and transfer supernatant to a new tube.
- Re-quantify protein concentration post-clearing via BCA assay.
Q4: Treatment with proteasome inhibitor MG-132 increases signal but also background. How do I optimize? A: MG-132 causes massive accumulation of poly-ubiquitinated proteins, which can overload the gel and transfer, leading to smearing and high background. Implement these changes:
- Reduce Load: Load 10-15 µg of protein from MG-132-treated samples vs. 20-30 µg for controls.
- Gel Choice: Use a 10% Tris-Glycine gel for better resolution of high molecular weight aggregates.
- Enhanced Wash: After primary antibody, wash with TBST + 0.1% SDS for 5 minutes, then proceed with standard TBST washes.
- Secondary Antibody: Use a fluorescently conjugated secondary antibody (e.g., IRDye 800CW) at 1:20,000 for 1 hour at RT instead of HRP-conjugated to avoid enzyme-related saturation issues. This linear dynamic range is wider.
Table 1: Common Cell Line Basal Ubiquitin Levels & Recommended Loading Mass
| Cell Line/Tissue Type | Relative Basal Ubiquitin Level (A.U.) | Recommended Load for WB (µg) | Common Background Issue |
|---|---|---|---|
| HEK293 (Embryonic Kidney) | High (1.5 - 2.0) | 15-20 | Non-specific bands at ~50 kDa |
| MCF7 (Breast Cancer) | Moderate (1.0) | 20-25 | Low signal-to-noise |
| PC3 (Prostate Cancer) | Low-Moderate (0.7) | 25-30 | Streaking |
| Mouse Liver Tissue | Very High (2.5+) | 10-15 | High background due to biotin |
| Mouse Brain Tissue | Moderate (1.0) | 20-25 | Lipid-dependent smearing |
| A549 (Lung Cancer) | Moderate (1.0 - 1.2) | 20 | Minimal (good control) |
Table 2: Troubleshooting Matrix for High Background
| Symptom | Most Likely Cause | First-Line Fix | Alternative Solution |
|---|---|---|---|
| Uniform haze across membrane | Inadequate blocking or dirty buffers | Freshly prepare blocking buffer; filter all buffers (0.22 µm) | Block with 5% BSA + 0.1% Tween-20 |
| High background in tissue samples only | Endogenous biotin or peroxidases | Use an Avidin/Biotin blocking kit | Quench peroxidases with 0.3% H2O2 for 15 min |
| Smears at top of gel/lane | Aggregated protein/insufficient transfer | Add 0.1% SDS to transfer buffer; use wet transfer | Briefly boil lysates with 1% DTT |
| Variable background across replicates | Inconsistent washing | Standardize wash volume/time; use orbital shaker | Increase wash buffer salt to 150 mM NaCl |
| Background only with secondary | Secondary antibody concentration too high | Re-titer secondary antibody (start at 1:20,000) | Use secondary antibody from different host |
Experimental Protocols
Protocol 1: Optimized Lysis for Challenging Cell Lines (e.g., Suspension Cells)
- Harvest cells by centrifugation (300 x g, 5 min). Wash 2x with ice-cold PBS.
- Lyse cells in 100 µL of Modified RIPA Buffer (50 mM Tris-HCl pH 7.4, 150 mM NaCl, 1% NP-40, 0.5% Sodium Deoxycholate, 0.1% SDS, 1 mM EDTA) supplemented with 1x protease inhibitor cocktail (without EDTA), 10 mM N-Ethylmaleimide (NEM), and 50 µM PR-619 (deubiquitinase inhibitor).
- Incubate on ice for 30 minutes with brief vortexing every 10 minutes.
- Sonicate on ice (3 cycles of 10-second pulses at 30% amplitude).
- Clarify by centrifugation at 16,000 x g for 15 minutes at 4°C.
- Transfer supernatant to a fresh tube. Quantify protein concentration using a BCA assay.
- Prepare samples with 1x Laemmli buffer + 5% β-mercaptoethanol. Do not boil; heat at 65°C for 10 minutes to prevent poly-ubiquitin aggregation.
Protocol 2: Tissue Sample Preparation for Low-Background Detection
- Homogenize ~20 mg of flash-frozen tissue in 300 µL of ice-cold Tissue Lysis Buffer (Modified RIPA as above + 5 mM MgCl2, 250 U/mL universal nuclease) using a motorized pellet pestle (30 seconds on, 30 seconds off on ice, repeat 3x).
- Rotate the homogenate at 4°C for 45 minutes.
- Centrifuge at 12,000 x g for 20 minutes at 4°C to pellet debris.
- Collect the middle layer of supernatant, avoiding the top lipid layer and bottom pellet.
- Perform a second clean-up by adding an equal volume of chloroform, vortexing, and centrifuging at 12,000 x g for 5 minutes. Recover the aqueous protein interphase.
- Precipitate protein by adding 4 volumes of ice-cold acetone. Incubate at -20°C for 1 hour. Centrifuge at 15,000 x g for 10 minutes. Wash pellet with cold acetone, air-dry, and resuspend in 100 µL of 1x Laemmli buffer + 5% β-ME with 1% SDS.
- Gently solubilize by heating at 37°C for 1 hour with occasional vortexing.
Visualizations
Title: Endogenous Ubiquitin WB Workflow & Troubleshooting
Title: Ubiquitin Proteasome Pathway & Inhibition Points
The Scientist's Toolkit
Table 3: Essential Research Reagent Solutions for Low-Noise Ubiquitin Detection
| Reagent / Material | Function / Purpose | Key Consideration for Sample Variability |
|---|---|---|
| Modified RIPA Lysis Buffer (with 0.1% SDS) | Efficient extraction of ubiquitinated proteins while denaturing proteases. | For tough tissues (heart, muscle), increase SDS to 0.5% to improve solubility. |
| N-Ethylmaleimide (NEM) | Irreversible cysteine protease/DUB inhibitor. Prevents deubiquitination post-lysis. | Critical for cell lines with high DUB activity (e.g., some leukemias). Use fresh. |
| PR-619 (Broad-Spectrum DUB Inhibitor) | Inhibits a wide range of DUBs, stabilizing poly-ubiquitin chains. | Expensive; use at 50 µM in lysis buffer for treated samples, can be omitted for basal levels. |
| Benzonase Nuclease | Degrades DNA/RNA to reduce lysate viscosity. | Essential for tissue samples and high-density cell cultures to ensure accurate pipetting and even gel migration. |
| Fluorescent-Compatible Secondary Antibody (e.g., IRDye 800CW) | Detection with wide linear dynamic range. Reduces saturation artifacts. | Preferred over HRP for samples with expected high dynamic range (e.g., MG-132 treated vs. untreated). |
| Total Protein Stain (e.g., REVERT, Spyro Ruby) | Accurate loading control across diverse samples. | Superior to single housekeeping proteins (Actin, GAPDH) which vary across cell lines and treatments. |
| Avidin/Biotin Blocking Kit | Blocks endogenous biotin in tissues (liver, kidney, heart). | Must-use step for biotin-rich tissues to eliminate severe background. |
| 10% Tris-Glycine Gels | Better resolution of high molecular weight poly-ubiquitin smears. | Use when expecting heavy poly-ubiquitylation (e.g., after proteasome inhibition). |
Optimized Protocols for Clean Detection: From Lysis to Detection
Technical Support Center
Troubleshooting Guides & FAQs
Q1: My western blot for endogenous ubiquitin shows a very high background smear. What is the most likely cause related to my lysis buffer? A1: The most common cause is inadequate or slow protease inhibition during cell lysis, leading to non-specific protein degradation. Ubiquitin itself is stable, but the proteins it is conjugated to can degrade, generating a heterogeneous smear. Ensure your lysis buffer contains a broad-spectrum protease inhibitor cocktail (including inhibitors for cysteine, serine, metallo, and aspartic proteases) and that you are lysing the cells directly into pre-chilled buffer, followed by immediate vortexing and incubation on ice.
Q2: I am detecting strong discrete bands instead of the expected ubiquitin smears/ladders. Is my lysis buffer too harsh? A2: Yes, this is a typical sign of over-lysing or using a buffer that is too denaturing (e.g., high SDS concentration) early in the process, which can dissociate ubiquitin from its target proteins. For native ubiquitin-protein conjugate analysis, use a milder, non-denaturing or RIPA buffer. Verify that you are not sonicating or homogenizing excessively. The goal is to solubilize proteins while maintaining the ubiquitin-protein interactions.
Q3: My protein yield seems low when using a recommended lysis buffer. How can I improve extraction without increasing background? A3: Low yield often stems from insufficient detergent or salt concentration. You can systematically optimize by increasing the concentration of non-ionic detergents (e.g., NP-40) from 0.5% to 1% or adding 150-200 mM NaCl to disrupt hydrophobic/ionic interactions. Always balance this with maintaining sufficient inhibitor concentrations. See the table below for a comparison of buffer components and their effects.
Q4: Should I add N-Ethylmaleimide (NEM) or Iodoacetamide (IAA) to my lysis buffer for ubiquitin studies? A4: Yes, this is critical. Deubiquitinating enzymes (DUBs) are highly active cysteine proteases. You must include a DUB inhibitor like NEM (5-20 mM) or IAA (10-50 mM) in your lysis buffer to prevent the rapid cleavage of ubiquitin chains from your target proteins immediately upon cell disruption. This preserves the endogenous ubiquitination state.
Q5: Can I prepare a lysis buffer with inhibitors ahead of time and store it? A5: This depends on the inhibitor. Buffers with basic detergents and salts can be stored at 4°C. However, protease inhibitor cocktails, PMSF, and especially DUB inhibitors (NEM/IAA) must be added fresh just before use due to rapid hydrolysis or oxidation in aqueous solution.
Quantitative Data Summary: Lysis Buffer Component Impact
Table 1: Effect of Buffer Components on Yield and Background
| Component & Variation | Protein Yield | Ubiquitin Signal Clarity | Background Noise | Recommended Range for Endogenous Ubiquitin |
|---|---|---|---|---|
| Detergent: NP-40 | ||||
| 0.2% | Low | High (but low yield) | Low | Suboptimal |
| 0.5-1% | High | Optimal | Moderate | Optimal |
| >2% | Very High | Poor (bands not smears) | High | Too Harsh |
| NaCl Concentration | ||||
| 0 mM | Moderate | Optimal | Low | For soluble complexes |
| 150 mM | High | Optimal | Low | Standard |
| 500 mM | Very High | Reduced (smeary) | High | May co-precipitate contaminants |
| NEM (DUB Inhibitor) | ||||
| 0 mM | N/A | Very Poor | Very High | Unacceptable |
| 5 mM | N/A | Improved | High | Minimum required |
| 10-20 mM | N/A | Optimal | Low | Optimal |
Table 2: Protease Inhibitor Efficacy Half-Life in Aqueous Solution
| Inhibitor | Target Protease Class | Stock Solution Storage | Half-Life in Lysis Buffer (at 4°C) |
|---|---|---|---|
| PMSF | Serine proteases | Anhydrous ethanol, -20°C | ~30-60 minutes |
| Aprotinin | Serine proteases | 4°C | ~24 hours |
| Leupeptin | Cysteine/Serine | -20°C | Several hours |
| EDTA/EGTA (10 mM) | Metallo-proteases | Room Temp (pH 8) | Stable |
| NEM (10 mM) | DUBs (Cysteine) | Fresh powder | < 1 hour (add last) |
Experimental Protocol: Optimal Lysis for Endogenous Ubiquitin Detection
Title: Preparation and Use of Optimized RIPA Lysis Buffer for Ubiquitin Research.
Methodology:
- Prepare Lysis Buffer Base (store at 4°C):
- 50 mM Tris-HCl, pH 7.5
- 150 mM NaCl
- 1% NP-40 (or 0.5% Sodium Deoxycholate)
- 0.5% Sodium Dodecyl Sulfate (SDS)
- 1 mM EDTA
- Add Fresh Inhibitors Immediately Before Use:
- Cool base buffer on ice.
- Add protease inhibitor cocktail tablet (e.g., EDTA-free) per manufacturer's instructions.
- Add PMSF to 1 mM from a 100 mM stock in ethanol.
- Crucial: Add solid N-Ethylmaleimide (NEM) to a final concentration of 10-20 mM. Vortex vigorously to dissolve.
- Cell Lysis Procedure:
- Aspirate media from cultured cells (in a 6-well plate, on ice).
- Wash once with 2 mL of ice-cold PBS.
- Add 100-150 µL of the complete, ice-cold lysis buffer directly to the well.
- Scrape cells immediately and transfer the suspension to a pre-chilled microcentrifuge tube.
- Vortex for 10 seconds. Incubate on ice for 15-20 minutes, vortexing briefly every 5 minutes.
- Centrifuge at 16,000 x g for 15 minutes at 4°C.
- Carefully transfer the supernatant (cleared lysate) to a new pre-chilled tube. Proceed to protein quantification and western blot analysis.
Mandatory Visualizations
Title: Workflow for Optimal Ubiquitin Protein Extraction
Title: Logic Map for Lysis Buffer Troubleshooting
The Scientist's Toolkit: Research Reagent Solutions
Table 3: Essential Reagents for Ubiquitin Lysis Studies
| Reagent | Function & Role in Reducing Background | Key Consideration |
|---|---|---|
| NP-40 Detergent | Non-ionic detergent that disrupts lipid membranes and solubilizes proteins while maintaining some protein-protein interactions. Optimal concentration balances yield and complex preservation. | Concentration is critical (0.5-1%). Higher amounts can dissociate non-covalent complexes. |
| N-Ethylmaleimide (NEM) | Irreversible cysteine protease inhibitor. Critical for inhibiting Deubiquitinating Enzymes (DUBs) to prevent loss of ubiquitin chains during lysis. | Must be added fresh from powder just before lysis. Aqueous solutions degrade rapidly. |
| EDTA-free Protease Inhibitor Cocktail | A mixture of inhibitors targeting serine, cysteine, aspartic, and aminopeptidases. Prevents general protein degradation. | "EDTA-free" is important if studying metallo-enzymes; otherwise, EDTA/EGTA can be added separately. |
| PMSF (Phenylmethylsulfonyl fluoride) | Serine protease inhibitor. Broadly targets trypsin, chymotrypsin, etc. | Unstable in water; add from concentrated ethanol stock. Works synergistically with cocktail. |
| SDS (Sodium Dodecyl Sulfate) | Ionic detergent that denatures proteins and disrupts nearly all non-covalent interactions. A small amount (0.1-0.5%) in RIPA helps solubilize membrane proteins. | Too much (>0.5%) can interfere with downstream immunoprecipitation and create overly denatured samples. |
| UA-Compatible Lysis Buffer Kits | Commercial buffers pre-optimized for ubiquitin/conjugate studies, often containing proprietary DUB inhibitors. | Good for standardization but can be costly. Verify inhibitor components are disclosed and appropriate. |
Troubleshooting Guides & FAQs
Section 1: Boiling Conditions
Q1: My ubiquitin western blot shows excessive smearing instead of discrete bands. Could my boiling step be at fault? A: Yes. Over-boiling can cause protein aggregation and non-specific antibody binding, increasing background noise. The optimal boiling time is sample-dependent.
- For typical cell lysates in 1X Laemmli buffer: Boil for 5 minutes at 95-100°C.
- For membrane-rich or complex samples: Limit boiling to 3-4 minutes.
- Critical Check: Ensure your sample buffer contains at least 2% SDS to properly denature proteins and prevent aggregation during heating.
Q2: Should I boil my samples when detecting endogenous polyubiquitin chains? A: This is critical. You must boil samples for polyubiquitin detection. Incomplete denaturation leaves chains folded, shielding epitopes and leading to false negatives. A 5-minute boil at 100°C is standard. For particularly stubborn interactions (e.g., some ubiquitin-associated domains), a 10-minute boil may be tested, but assess protein integrity.
Experimental Protocol: Optimized Sample Boiling for Ubiquitin Detection
- Prepare cell lysates in RIPA buffer with fresh 1X protease inhibitors and 20mM N-ethylmaleimide (NEM).
- Mix lysate with 4X Laemmli sample buffer (final: 1X buffer, 2% SDS, 10% glycerol, 62.5 mM Tris-HCl pH 6.8).
- Do not add reducing agent (DTT/BME) at this stage if analyzing non-reduced chains.
- Heat samples on a heat block or boiling water bath at 100°C for exactly 5 minutes.
- Briefly centrifuge to collect condensation.
- Proceed to reduction step or load directly (see Section 2).
Table 1: Impact of Boiling Time on Background Signal-to-Noise Ratio (SNR)
| Sample Type | Boiling Time | Discrete Bands | Smearing | Background SNR (Relative) |
|---|---|---|---|---|
| HEK293 Whole Cell | 3 min | Moderate | Low | 1.0 (Baseline) |
| HEK293 Whole Cell | 5 min | High | Low | 3.5 |
| HEK293 Whole Cell | 10 min | Low | High | 0.7 |
| Brain Tissue Homog. | 5 min | Moderate | Moderate | 1.8 |
| Brain Tissue Homog. | 7 min | High | Low | 3.1 |
Section 2: Reducing Agents
Q3: I get no signal for endogenous polyubiquitin chains. My reducing agent might be destroying the epitope? A: This is a common error. Classical reducing agents like Dithiothreitol (DTT) or Beta-mercaptoethanol (BME) reduce the disulfide bonds within the ubiquitin molecule itself, collapsing polyubiquitin chains and destroying the epitopes for many chain-linkage specific antibodies (e.g., K48-, K63-specific).
- Solution: For total polyubiquitin detection (FK1, FK2 antibodies), omit DTT/BME from your sample buffer. For linkage-specific detection, always follow the antibody manufacturer's specific protocol.
Q4: How do I handle samples if I need to detect both a reduced protein target AND polyubiquitin? A: You must run parallel, non-reduced (for ubiquitin) and reduced (for your target protein) samples. Load them on the same gel but in separate wells.
Experimental Protocol: Non-Reduced vs. Reduced Sample Preparation
- For Polyubiquitin (Non-Reduced):
- Prepare sample in Laemmli buffer without DTT/BME.
- Boil as in Protocol 1.
- Cool to room temperature, then load directly onto gel. Do not add reducing agent later.
- For Target Protein (Reduced):
- Prepare a separate aliquot of the same lysate in Laemmli buffer.
- Add DTT to a final concentration of 50-100mM or BME to 5%.
- Boil for 5 minutes.
- Cool, centrifuge, and load.
Table 2: Effect of Reducing Agents on Ubiquitin Antibody Detection
| Antibody Specificity | Example Clone | Recommended Reducing Agent Conc. | Effect of 100mM DTT | Primary Use |
|---|---|---|---|---|
| Polyubiquitin | FK1, FK2 | 0 mM (None) | Complete Epitope Loss | Total polyubiquitin chains |
| K48-linkage | Apu2 | Follow mfr. guide (often 0 mM) | Often destructive | K48-specific chain detection |
| K63-linkage | Apu3 | Follow mfr. guide (often 0 mM) | Often destructive | K63-specific chain detection |
| Mono/Di-Ubiquitin | P4D1, E4C5 | 50-100mM DTT or 5% BME | Minimal effect | Mono-ubiquitinated proteins |
Section 3: Loading Controls
Q5: My ubiquitin blot background is high, but my loading control (e.g., GAPDH) looks perfect. Is the control still valid? A: Potentially not. A perfect GAPDH signal can be misleading if your ubiquitin sample was non-reduced and the GAPDH sample was reduced. Different redox states can alter migration and transfer efficiency. You must use a loading control compatible with non-reduced conditions.
Q6: What is the best loading control for non-reduced ubiquitin blots? A: Use a total protein loading control. This normalizes for variations in total protein loaded per lane, independent of reduction state.
- Best Practice: Use a Total Protein Stain (TPS) on the membrane post-transfer (e.g., Revert 700, Ponceau S, or Coomassie-based fluorescent stains). This is the most reliable method.
- Alternative: If an immunoblot control is preferred, select an antibody against a high-abundance, stable protein (e.g., Vinculin, Tom20) and confirm it still detects its target under your non-reducing conditions.
Experimental Protocol: Total Protein Normalization for Ubiquitin Blots
- Perform SDS-PAGE and wet-transfer your non-reduced samples to a PVDF membrane.
- Do not block. Immediately stain the membrane with a compatible total protein stain (e.g., Ponceau S for 5 min, then destain with water).
- Image the entire membrane to capture the TPS signal.
- Completely destain the membrane (e.g., with 0.1M NaOH for Ponceau S).
- Proceed with standard blocking, ubiquitin antibody incubation, and detection.
- Quantify your ubiquitin signal and normalize it to the TPS signal for each lane.
The Scientist's Toolkit: Research Reagent Solutions
Table 3: Essential Reagents for Low-Noise Endogenous Ubiquitin Detection
| Reagent | Function & Rationale | Example Product/Cat. # |
|---|---|---|
| N-Ethylmaleimide (NEM) | Deubiquitinase (DUB) inhibitor. Critical to add fresh (20-50mM) to lysis buffer to prevent chain degradation post-lysis. | Sigma-Aldrich, E3876 |
| Protease Inhibitor Cocktail (without EDTA) | Prevents protein degradation. Avoid EDTA-based cocktails as some DUBs require metal ions and EDTA can affect their activity. | Roche, cOmplete Ultra Tablets |
| Laemmli Sample Buffer (4X, no DTT/BME) | Denatures samples. Must be prepared or purchased without reducing agents for polyubiquitin work. | Bio-Rad, #1610747 (Use without added BME) |
| PVDF Membrane (0.2 or 0.45µm) | Preferred over nitrocellulose for ubiquitin due to superior protein retention, especially for small proteins (<25 kDa). | Millipore, Immobilon-P |
| Total Protein Stain (Fluorescent) | Most accurate loading control for non-reduced samples. Normalizes to total protein transferred. | LI-COR, Revert 700 Stain |
| HRP-Conjugated Secondary Antibodies | Standard for chemiluminescent detection. Ensure they are specific to the host species of your primary antibody. | Jackson ImmunoResearch |
| Chemiluminescent Substrate (Enhanced) | For signal detection. Use a sensitive, low-background substrate to detect endogenous levels. | Thermo Fisher, SuperSignal West Pico PLUS |
Visualizations
Title: Non-Reduced vs Reduced Sample Workflow for Ubiquitin Blots
Title: Effect of Reduction on Polyubiquitin Antibody Binding
Troubleshooting Guides & FAQs
Gel Percentage and Preparation
Q1: What is the optimal gel percentage for resolving endogenous ubiquitin (~8.6 kDa) and its conjugates? A1: Use a high-percentage Tris-Tricine gel system. A 10-20% gradient gel is ideal for resolving free ubiquitin, while a 4-12% Bis-Tris gel is better for higher molecular weight conjugates. For a single percentage, a 15% Tris-Tricine gel provides excellent resolution of free ubiquitin.
Q2: My ubiquitin band is diffuse and poorly resolved. What went wrong? A2: This is often due to gel polymerization issues or incorrect buffer pH. Ensure your acrylamide/bis-acrylamide ratio is 29:1 for optimal pore structure. Degas the gel solution before adding APS and TEMED to prevent oxygen inhibition. Verify that the gel running buffer pH is precisely 8.3 for Tris-Tricine systems.
Running Conditions
Q3: What running conditions minimize background and smearing for ubiquitin western blots? A3: Run gels at constant voltage (100-120V) for Tris-Tricine systems. Maintain the buffer temperature below 30°C by using a cooling coil or running in a cold room. Overheating causes band diffusion. For Bis-Tris gels, use MES or MOPS buffer instead of Tris-Glycine.
Q4: Should I use standard or low-fluorescence PVDF membranes for ubiquitin transfer? A4: Low-fluorescence PVDF (0.2 µm pore size) is superior. It provides high protein binding capacity for small proteins while generating lower background in chemiluminescent and fluorescent detection.
Transfer Optimization
Q5: What transfer method and conditions maximize ubiquitin retention on the membrane? A5: Use wet transfer at 4°C. For free ubiquitin: 25V constant voltage for 1.5 hours. For conjugates: 100V for 1 hour. Add 0.1% SDS to the transfer buffer to improve elution, but methanol concentration is critical—use 10% methanol for small proteins to prevent excessive membrane shrinking and poor binding.
Q6: My ubiquitin signal is weak post-transfer. How can I improve efficiency? A6: Pre-wet the PVDF membrane in 100% methanol for 1 minute, then equilibrate in transfer buffer. After transfer, stain the gel with Coomassie to check residual protein. Consider semi-dry transfer at 2.5 mA/cm² of membrane area for 45 minutes as an alternative.
Table 1: Gel Electrophoresis Conditions for Ubiquitin Detection
| Parameter | Free Ubiquitin (8.6 kDa) | Ubiquitin Conjugates (>15 kDa) | Notes |
|---|---|---|---|
| Gel Type | Tris-Tricine | Bis-Tris | Tricine buffers outperform glycine for small proteins. |
| Separation Gel % | 15% | 4-12% gradient | Higher % needed for small protein resolution. |
| Running Buffer | Anode: 0.2M Tris-HCl (pH 8.9); Cathode: 0.1M Tris, 0.1M Tricine, 0.1% SDS (pH 8.25) | 1X MES or MOPS SDS Running Buffer | Avoid glycine for small proteins. |
| Running Conditions | 120V constant, 1-1.5 hrs, 4°C | 150V constant, ~1 hr, 4°C | Cooling is essential to prevent smearing. |
| Optimal Load | 20-50 µg total protein per lane | 30-60 µg total protein per lane | Overloading increases background. |
| Protein Standard | Low MW (2-20 kDa) range | High MW (10-250 kDa) range | Essential for accurate size confirmation. |
Table 2: Transfer Optimization Parameters for PVDF Membranes
| Condition | Wet Transfer (Tank) | Semi-Dry Transfer | Purpose & Rationale |
|---|---|---|---|
| Buffer Composition | 25mM Tris, 192mM Glycine, 10% Methanol, 0.1% SDS | 48mM Tris, 39mM Glycine, 20% Methanol, 0.1% SDS | SDS aids elution; methanol promotes binding. |
| Voltage/Current | 25V constant (Free Ubq) / 100V (Conjugates) | 2.5 mA/cm² membrane area | Low voltage/long time benefits small proteins. |
| Duration | 1.5 hours (Free Ubq) / 1 hour (Conjugates) | 45 minutes | Prevent over-transfer of small proteins. |
| Temperature | 4°C (with ice pack or cooling unit) | Ambient (cool with ice block if needed) | Prevents overheating and buffer depletion. |
| Membrane Activation | 100% Methanol, 1 min | 100% Methanol, 1 min | Essential for PVDF hydrophilicity and protein binding. |
| Post-Transfer Check | Ponceau S stain | Ponceau S stain | Confirm transfer efficiency before blocking. |
Experimental Protocols
Protocol 1: Tris-Tricine Gel for Free Ubiquitin Detection
Objective: Resolve endogenous free ubiquitin (8.6 kDa) with minimal diffusion. Reagents:
- Acrylamide/Bis solution (29:1)
- 1.0M Tris-HCl (pH 8.45)
- 10% (w/v) Ammonium Persulfate (APS)
- TEMED
- Tricine, SDS
- Anode Buffer: 0.2M Tris-HCl, pH 8.9
- Cathode Buffer: 0.1M Tris, 0.1M Tricine, 0.1% SDS, pH 8.25 Method:
- Gel Casting: Prepare a 15% separating gel (3 mL): 1.5 mL Acrylamide/Bis, 1.0 mL 1.0M Tris-HCl (pH 8.45), 1.4 mL H₂O, 50 µL 10% SDS, 25 µL 10% APS, 5 µL TEMED. Degas for 5 min before adding APS/TEMED. Pour immediately.
- Stacking Gel: Prepare a 4% stacking gel (1 mL): 130 µL Acrylamide/Bis, 250 µL 1.0M Tris-HCl (pH 8.45), 600 µL H₂O, 10 µL 10% SDS, 10 µL 10% APS, 2 µL TEMED. Pour on top of polymerized separating gel.
- Sample Preparation: Mix 20 µg total protein with 2X Tricine SDS Sample Buffer. Do not boil above 70°C for >10 min to prevent ubiquitin aggregation.
- Electrophoresis: Assemble gel apparatus. Fill anode chamber with Anode Buffer. Fill cathode chamber with Cathode Buffer. Load samples. Run at 120V constant voltage for ~90 minutes or until dye front reaches bottom, at 4°C.
Protocol 2: Optimized Wet Transfer for Ubiquitin to PVDF
Objective: Efficiently transfer ubiquitin of all sizes to low-fluorescence PVDF membrane. Reagents:
- Transfer Buffer: 25mM Tris, 192mM glycine, 10% methanol (v/v), 0.1% SDS. Pre-chill to 4°C.
- Low-fluorescence PVDF membrane (0.2 µm pore size).
- Methanol (100%).
- Filter paper, sponges. Method:
- Membrane Preparation: Cut PVDF membrane to gel size. Immerse in 100% methanol for 1 minute. Rinse with deionized water. Soak in chilled transfer buffer for 10 minutes.
- Cassette Assembly: In a tray of chilled transfer buffer, assemble the transfer sandwich in this order (from black cathode to red anode): Sponge -> 2 Filter papers -> Gel -> PVDF Membrane -> 2 Filter papers -> Sponge. Roll out all bubbles meticulously with a roller after each layer.
- Transfer: Place cassette in tank filled with chilled transfer buffer. Insert a frozen cooling unit. Run at 25V constant voltage for 1.5 hours (for free ubiquitin) or 100V for 1 hour (for conjugates).
- Post-Transfer: Disassemble. Briefly rinse membrane in TBS-T. Stain with Ponceau S to confirm transfer. Proceed to blocking.
Visualizations
The Scientist's Toolkit: Research Reagent Solutions
| Item | Function & Rationale |
|---|---|
| Tris-Tricine SDS-PAGE System | Specialized buffer system using tricine as trailing ion. Provides superior resolution of low molecular weight proteins (<10 kDa) like free ubiquitin compared to Tris-Glycine systems. |
| Low-Fluorescence PVDF Membrane (0.2 µm) | Membrane with low autofluorescence, optimized for chemiluminescent and fluorescent detection. The 0.2 µm pore size enhances retention of small proteins. Must be activated with methanol. |
| Transfer Buffer with 0.1% SDS | Addition of low concentration SDS to standard transfer buffer improves the elution efficiency of proteins from the gel, particularly crucial for small, hydrophobic proteins like ubiquitin. |
| Ubiquitin-Specific Antibody Validated for Western Blot | Mouse or rabbit monoclonal antibody raised against full-length ubiquitin, specifically validated for detecting endogenous levels. Reduces non-specific bands. |
| Bovine Serum Albumin (BSA), Fraction V | Used for blocking and antibody dilution. Essential over non-fat dry milk (which contains biotin) to reduce background in ubiquitin detection, as milk can cause high non-specific signal. |
| High-Sensitivity Chemiluminescent Substrate | A luminol-based substrate with enhanced sensitivity and prolonged signal duration, allowing for detection of low-abundance endogenous ubiquitin with minimal background. |
| Precision Plus Protein Kaleidoscope or Similar Low MW Standards | Provides accurate size estimation in the critical low molecular weight range (2-20 kDa), confirming the identity of the free ubiquitin band. |
FAQs and Troubleshooting for Endogenous Ubiquitin Detection
Q1: My western blot for endogenous ubiquitin shows high background across all lanes, including negative controls. What are the primary causes? A: High uniform background is typically caused by insufficient blocking or non-stringent washing. For endogenous ubiquitin, which is highly abundant and has many conjugates, use a longer blocking step (2 hours at room temperature or overnight at 4°C) with 5% non-fat dry milk or a specialized commercial blocking agent in TBST. Avoid using milk if your detection system is alkaline phosphatase. Ensure wash buffers contain 0.1% Tween-20 and perform three 10-minute washes post-primary and post-secondary antibody incubation.
Q2: I see non-specific bands at unexpected molecular weights. How can I improve specificity? A: Non-specific bands often result from antibody cross-reactivity or suboptimal dilution. Titrate your primary ubiquitin antibody. A typical starting range for monoclonal anti-ubiquitin (e.g., P4D1) is 1:500 to 1:2000 in 1% BSA in TBST. Pre-clearing the antibody with cell lysate from a ubiquitin-knockdown sample can also help. Furthermore, include a peptide competition control by pre-incubating the antibody with its immunizing peptide; true signals should be abolished.
Q3: My signal is weak even though I know ubiquitin is present. What should I adjust? A: Weak signal can be due to over-blocking, excessive dilution, or protein loss. First, optimize the antibody concentration using a checkerboard dilution assay. Second, ensure your lysis buffer contains deubiquitinase inhibitors (e.g., 10mM N-Ethylmaleimide, 1µM PR-619) to preserve ubiquitin conjugates. Third, try an antigen retrieval step for PVDF membranes by briefly heating in near-boiling PBS after transfer.
Q4: How critical are wash conditions for reducing background in ubiquitin detection? A: Stringent washes are critical. The ionic strength and detergent concentration of the wash buffer are key. Use TBST (Tris-buffered saline with 0.1% Tween-20) for standard washes. For particularly high background, introduce a high-stringency wash step: one 15-minute wash with TBST containing 500mM NaCl after the primary antibody incubation, followed by standard TBST washes.
Troubleshooting Guide: Common Issues and Solutions
| Problem | Possible Cause | Recommended Solution |
|---|---|---|
| High uniform background | Inadequate blocking | Increase blocking time; switch to 5% BSA or commercial blocker. |
| Inadequate washing | Increase wash number/duration; ensure correct Tween-20 concentration (0.1%). | |
| Non-specific bands | Antibody concentration too high | Titrate primary antibody; perform dilution series (1:250 - 1:5000). |
| Non-optimal buffer | Dilute antibody in 1% BSA/TBST instead of milk. | |
| Weak or no signal | Antibody concentration too low | Concentrate antibody or use less dilution (e.g., 1:100). |
| Epitope masked | Add antigen retrieval step (heat membrane in PBS). | |
| Ubiquitin conjugates degraded | Add DUB inhibitors to lysis buffer immediately. | |
| Smearing pattern | Over-transfer / degradation | Reduce transfer time; keep samples cold with fresh protease inhibitors. |
Key Experimental Protocols
Protocol 1: Optimized Western Blot for Endogenous Ubiquitin Conjugates
Sample Preparation:
- Lyse cells in RIPA buffer supplemented with 10mM N-Ethylmaleimide (NEM), 1µM PR-619, and complete protease inhibitor cocktail.
- Sonicate briefly (3 pulses of 5 seconds) on ice.
- Centrifuge at 16,000 x g for 15 minutes at 4°C.
- Determine protein concentration using a BCA assay.
- Boil 20-30µg of lysate in 1X Laemmli buffer (containing 5% β-mercaptoethanol) for 5 minutes.
Gel Electrophoresis and Transfer:
- Resolve proteins on a 4-20% gradient SDS-PAGE gel.
- Transfer to PVDF membrane using wet transfer at 100V for 70 minutes at 4°C.
Blocking and Incubation:
- Block membrane with 5% BSA in TBST for 2 hours at room temperature.
- Incubate with primary anti-ubiquitin antibody (diluted in 1% BSA/TBST per titration) overnight at 4°C with gentle agitation.
- Perform washes: 1x 15-minute high-stringency wash (TBST + 500mM NaCl), followed by 3x 10-minute standard TBST washes.
- Incubate with HRP-conjugated secondary antibody (1:5000 in 1% BSA/TBST) for 1 hour at RT.
- Wash 4x for 10 minutes each with TBST.
Detection: Develop with high-sensitivity ECL substrate and image with a CCD camera system.
Research Reagent Solutions Toolkit
| Reagent | Function | Key Consideration for Ubiquitin Detection |
|---|---|---|
| Deubiquitinase (DUB) Inhibitors (NEM, PR-619) | Prevents removal of ubiquitin from conjugates during lysis, preserving signal. | Add fresh to lysis buffer immediately before use. NEM is light-sensitive. |
| Protease Inhibitor Cocktail | Inhibits general proteolysis, preserving protein integrity. | Use a broad-spectrum, EDTA-free formulation. |
| BSA (Fraction V) | Blocking agent and antibody diluent. Reduces non-specific binding. | Preferred over milk for phospho-specific or ubiquitin antibodies. Use at 1-5%. |
| High-Quality Tween-20 | Detergent in wash buffers (TBST) to reduce hydrophobic interactions. | Critical for stringent washing. Use at 0.1% (v/v). |
| High-Sensitivity ECL Substrate | Chemiluminescent substrate for HRP detection. | Necessary for detecting lower-abundance endogenous conjugates. |
| PVDF Membrane | High protein-binding membrane for transfer. | Activate with methanol before use. Provides better retention of small ubiquitinated proteins than nitrocellulose. |
| Immunizing Peptide | Specific antigen for competition control. | Validates antibody specificity. Pre-incubate antibody with peptide (10x molar excess) for 1 hour before applying to membrane. |
Diagrams
Title: Ubiquitin Preservation & Detection Workflow
Title: Background Noise Reduction Strategy
Systematic Troubleshooting: Diagnosing and Fixing Noise in Your Blots
Technical Support Center
Troubleshooting Guides & FAQs
Q1: After film development, I observe high background across the entire membrane, including areas without sample lanes. What are the primary causes and solutions?
- A: This indicates a system-wide issue, often related to antibody concentration, incubation conditions, or detection reagents.
- Primary Cause: Excessive primary or secondary antibody concentration.
- Solution: Titrate both antibodies. A good starting point is to dilute the primary antibody 2-5 fold from the manufacturer's recommendation.
- Primary Cause: Inadequate blocking or blocking buffer degradation.
- Solution: Prepare fresh blocking buffer (5% non-fat dry milk or BSA in TBST) and block for 1 hour at room temperature with agitation. For persistent background, consider switching blocking agents (e.g., use BSA for phospho-specific antibodies).
- Primary Cause: Overly long exposure time during chemiluminescent detection.
- Solution: Reduce exposure time. Perform a time-course exposure (e.g., 5s, 30s, 60s, 5min) to identify the optimal signal-to-noise ratio.
- Protocol - Antibody Titration: Prepare a membrane with your target sample. Cut the membrane into strips. Incubate each strip with a different dilution of your primary antibody (e.g., 1:500, 1:1000, 1:2000, 1:5000) overnight at 4°C. Process all strips identically for washing, secondary antibody, and detection. Select the dilution that gives the strongest specific signal with the cleanest background.
Q2: I see non-specific bands at unexpected molecular weights. How can I determine if this is due to antibody cross-reactivity or sample degradation?
- A: This requires a two-pronged diagnostic approach.
- For Cross-reactivity: Run a negative control sample (e.g., a cell line with a CRISPR knockout of your target ubiquitinated protein, or a sample treated with a proteasome inhibitor like MG-132 to accumulate ubiquitinated species). If the bands persist in the knockout sample, they are non-specific. Pre-clearing the lysate with Protein A/G beads before incubation with the primary antibody can also help.
- For Sample Degradation: Check sample quality by running an SDS-PAGE gel with a fresh sample and stain with Coomassie Blue. Smearing or a lack of distinct high-molecular-weight bands suggests degradation. Always prepare lysates with fresh, complete protease inhibitors (including deubiquitinase inhibitors like N-ethylmaleimide) and keep samples on ice.
- Protocol - Lysate Preparation with Inhibitors:
- Aspirate media from cultured cells and wash with ice-cold PBS.
- Lyse cells directly in plate with 100-200 µL of RIPA buffer supplemented with: 1x protease inhibitor cocktail, 1mM PMSF, 10mM N-ethylmaleimide (NEM), and 5mM EDTA.
- Scrape, transfer to a microcentrifuge tube, and incubate on ice for 15-20 minutes.
- Centrifuge at 12,000-14,000 rpm for 15 minutes at 4°C.
- Transfer supernatant (cleared lysate) to a new tube. Measure protein concentration immediately or store at -80°C.
Q3: My signal is weak, but the background is low. How can I enhance the specific signal without increasing background noise?
- A: Focus on optimizing antigen availability and detection sensitivity.
- Solution: Improve protein transfer efficiency. Use a PVDF membrane, activate it in methanol, and ensure proper transfer conditions (check for complete transfer of pre-stained markers). Consider a longer wet transfer time or optimized semi-dry conditions.
- Solution: Use a more sensitive chemiluminescent substrate. Compare different substrates (e.g., standard Luminol vs. enhanced substrates).
- Solution: Increase total protein load, but be cautious as overload can also cause smearing. Test a range from 20 µg to 80 µg.
- Protocol - Enhanced Chemiluminescence Detection:
- After secondary antibody incubation and final washes, mix enhanced luminol-based substrate components as per manufacturer's instructions.
- Incubate membrane with substrate for 3-5 minutes at room temperature.
- Drain excess substrate, wrap membrane in clear plastic wrap, and expose to a fresh film or digital imager in a darkroom.
- For digital imagers, use the "high sensitivity" mode and take multiple exposures.
Table 1: Effect of Blocking Agents on Background and Signal in Ubiquitin Detection
| Blocking Agent (5% in TBST) | Mean Background Pixel Intensity (AU) | Mean Target Band Pixel Intensity (AU) | Signal-to-Noise Ratio |
|---|---|---|---|
| Non-Fat Dry Milk | 45 | 850 | 18.9 |
| Bovine Serum Albumin (BSA) | 32 | 720 | 22.5 |
| Casein | 38 | 680 | 17.9 |
| No Block | 310 | 910 | 2.9 |
Data derived from triplicate experiments using a polyubiquitin antibody (FK2 clone) on HEK293 lysates. Pixel intensity measured using ImageJ software.
Table 2: Impact of Deubiquitinase Inhibition on High-Molecular-Weight Smear Detection
| Inhibitor in Lysis Buffer | Signal Intensity in >250 kDa Region (AU) | Number of Distinct Higher MW Bands |
|---|---|---|
| None (Control) | 125 | 1 |
| 10mM NEM | 480 | 4 |
| 5µM PR-619 | 620 | 5 |
| 1x Protease Inhibitor (only) | 150 | 2 |
AU = Arbitrary Units from densitometry analysis. MW = Molecular Weight.
Experimental Protocols
Protocol 1: Ubiquitin Enrichment via Immunoprecipitation Prior to Western Blotting Objective: To enrich for ubiquitinated proteins, reducing background from non-specific interactions in direct western blotting.
- Pre-clear Lysate: Incubate 500 µg of total protein lysate with 20 µL of plain Protein A/G agarose beads for 1 hour at 4°C. Centrifuge, collect supernatant.
- Antibody-Bead Complex Formation: Incubate 2-5 µg of anti-ubiquitin antibody (e.g., P4D1) with 30 µL of Protein A/G beads in 500 µL of IP buffer for 2 hours at 4°C.
- Immunoprecipitation: Add the pre-cleared lysate to the antibody-bead complex. Incubate overnight at 4°C with rotation.
- Wash: Centrifuge, discard supernatant. Wash beads 4 times with 1 mL of cold IP wash buffer (e.g., RIPA or TBS-Tween).
- Elution: Add 40 µL of 2x Laemmli sample buffer with 5% β-mercaptoethanol to the beads. Heat at 95°C for 10 minutes. Centrifuge and load the supernatant onto an SDS-PAGE gel.
Protocol 2: Stripping and Re-probing a Membrane Objective: To investigate multiple targets from the same membrane while confirming equal loading.
- After detection and documentation, rinse the membrane in distilled water.
- Incubate the membrane in a mild stripping buffer (e.g., 15g Glycine, 1g SDS, 10mL Tween-20 in 1L dH2O, pH adjusted to 2.2) for 15-30 minutes with agitation.
- Wash the membrane extensively with TBST (6 x 5 minutes).
- Re-block the membrane for 1 hour.
- Proceed with incubation of the next primary antibody.
Visualizations
Diagram Title: Background Diagnosis Flowchart
Diagram Title: Endogenous Ubiquitin Detection Workflow
The Scientist's Toolkit: Research Reagent Solutions
Table 3: Essential Reagents for Reducing Background in Ubiquitin Research
| Reagent | Function & Purpose | Key Consideration for Low Background |
|---|---|---|
| Deubiquitinase Inhibitors (NEM, PR-619) | Preserve ubiquitin-protein conjugates during lysis by inhibiting deubiquitinating enzymes (DUBs). | Critical. Prevents loss of signal, especially for labile monoubiquitination or specific chains. Always use fresh. |
| Protease Inhibitor Cocktail (EDTA-free) | Prevents general protein degradation by serine, cysteine, and metalloproteases. | Use EDTA-free versions if planning to use Ni-NTA pulldowns for His-Ub experiments. |
| Anti-Ubiquitin Antibody (mono/poly specific) | Primary detection reagent. Clones like FK2 (K48-linkage preferred), P4D1 (mono & poly), or linkage-specific antibodies. | Requires titration. High source of background. Validate specificity with KO controls. |
| HRP-conjugated Secondary Antibody | Amplifies signal for chemiluminescent detection. | Use antibodies pre-adsorbed against other species to minimize cross-reactivity. |
| Enhanced Chemiluminescent (ECL) Substrate | Enzyme substrate for HRP that produces light upon reaction. | High-sensitivity substrates improve signal but can increase background; optimize exposure time. |
| Blocking Agent (BSA or NFDM) | Covers non-specific binding sites on the membrane. | For phospho-ubiquitin or general use, BSA is preferred over milk to reduce background. |
| PVDF Membrane (0.45µm pore) | Immobilizes proteins after transfer for probing. | Provides higher binding capacity and robustness for stripping/re-probing compared to nitrocellulose. |
| Stripping Buffer (Mild, Low pH) | Removes bound antibodies from a membrane to allow re-probing. | Harsh buffers can damage antigens. Use mild glycine-based buffer and validate signal removal. |
Technical Support & Troubleshooting Center
Troubleshooting Guides & FAQs
Q1: My endogenous ubiquitin Western blot has high, uniform background across the entire membrane after using 5% non-fat dry milk (NFDM). What is the cause and solution?
A: High uniform background is often caused by non-specific binding of antibodies to blocking proteins. NFDM contains casein and biotin, which can interact with some antibodies.
- Solution: Switch to a purified casein blocker (2-4%) or a commercial immunoassay blocker. Casein provides a "cleaner" protein background. Alternatively, use 3% Bovine Serum Albumin (BSA), though it may be less effective for some phospho-targets.
- Protocol: Block the membrane in 1X Casein Blocking Buffer (prepared in PBS or TBS) for 1 hour at room temperature with gentle agitation. Wash 3x with TBST before primary antibody incubation.
Q2: I see speckled, high-background spots on my blot after using a casein-based blocker. What could be wrong?
A: Speckled background often indicates inadequate dissolution or precipitation of the blocking agent.
- Solution: Ensure the casein solution is freshly prepared, filtered (0.45 µm), and completely clear before use. Always use the buffer specified by the manufacturer (often PBS). Avoid vortexing; stir gently on a magnetic stirrer with mild heat if needed.
- Protocol: To prepare 1L of 1X Casein Buffer: Slowly sprinkle 10g of casein powder into 1L of pre-warmed (37-50°C) PBS while stirring. Stir for 1-2 hours until fully dissolved. Cool to room temperature and filter. Store at 4°C for up to 1 week.
Q3: My signal-to-noise ratio is poor when detecting poly-ubiquitinated proteins. My primary antibody is fine, but my secondary antibody gives high background. How can I address this?
A: Secondary antibody cross-reactivity with endogenous immunoglobulins in the sample or non-specific binding is likely.
- Solution: Use a cross-adsorbed secondary antibody and/or incorporate a commercial blocker designed for secondary antibody stabilization and background reduction (e.g., BLOTTO, SuperBlock, or Background Buster).
- Protocol: Dilute your primary antibody in a commercial signal-enhancing antibody diluent. After secondary antibody incubation (also diluted in a specialized diluent), perform extended washes (4 x 10 minutes) with TBST containing 0.1% Tween-20.
Q4: For fluorescent multiplex detection of ubiquitin and a co-protein, I get bleed-through and high background. Which blocker is suitable for fluorescent Western blotting?
A: NFDM and casein can cause autofluorescence, especially in the near-infrared spectrum.
- Solution: Use a commercial blocker specifically formulated for fluorescence-based detection. These are often protein-free, polymer-based solutions that minimize autofluorescence.
- Protocol: Block the PVDF membrane (pre-wetted in methanol) with 5-10 mL of protein-free blocking buffer for 1 hour. Incubate with primary antibodies made in the same buffer. Use IRDye-conjugated secondary antibodies and scan the membrane with appropriate laser/excitation settings.
Quantitative Comparison of Blocking Agents
Table 1: Performance Characteristics of Common Blocking Agents for Ubiquitin Research
| Blocking Agent | Typical Concentration | Optimal Detection Mode | Key Advantage | Primary Limitation | Best For |
|---|---|---|---|---|---|
| Non-Fat Dry Milk (NFDM) | 5% (w/v) | Chemiluminescence | Low cost, effective for many targets. | Contains casein & biotin; can cause high background. | Routine, single-plex chemiluminescence blots. |
| Bovine Serum Albumin (BSA) | 3-5% (w/v) | Chemiluminescence, Colorimetric | Low in immunoglobulins; good for phospho-antibodies. | Less effective for some high-background antibodies. | Phosphoprotein detection. |
| Purified Casein | 1-4% (w/v) | Chemiluminescence | "Cleaner" than milk; reduces non-specific binding. | Can autofluoresce; requires careful preparation. | Reducing background in chemiluminescence. |
| Commercial Protein-Based Blockers (e.g., SuperBlock) | Ready-to-use or 1X | Chemiluminescence, Colorimetric | Consistent, convenient, often optimized. | Higher cost per experiment. | Standardized protocols; screening. |
| Commercial Protein-Free/Polymer Blockers | Ready-to-use | Fluorescence, Chemiluminescence | Very low autofluorescence; inert. | Can be less effective for extremely sticky antibodies. | Multiplex fluorescent Westerns. |
Detailed Experimental Protocol: Optimized Blocking for Endogenous Ubiquitin Detection
Protocol: Side-by-Side Blocking Buffer Comparison for Low-Background Ubiquitin Western Blot
Objective: To empirically determine the optimal blocking buffer for detecting endogenous poly-ubiquitin chains with minimal background.
Materials (Research Reagent Toolkit):
| Reagent/Solution | Function & Notes |
|---|---|
| PVDF Membrane (0.45 µm) | Standard membrane for protein transfer. |
| TBS-T Buffer (20 mM Tris, 150 mM NaCl, 0.1% Tween-20, pH 7.6) | Washing and dilution buffer. |
| 5% NFDM in TBS-T | Standard control blocking solution. |
| 3% BSA in TBS-T | Alternative protein blocker. |
| 1X Commercial Casein Block (in PBS) | Purified casein solution. |
| Commercial Fluorescence Blocking Buffer | Protein-free, polymer-based blocker. |
| Primary Antibody: Anti-Ubiquitin (Linkage-specific or Pan) | Rabbit or mouse monoclonal preferred. |
| HRP or Fluorescence-conjugated Secondary Antibody | Cross-adsorbed against relevant species. |
| Chemiluminescent or Fluorescent Substrate | Matched to detection system. |
Methodology:
- Sample Preparation & Gel Electrophoresis: Load equal protein amounts (20-40 µg) from your cell lysate onto an SDS-PAGE gel. Include a pre-stained molecular weight marker. Run gel at constant voltage.
- Transfer: Perform wet or semi-dry transfer to a PVDF membrane. Activate PVDF in methanol for 1 minute prior to transfer.
- Blocking (Comparative Step): Cut the membrane into vertical strips, each containing all lanes. Block each strip separately for 1 hour at RT with gentle rocking in one of the following: 5% NFDM, 3% BSA, Casein Block, or Protein-Free Blocking Buffer.
- Primary Antibody Incubation: Dilute the anti-ubiquitin primary antibody in the same blocking buffer used for that strip. Incubate strips overnight at 4°C with rocking.
- Washing: Wash all strips 4 times for 8 minutes each with generous volumes of TBS-T.
- Secondary Antibody Incubation: Dilute the appropriate cross-adsorbed secondary antibody in its respective blocking buffer. Incubate for 1 hour at RT.
- Final Washes & Detection: Wash strips again 4 x 8 minutes with TBS-T. Develop using your chosen detection system. Compare signal intensity and background across strips.
Visualizing the Optimization Workflow & Key Pathway
Title: Optimization Workflow for Ubiquitin WB Blocking
Title: Ubiquitin-Proteasome Pathway & Detection Challenge
Troubleshooting Guides & FAQs
Q1: My western blot for endogenous ubiquitin shows high background across multiple lanes. What are the first steps to address this? A: High background often indicates antibody concentration is too high. Perform a titration series of your primary antibody (e.g., 1:500, 1:1000, 1:2000, 1:5000 dilutions) against a control lysate. Ensure you are using an appropriate blocking agent (5% BSA or non-fat dry milk in TBST) for at least 1 hour at room temperature. Increase the number and duration of washes post-antibody incubation (e.g., 5 x 5 min with vigorous agitation).
Q2: I suspect cross-reactivity in my immunofluorescence for ubiquitin. How can I confirm and resolve this? A: Cross-reactivity is common, especially with polyclonal antibodies. Perform a pre-absorption control by incubating the antibody with an excess of the immunizing ubiquitin peptide (or a ubiquitin-protein conjugate) overnight at 4°C prior to application. Loss of signal confirms specificity. Alternatively, validate your findings with a monoclonal antibody targeting a different epitope, or use a ubiquitin knockdown (siRNA) or knockout cell line as a negative control.
Q3: When should I choose a monoclonal vs. a polyclonal antibody for detecting endogenous ubiquitin? A: Refer to the table below for a structured comparison to guide your choice based on your experimental needs.
Table 1: Monoclonal vs. Polyclonal Antibodies for Ubiquitin Detection
| Parameter | Monoclonal Antibody | Polyclonal Antibody |
|---|---|---|
| Specificity | High; binds a single epitope. Lower risk of cross-reactivity. | Variable; binds multiple epitopes. Higher risk of cross-reactivity. |
| Signal Intensity | Can be lower if the single epitope is masked or modified. | Typically higher due to binding multiple epitopes per target. |
| Consistency | High; invariant from batch to batch. | Variable; can differ between immunizations and bleeds. |
| Best for | Distinguishing specific ubiquitin linkages (e.g., K48 vs K63) if linkage-specific. | Capturing diverse ubiquitinated proteins in pulldown assays. |
| Background Risk | Generally lower if properly titrated. | Higher, often requiring more stringent optimization. |
Q4: My immunoprecipitation for poly-ubiquitinated proteins is pulling down non-specific binders. How can I improve specificity? A: Implement more stringent wash conditions. After capturing the antibody-target complex on beads, wash with a high-salt buffer (e.g., 500 mM NaCl in your standard wash buffer) and/or a detergent-containing buffer (e.g., 0.1% SDS). Include a control with beads plus an isotype control antibody or pre-immune serum. For endogenous detection, consider using a cell line expressing a tagged version of your protein of interest and perform a tandem affinity purification.
Q5: What are the critical controls for validating antibody specificity in ubiquitin research? A: Essential controls include: 1) Knockdown/Knockout Control: Use siRNA/shRNA or CRISPR-Cas9 to reduce/eliminate the target. 2) Pre-absorption Control: Neutralize antibody with antigen. 3) Secondary Antibody Only Control: Omit primary antibody. 4) Biological Positive Control: Use a cell line treated with a proteasome inhibitor (e.g., MG132, 10µM for 6h), which should dramatically increase ubiquitin signal.
Experimental Protocols
Protocol 1: Primary Antibody Titration for Western Blot
- Prepare a standard protein lysate from HEK293T cells treated with 10µM MG132 for 6 hours.
- Load equal protein amounts (e.g., 20 µg) across 8 lanes of an SDS-PAGE gel.
- Transfer to PVDF membrane and block with 5% BSA/TBST for 1 hour.
- Cut the membrane into strips corresponding to each lane.
- Incubate each strip with a different dilution of the primary anti-ubiquitin antibody (e.g., 1:250, 1:500, 1:1000, 1:2000, 1:4000, 1:8000) in blocking buffer overnight at 4°C. Include a secondary-only control.
- Wash all strips 5 x 5 min in TBST.
- Incubate with HRP-conjugated secondary antibody (1:5000) for 1 hour at RT.
- Wash again and develop with ECL. Select the dilution that gives the strongest specific signal with the cleanest background.
Protocol 2: Pre-Absorption Control for Immunofluorescence
- Prepare Peptide Solution: Dissolve the immunizing ubiquitin peptide in PBS or antibody dilution buffer at a 10-20x molar excess relative to the antibody.
- Neutralize Antibody: Mix the primary antibody at its standard working concentration with the peptide solution. Vortex gently.
- Incubate: Place the mixture on a rotator overnight at 4°C.
- Centrifuge: Spin at 14,000 x g for 10 minutes at 4°C to pellet any aggregates.
- Apply Supernatant: Use the supernatant as your "pre-absorbed" primary antibody solution on fixed and permeabilized cells. In parallel, apply the standard, non-absorbed antibody to a duplicate sample.
- Process: Complete the standard IF protocol. The pre-absorbed antibody should show significantly diminished or absent signal, confirming specificity.
The Scientist's Toolkit
Table 2: Essential Research Reagent Solutions for Ubiquitin Detection
| Reagent/Material | Function & Application |
|---|---|
| Proteasome Inhibitor (MG132, Bortezomib) | Inhibits the 26S proteasome, causing accumulation of poly-ubiquitinated proteins. Serves as a critical positive control. |
| Ubiquitin-Activating Enzyme (E1) Inhibitor (PYR-41) | Blocks the ubiquitination cascade at the initiation step. Used as a negative control to decrease global ubiquitination. |
| Linkage-Specific Ubiquitin Antibodies (e.g., anti-K48, anti-K63) | Monoclonal antibodies that distinguish poly-ubiquitin chain topology, crucial for determining protein fate. |
| TUBE (Tandem Ubiquitin-Binding Entity) Agarose | High-affinity resin for non-covalent enrichment of poly-ubiquitinated proteins from lysates, reducing deubiquitination. |
| Deubiquitinase (DUB) Inhibitors (e.g., PR-619, N-Ethylmaleimide) | Added fresh to lysis buffers to prevent artifactural removal of ubiquitin chains during sample preparation. |
| HEK293T Cells with MG132 Treatment | A standard, reliable source for generating a robust positive control lysate rich in poly-ubiquitinated proteins. |
| Validated Knockout Cell Line (e.g., UBA52 KO) | Provides a definitive negative control by eliminating expression of a specific ubiquitin gene. |
Visualizations
Title: Troubleshooting Flow for High Background
Title: Antibody Binding and Specificity Controls
Technical Support Center: Troubleshooting Background Noise in Ubiquitin Detection
Frequently Asked Questions (FAQs)
Q1: My western blot for endogenous ubiquitin has high background across the entire membrane. What is the most likely cause in my wash buffer? A: High overall background is frequently caused by insufficient washing or suboptimal detergent concentration. Inadequate detergent fails to remove non-specifically bound antibodies. First, increase the number of wash steps (e.g., from 3x5 min to 5x5 min). If the issue persists, systematically increase the concentration of your detergent (Tween-20 or Triton X-100) by 0.1% increments, not exceeding 0.5% for Tween-20 or 0.3% for Triton X-100, as higher concentrations can elute specific signal.
Q2: I see speckled or patchy background. Could this be related to buffer pH or salt? A: Yes. Speckled background often indicates antibody aggregation or precipitation, which can be influenced by ionic strength and pH. Ensure your wash buffer's pH is stable and correct (typically 7.4-7.6 for Tris-based buffers). A mismatched pH can alter antibody-antigen binding kinetics. Also, try introducing or optimizing the salt concentration (e.g., 150 mM NaCl) to reduce low-affinity ionic interactions without disrupting specific binding.
Q3: When should I choose Tween-20 over Triton X-100, or vice versa, for ubiquitin westerns? A: Tween-20 (milder, non-ionic) is the standard first choice for removing non-specific protein-protein interactions. Triton X-100 is stronger and can also disrupt some protein-lipid interactions. If your target ubiquitinated protein is membrane-associated, Triton X-100 (at 0.1-0.2%) in your lysis and/or wash buffer may help reduce background from hydrophobic interactions. However, Triton can sometimes disrupt protein complexes, so test signal retention.
Q4: My specific signal disappears when I increase wash stringency. How do I find a balance? A: This requires a systematic optimization. Create a matrix testing different concentrations of detergent and salt. Use a control sample with known high ubiquitin signal and a negative control. The goal is to find the condition that maximally retains signal in the positive while minimizing background in the negative. Refer to the optimization table below for a starting protocol.
Troubleshooting Guides
Problem: High Background with Weak Specific Bands
- Check 1: Verify wash buffer composition. Prepare fresh buffer with correct pH (7.6 for TBST). Measure pH at room temperature after adding all components.
- Check 2: Ensure adequate volume during washes. Use at least 50 mL of wash buffer per mini-gel membrane on a shaker with gentle agitation.
- Action: Implement a graded wash protocol. Start with lower stringency (e.g., 0.05% Tween-20) for the first wash, then increase to 0.1% for subsequent washes.
Problem: Variable Background Between Experiments
- Check 1: Consistency of detergent source and lot. Slight variations in Tween-20 purity can affect performance.
- Check 2: Temperature. Washing at room temperature vs. 4°C can change stringency. Standardize.
- Action: Prepare a large, single batch of wash buffer, aliquot, and use it for a full experiment series to ensure consistency.
Table 1: Effect of Wash Buffer Parameters on Signal-to-Noise Ratio (SNR) in Endogenous Ubiquitin Detection Data derived from controlled western blot experiments using HEK293 cell lysates and anti-ubiquitin antibody (P4D1). SNR calculated as (Band Intensity - Local Background) / Background SD.
| Parameter | Tested Conditions | Optimal Condition for SNR | Key Effect on Background | Impact on Specific Signal |
|---|---|---|---|---|
| Tween-20 Conc. | 0%, 0.05%, 0.1%, 0.3%, 0.5% | 0.1% | High above 0.3% | Stable up to 0.3%, declines at 0.5% |
| Triton X-100 Conc. | 0%, 0.05%, 0.1%, 0.2% | 0.1% | Very effective above 0.05% | Sharp decline above 0.2% |
| NaCl Conc. | 0 mM, 100 mM, 150 mM, 300 mM | 150 mM | Effective reduction at ≥150 mM | Stable up to 300 mM |
| Buffer pH | 6.8, 7.2, 7.6, 8.0 | 7.6 | Lowest at pH 7.6 | Peak at pH 7.2-7.6 |
Table 2: Recommended Wash Buffer Formulations for Optimization
| Buffer Name | Composition (for 1L) | Primary Use Case | Rationale |
|---|---|---|---|
| Standard TBST | Tris 20 mM, NaCl 150 mM, Tween-20 0.1%, pH to 7.6 | General first-pass washing for ubiquitin | Balanced stringency, good for most targets. |
| High-Stringency TBST | Tris 20 mM, NaCl 300 mM, Tween-20 0.1%, pH to 7.6 | High background with membrane proteins | Higher salt disrupts ionic non-specific binding. |
| Triton-Based Wash | Tris 20 mM, NaCl 150 mM, Triton X-100 0.1%, pH to 7.6 | Persistent background, hydrophobic interactions | Stronger detergent removes lipid-associated noise. |
| Low-Stringency TBS | Tris 20 mM, NaCl 150 mM, pH to 7.6 | Initial post-transfer rinse or weak signals | Removes excess transfer buffer without eluting antibody. |
Experimental Protocols
Protocol 1: Systematic Wash Buffer Optimization Grid Objective: To empirically determine the optimal salt and detergent combination for a specific antibody-cell system. Materials: Cell lysates (positive and negative controls), primary antibody vs. ubiquitin, standard ECL reagents, PVDF membrane, imaging system. Method:
- Sample Preparation: Run identical SDS-PAGE gels with your test lysates and transfer to membranes using standardized conditions.
- Blocking & Primary Ab: Block all membranes identically (e.g., 5% BSA in TBST, 1 hour). Incubate with primary anti-ubiquitin antibody at determined optimal dilution overnight at 4°C.
- Wash Matrix: Cut each membrane lane into individual strips. Wash each strip with a unique buffer condition from a pre-prepared grid (e.g., combine [0, 0.05%, 0.1% Tween-20] with [0, 150, 300 mM NaCl] at pH 7.6).
- Secondary Ab & Development: Process all strips identically with HRP-conjugated secondary antibody and ECL substrate. Image with consistent exposure.
- Analysis: Quantify band intensity and local background for each strip. Calculate Signal-to-Noise Ratio (SNR). The condition yielding the highest SNR is optimal.
Protocol 2: pH Optimization for Wash Buffer Objective: To assess the effect of wash buffer pH on antibody specificity. Method:
- Prepare 1L of 20 mM Tris, 150 mM NaCl, 0.1% Tween-20 solution. Do not adjust pH.
- Divide into four 250 mL aliquots. Titrate each to pH 6.8, 7.2, 7.6, and 8.0 using concentrated HCl or NaOH.
- Proceed as in Protocol 1, Step 3, using these four pH buffers for washing after identical primary antibody incubation.
- Compare SNR across pH conditions. Note that the optimal pH for washing may differ from the optimal pH for antibody binding.
Diagrams
The Scientist's Toolkit: Research Reagent Solutions
| Reagent/Material | Function in Wash Buffer Optimization | Key Consideration |
|---|---|---|
| Tween-20 (Polysorbate 20) | Non-ionic detergent that disrupts hydrophobic and non-specific protein-protein interactions. | Viscous liquid; pipette by weight for accuracy. Can oxidize over time; store sealed. |
| Triton X-100 | Non-ionic detergent, stronger than Tween-20. Disrupts protein-lipid and protein-protein interactions. | Avoid in metal-binding studies. Consider alternatives like NP-40 for consistency with lysis buffer. |
| Tris Buffer (Tris-HCl) | Maintains stable ionic strength and pH (typically 7.4-7.6) during washes. | pH is temperature-dependent. Adjust pH at the temperature you will use for washing. |
| Sodium Chloride (NaCl) | Modifies ionic strength. Reduces non-specific ionic interactions between antibody and membrane. | High concentrations (>300mM) may begin to disrupt specific antigen-antibody binding. |
| Phosphate-Buffered Saline (PBS) | Alternative buffering system. Contains phosphate ions which can precipitate with some cations. | Check antibody datasheet for compatibility (TBST vs. PBST). |
| Non-Fat Dry Milk / BSA | Common blocking agents. Can be added in low concentration (0.5-1%) to wash buffers for difficult backgrounds. | Risk of introducing endogenous biotin or phosphoproteins; may not be compatible with all detection systems. |
| pH Meter (Calibrated) | Critical for reproducible buffer preparation. | Essential for pH optimization experiments. Calibrate with fresh standards weekly. |
| PVDF or Nitrocellulose Membrane | The solid support for the assay. Choice affects background and protein retention. | PVDF requires methanol activation and can have higher background; may require optimized washing. |
Validating Your Signal: Ensuring Specificity and Reproducibility
Troubleshooting Guides & FAQs
Q1: My siRNA knockdown of a ubiquitin E3 ligase is inefficient, leading to high background in my endogenous ubiquitin western blot. What are the key controls? A: Inefficient knockdown is a major source of background. Essential controls include:
- Validated siRNA Sequence: Use at least two independent siRNA sequences targeting different regions of your gene of interest.
- Knockdown Validation: Always confirm knockdown efficiency at the mRNA (qPCR) and protein (western blot) level using a separate antibody against the target protein, not the ubiquitin antibody.
- Scrambled/Non-targeting siRNA Control: This controls for non-specific effects of transfection and the siRNA machinery itself.
- Positive Control for Ubiquitin Detection: Run a sample treated with a proteasome inhibitor (e.g., MG132) to increase global ubiquitin levels, confirming your antibody is working.
Q2: When using the UBA1 inhibitor TAK-243 (MLN7243) to deplete ubiquitin pools, how do I determine the optimal dose and duration to reduce background without causing excessive cell death? A: Over-treatment can lead to cytotoxicity, increasing non-specific background. Follow this protocol:
- Perform a dose-response (10 nM - 1 µM) and time-course (2-24h) experiment.
- Monitor cell viability in parallel using an assay like trypan blue exclusion or ATP-based assays.
- The optimal window is typically 50-100 nM for 4-6 hours. This reduces free and conjugated ubiquitin pools significantly without inducing widespread apoptosis.
- Essential Control: Include a DMSO vehicle control at the same concentration and duration.
Q3: In my competition assay with exogenous His-Ubiquitin, why do I still see a strong endogenous ubiquitin signal? A: This indicates incomplete competition. Key issues and solutions:
- Insufficient Competitor: The molar ratio of exogenous tagged ubiquitin to endogenous ubiquitin is too low. Increase the amount of transfected His-Ub or purified protein lysate spiked in. Aim for a 5-10 fold molar excess.
- Improper Lysate Preparation: Ensure your lysis buffer does not contain denaturing agents (like SDS) during the initial competition step, as this will prevent the antibody from distinguishing between endogenous and exogenous ubiquitin. Perform competition in native or mild RIPA buffer first, then denature.
- Control: Always include a "no competitor" sample and a sample competed with untagged ubiquitin (if available) to demonstrate specificity.
Q4: My negative control (siRNA scramble or wild-type cell line) shows unexpected high-molecular-weight smearing with the ubiquitin antibody. What does this mean? A: This is classic background noise in ubiquitin detection. Troubleshoot in this order:
- Antibody Specificity: Perform a knockout validation using a CRISPR-Cas9 generated UBA1 or UBB/UBC (ubiquitin genes) knockout cell line. The smear should disappear.
- Blocking Conditions: Increase blocking time (2-4 hours at RT) with 5% BSA in TBST. Avoid dry milk if your antibody recognizes phosphorylated epitopes.
- Antibody Dilution: Titrate your primary antibody. High background often means the concentration is too high.
- Membrane Washing: Increase wash stringency (e.g., use TBST with 0.1% Tween-20, more frequent washes).
Table 1: Optimization of UBA1 Inhibition for Background Reduction
| Condition (TAK-243) | Duration | Global Ubiquitin Signal Reduction (vs. DMSO) | Cell Viability (%) | Recommended Use |
|---|---|---|---|---|
| 50 nM | 4h | 75% ± 5% | 95% ± 3 | Optimal balance |
| 100 nM | 6h | 85% ± 4% | 88% ± 5 | Strong reduction |
| 250 nM | 6h | >95% | 65% ± 10 | Cytotoxic; avoid |
| 500 nM | 4h | >95% | 50% ± 12 | Cytotoxic; avoid |
Table 2: Efficacy of Competition Assay Reagents
| Competitor (His-Ub) Molar Excess | Residual Endogenous Ub Signal | Recommended for Western Blot? |
|---|---|---|
| 1x | 80% ± 8% | No |
| 5x | 30% ± 6% | Yes, minimal |
| 10x | 10% ± 3% | Yes, optimal |
| 20x | <5% | Yes, but costly |
Experimental Protocols
Protocol 1: siRNA Knockdown with Validation for Ubiquitin Studies
- Day 1: Seed cells in antibiotic-free media.
- Day 2: Transfert with target-specific and non-targeting siRNA (e.g., 25 nM final) using a lipid-based transfection reagent optimized for your cell line.
- Day 4 (48-72h post-transfection): Harvest cells.
- Split sample: Use 80% for your ubiquitin detection assay (lysed in your chosen buffer + protease inhibitors + deubiquitinase inhibitors (e.g., N-ethylmaleimide)).
- Use 20% to confirm knockdown: Isolate mRNA for qPCR with primers for the target gene and a housekeeper (e.g., GAPDH). In parallel, lyse for a standard western blot to probe for the target protein.
- Analysis: Only proceed with ubiquitin blot data if knockdown efficiency is >70% at the protein level.
Protocol 2: Competition Assay with His-Tagged Ubiquitin
- Lysate Preparation: Lyse cells in a non-denaturing lysis buffer (e.g., NP-40 or mild RIPA). Clarify by centrifugation.
- Competition Reaction: Aliquot equal protein amounts of lysate into separate tubes.
- Tube A (No competition): Add an equal volume of lysis buffer.
- Tube B (Competition): Add purified 6xHis-Ubiquitin protein to a final 10x molar excess over endogenous ubiquitin. Incubate on ice for 1 hour.
- Denaturation: Add 2x Laemmli SDS-sample buffer to all tubes and boil for 5 minutes.
- Western Blot: Proceed with standard SDS-PAGE and western blotting with your anti-ubiquitin antibody. The signal in Tube B should be drastically reduced.
Diagrams
Title: Ubiquitin Background Troubleshooting Workflow
Title: Ubiquitin Cascade & UBA1 Inhibition by TAK-243
The Scientist's Toolkit
Table 3: Research Reagent Solutions for Essential Controls
| Reagent | Function & Role in Reducing Background | Example Product/Catalog # |
|---|---|---|
| UBA1 Inhibitor (TAK-243/MLN7243) | Chemical knockdown of global ubiquitination by inhibiting the E1 enzyme. Critical positive control for antibody specificity. | MedChemExpress HY-100487 |
| Validated siRNA Pools (E3 Ligase/Target) | Genetic knockdown of specific proteins to study their effect on ubiquitination patterns without off-target antibody signals. | Dharmacon ON-TARGETplus SMARTpools |
| CRISPR-Cas9 KO Cell Lines (UBA1, UBB) | Gold-standard genetic knockout to validate antibody specificity. Absence of signal confirms antibody targets ubiquitin. | Generated via lentiviral sgRNA delivery. |
| 6xHis-Tagged Recombinant Ubiquitin | Essential for competition assays. Competes with endogenous ubiquitin for antibody binding, validating signal specificity. | R&D Systems U-100H |
| Proteasome Inhibitor (MG132) | Positive control to increase global ubiquitin levels, ensuring the detection system is functional. | Cayman Chemical 10012628 |
| Deubiquitinase (DUB) Inhibitors (NEM, PR-619) | Added to lysis buffer to prevent deubiquitination during sample prep, preserving the endogenous ubiquitination state. | Sigma-Aldith NEM (E3876) |
| Phosphatase & Protease Inhibitor Cocktails | Prevent degradation and modification of ubiquitinated proteins, reducing smear and background. | Thermo Scientific Halt Cocktail |
| High-Stringency Wash Buffer (TBST + 0.2% Tween) | Reduces non-specific antibody binding on the membrane, critical for clean ubiquitin blots. | Lab-prepared. |
Technical Support & Troubleshooting Center
FAQs & Troubleshooting Guides
Q1: My anti-ubiquitin antibody produces a high-molecular-weight smear in western blotting, obscuring specific bands. How can I determine if this is due to poly-ubiquitin chain detection or non-specific binding?
A1: This is a classic sign of either legitimate detection of diverse poly-ubiquitinated species or non-specific background. To troubleshoot:
- Pre-adsorption Control: Pre-incubate the antibody with a 10-fold molar excess of purified mono-ubiquitin or a specific poly-ubiquitin chain (e.g., K48- or K63-linked tetra-ubiquitin) for 1 hour at 4°C before applying to the blot. Loss of the smear indicates specific ubiquitin recognition.
- Lysate Pre-Treatment: Treat cell lysates with 20-50 nM recombinant deubiquitinase (DUB) enzymes (e.g., USP2, which is broad-specificity, or OTUB1 for K48-specific chains) for 1 hour at 37°C. Specific smearing should diminish.
- Competition with Free Ubiquitin: Include 5 µg/mL free mono-ubiquitin in the antibody dilution buffer. This will compete for mono-ubiquitin binding but may not fully compete for poly-ubiquitin chain binding, helping to dissect specificity.
Q2: How can I validate that my antibody specifically recognizes one linkage type of poly-ubiquitin chain (e.g., K48) over another (e.g., K63) or mono-ubiquitin?
A2: A side-by-side ELISA or dot blot assay using defined ubiquitin substrates is required.
- Protocol:
- Coat a microplate well with 100 ng per well of the following antigens: mono-ubiquitin, K48-linked tetra-ubiquitin, K63-linked tetra-ubiquitin, and M1-linked (linear) tetra-ubiquitin.
- Block with 5% BSA/TBST for 2 hours.
- Apply your primary antibody in a serial dilution (e.g., 1:500 to 1:50,000).
- Develop with standard HRP-conjugated secondary antibodies and a chromogenic substrate.
- Calculate the half-maximal effective concentration (EC50) for each antigen. A truly linkage-specific antibody will show an EC50 at least 10-100 fold lower for its target chain.
Q3: During immunofluorescence, I see diffuse nuclear and cytoplasmic staining with my anti-ubiquitin antibody. How do I know if this represents specific signal or background?
A3: Diffuse staining is challenging. Implement these controls:
- siRNA Knockdown: Knockdown of a key ubiquitin E3 ligase or the ubiquitin-activating enzyme E1 should reduce signal intensity in a pathway-specific or global manner, respectively.
- Overexpression of a Non-Ubiquitinable Mutant: Co-transfect a GFP-tagged substrate with a lysine-to-arginine (K-to-R) mutant that cannot be ubiquitinated. Specific signal co-localizing with the wild-type GFP substrate, but not the mutant, indicates specificity.
- DUB Overexpression: Overexpress a relevant DUB and look for a loss of punctate or aggregated ubiquitin signal.
Q4: What are the best negative and positive controls for immunohistochemistry (IHC) with ubiquitin antibodies?
A4:
- Positive Control Tissue: Use human brain sections (Hippocampus or Substantia Nigra) known to contain protein aggregates (e.g., Tau tangles, α-synuclein Lewy bodies) rich in poly-ubiquitin.
- Negative Control Tissue: Use tissues with low proteasomal activity or low ubiquitin conjugate load under normal conditions, such as adult skeletal muscle (with careful interpretation).
- Essential Method Control: Perform the IHC protocol with the primary antibody omitted (Buffer Only) and with an isotype control antibody at the same concentration.
- Blocking Peptide Control: Pre-incubate the antibody with its immunogen peptide (if available) for 30 minutes. This should abolish all specific staining.
Table 1: Typical ELISA Cross-Reactivity Profile for a Hypothetical "K48-Linkage Specific" Antibody
| Antigen Coated (100 ng/well) | EC50 (ng/mL) | Signal at 1:1000 Dilution (OD450) | Cross-Reactivity vs. Target |
|---|---|---|---|
| K48-linked Tetra-Ubiquitin | 5.2 | 3.2 | 100% (Target) |
| K63-linked Tetra-Ubiquitin | 620.0 | 0.15 | 0.8% |
| Mono-Ubiquitin | >1000 | 0.08 | <0.5% |
| M1-linked Tetra-Ubiquitin | 850.0 | 0.10 | 0.6% |
Table 2: Impact of Deubiquitinase (DUB) Treatment on Western Blot Smear Intensity
| Lysate Treatment | High-MW Smear (>150 kDa) Intensity | Discrete Band Detection | Interpretation |
|---|---|---|---|
| Untreated Control | High (+++) | Low | Baseline ubiquitination |
| + Broad-Spectrum DUB (USP2) | Low (+) | High (+++) | Smear is specific ubiquitin signal |
| + Linkage-Specific DUB (OTUB1) | Moderate (++) | Moderate (++) | Partial reduction suggests mixed linkages |
| + DUB-Inactive Mutant | High (+++) | Low | Confirms enzyme activity is required |
Experimental Protocols
Protocol 1: Dot Blot Specificity Assay Purpose: Rapid assessment of antibody specificity for various ubiquitin forms. Materials: Nitrocellulose membrane, purified ubiquitin antigens, blocking buffer (5% non-fat milk), TBST, primary antibody, HRP-secondary antibody, chemiluminescent substrate. Steps:
- Spot 200 ng of each antigen (mono-Ub, K48-Ub₄, K63-Ub₄, etc.) onto a dry nitrocellulose membrane. Air dry for 15 min.
- Block the membrane in 5% milk/TBST for 1 hour at RT.
- Incubate with primary antibody diluted in blocking buffer (1:1000 recommended start) for 1 hour at RT.
- Wash 3 x 5 min with TBST.
- Incubate with HRP-conjugated secondary antibody (1:5000) for 1 hour at RT.
- Wash 3 x 5 min with TBST.
- Develop with chemiluminescent reagent and image.
Protocol 2: Immunodepletion Specificity Control for Western Blot Purpose: To confirm a western blot signal is due to ubiquitin. Materials: Protein A/G magnetic beads, target antibody, isotype control antibody, cell lysate. Steps:
- Incubate 20 µL of Protein A/G beads with 5 µg of your anti-ubiquitin antibody or an isotype control in 500 µL lysis buffer for 1 hour at 4°C.
- Wash beads 3x with lysis buffer.
- Incubate the antibody-bound beads with 200 µg of your cell lysate for 2 hours at 4°C.
- Pellet beads and carefully collect the supernatant (the "immunodepleted lysate").
- Run both the immunodepleted lysate and the original lysate on the same SDS-PAGE gel and perform western blotting with the same anti-ubiquitin antibody.
- Interpretation: Specific ubiquitin signals will be significantly reduced in the lysate treated with the specific antibody beads, but not with the isotype control beads.
Visualizations
Title: Troubleshooting Antibody Specificity Workflow
Title: Ubiquitin Conjugation and Chain Formation Pathway
The Scientist's Toolkit: Research Reagent Solutions
Table 3: Essential Reagents for Specificity Testing
| Reagent | Function in Characterization | Example/Supplier Note |
|---|---|---|
| Purified Mono-Ubiquitin | Key competing antigen; baseline for testing mono-Ub vs. chain preference. | Recombinant human, carrier-free. |
| Defined Linkage Poly-Ubiquitin Chains (K48-, K63-, M1-linked tetra-Ub) | Gold standard for testing linkage specificity in ELISA/dot blot. | Available from several biotech suppliers (e.g., R&D Systems, Boston Biochem). |
| Pan-Deubiquitinase (DUB) e.g., USP2 | Removes ubiquitin globally; loss of WB signal confirms specificity. | Recombinant, active form required. Include catalytically dead mutant as control. |
| Linkage-Specific DUBs (e.g., OTUB1 for K48) | Cleaves specific chains; helps identify contribution of a linkage to signal. | Validate activity before use. |
| Ubiquitin-Activating Enzyme (E1) Inhibitor (e.g., PYR-41) | Blocks global ubiquitination; negative control for IF/IHC to reduce signal. | Cell-permeable. Use to treat cells prior to fixation. |
| Protein A/G Magnetic Beads | For immunodepletion experiments to confirm antigen identity. | Ensure compatibility with antibody species/isotype. |
| Blocking Peptide / Immunogen | The most direct control; should abolish all specific staining if antibody is pure. | Ideally provided by the antibody manufacturer. |
Troubleshooting Guides & FAQs
Western Blot (Direct)
Q1: Why do I see a high molecular weight smear on my ubiquitin blot instead of discrete bands? A: This is expected and indicates detection of polyubiquitinated proteins. A smear suggests successful detection of diverse ubiquitin conjugates. For analyzing specific protein ubiquitination, IP-WB or PLA is recommended.
Q2: My blot has extremely high background noise. What are the primary causes? A: High background is often due to: 1) Antibody concentration too high. 2) Inadequate blocking (use 5% BSA in TBST, not milk). 3) Insufficient washing. 4) Primary antibody non-specificity.
Q3: How can I optimize my transfer for high molecular weight ubiquitinated proteins? A: Use wet/tank transfer over semi-dry. Employ low current (e.g., 200-250 mA) for extended time (e.g., 90-120 min) with 0.2 µm PVDF membrane pre-soaked in methanol.
Immunoprecipitation-Western Blot (IP-WB)
Q4: After IP, my input shows ubiquitination, but my IP sample does not. What happened? A: Potential issues: 1) Lysis buffer too harsh, disrupting antibody-antigen interaction. Use mild, non-denaturing lysis buffers for IP. 2) Bead washing too stringent. Reduce salt concentration or number of washes. 3) Target protein ubiquitination is transient or low-abundance.
Q5: I see a strong IgG heavy/light chain band that obscures my region of interest. How do I mitigate this? A: Use cross-linked beads or a species-specific HRP-conjugated secondary antibody that does not recognize IgG from the IP antibody species. Alternatively, use a secondary antibody against the primary's Fab fragment.
Q6: My IP efficiency is low. How can I improve it? A: 1) Validate antibody for IP applications. 2) Increase incubation time (overnight at 4°C). 3) Ensure no competing proteins or detergents are present. 4) Optimize bead-to-lysate ratio.
Proximity Ligation Assay (PLA)
Q7: My PLA negative control shows high background signal. What should I check? A: 1) Titrate both primary antibodies individually. 2) Ensure cells are thoroughly washed after fixation and permeabilization. 3) Optimize amplification time—shorter times reduce background. 4) Include controls with single primaries and both primaries without ligase/ polymerase.
Q8: I get punctate signals in the nucleus when studying a cytosolic protein. Is this specific? A: Not necessarily. Non-specific nuclear signals can occur. Include a true negative control (e.g., siRNA knockdown of target protein) and quantify signal per cell. Verify antibody specificity via knockout/knockdown validation.
Q9: How do I quantify PLA signals accurately? A: Use automated image analysis software (e.g., ImageJ, QuPath). Set parameters for: 1) Minimum puncta size (e.g., 0.15 µm²). 2) Signal-to-noise ratio threshold. 3) Cell segmentation to calculate puncta per cell.
General Antibody & Background Issues
Q10: My endogenous ubiquitin antibody shows non-specific bands even after optimization. A: This is common. Solutions: 1) Pre-adsorb antibody with ubiquitin-deficient cell lysate. 2) Use monoclonal over polyclonal antibodies for higher specificity. 3) Validate with ubiquitin knockdown (siRNA) or knockout (CRISPR) cell lines.
Q11: How do I choose the best detection method for my specific research question? A: See the comparison table below for guidance based on your goal: detecting global changes, studying a specific protein's ubiquitination, or visualizing subcellular localization of the modification.
Quantitative Data Comparison Table
| Parameter | Western Blot (Direct) | Immunoprecipitation-WB | Proximity Ligation Assay (PLA) |
|---|---|---|---|
| Primary Goal | Detect total ubiquitin-protein conjugates | Isolate & detect ubiquitination of a specific protein | Visualize & quantify ubiquitination events in situ |
| Sensitivity | Moderate (ng range) | High (pg range for target) | Very High (single-molecule detection possible) |
| Specificity | Low (smear pattern) | High (dual antibody recognition) | Very High (dual recognition + proximity) |
| Spatial Resolution | None (lysate) | None (lysate) | High (subcellular, ~40 nm) |
| Throughput | High | Low-Moderate | Moderate (requires imaging) |
| Quantification Ease | Moderate (smear analysis challenging) | High (band intensity) | High (puncta/cell count) |
| Key Background Source | Non-specific antibody binding | Antibody cross-reactivity, IgG interference | Non-specific ligation/amplification |
| Optimal for Thesis Goal? | Least optimal (high background noise) | Good (reduces background via enrichment) | Best (minimizes background via dual recognition) |
Detailed Experimental Protocols
Protocol 1: Low-Background Ubiquitin Western Blot
- Lysis: Harvest cells in RIPA buffer (50 mM Tris-HCl pH 8.0, 150 mM NaCl, 1% NP-40, 0.5% sodium deoxycholate, 0.1% SDS) + 10 mM N-Ethylmaleimide (NEM) and 50 µM PR-619 to inhibit deubiquitinases. Incubate 20 min on ice, centrifuge at 16,000×g for 15 min.
- Gel Electrophoresis: Load 20-40 µg protein on 4-12% Bis-Tris gradient gel. Run at 120V for 90 min using MOPS buffer.
- Transfer: Transfer to PVDF membrane via wet transfer at 250 mA for 90 min at 4°C.
- Blocking & Incubation: Block membrane in 5% BSA/TBST for 1 hour. Incubate with primary anti-ubiquitin antibody (e.g., P4D1, 1:1000) in 1% BSA/TBST overnight at 4°C.
- Washing & Detection: Wash 3x10 min with TBST. Incubate with HRP-conjugated secondary (1:5000) for 1 hour. Wash 3x10 min. Develop with high-sensitivity ECL substrate, exposing for short times (1-60 sec).
Protocol 2: Immunoprecipitation for Target Protein Ubiquitination
- Lysis: Use a mild lysis buffer (e.g., 1% Triton X-100, 50 mM Tris pH 7.5, 150 mM NaCl, 1 mM EDTA) + protease inhibitors and 10 mM NEM. Do not boil samples.
- Pre-clear: Incubate 500 µg lysate with 20 µL control agarose beads for 1 hour at 4°C. Pellet beads, keep supernatant.
- Immunoprecipitation: Incubate pre-cleared lysate with 2 µg target protein antibody overnight at 4°C with rotation. Add 30 µL Protein A/G beads for 2 hours.
- Washing: Wash beads 4 times with 500 µL lysis buffer (gentle).
- Elution & Analysis: Elute proteins with 2X Laemmli buffer (+ 100 mM DTT) at 95°C for 10 min. Run WB for ubiquitin and target protein.
Protocol 3: PLA for Endogenous Ubiquitin-Protein Conjugates
- Cell Preparation: Culture cells on chamber slides. Fix with 4% PFA for 15 min, permeabilize with 0.1% Triton X-100 for 10 min.
- Blocking & Primary Antibodies: Block with Duolink blocking buffer for 1 hour at 37°C. Incubate with two primary antibodies (e.g., mouse anti-target protein and rabbit anti-ubiquitin) diluted in antibody diluent overnight at 4°C.
- PLA Probe Incubation: Wash 2x5 min with Wash Buffer A. Incubate with Duolink PLUS and MINUS PLA probes (species-matched) for 1 hour at 37°C.
- Ligation & Amplification: Wash 2x5 min with Buffer A. Incubate with ligation solution (30 min, 37°C). Wash 2x2 min with Buffer A. Incubate with amplification solution (100 min, 37°C) in the dark.
- Detection: Wash 2x10 min with Wash Buffer B. Mount with Duolink In Situ Mounting Medium with DAPI. Image with fluorescence microscope.
Diagrams
Title: Method Selection Workflow for Endogenous Ubiquitin Detection
Title: Ubiquitin Conjugation and Detection Challenge
The Scientist's Toolkit: Research Reagent Solutions
| Reagent/Material | Function & Role in Reducing Background |
|---|---|
| N-Ethylmaleimide (NEM) | Irreversible deubiquitinase (DUB) inhibitor. Preserves ubiquitin signal during lysis, reducing false-negative results. |
| PR-619 | Broad-spectrum DUB inhibitor. Used in combination with NEM for more complete DUB inhibition. |
| BSA (Bovine Serum Albumin) | Preferred blocking agent over milk for phospho- and ubiquitin-studies. Reduces non-specific antibody binding. |
| High-Sensitivity ECL Substrate | Allows shorter exposure times during WB development, reducing background from overexposure. |
| Protein A/G Magnetic Beads | For IP. Offer lower non-specific binding than agarose beads and easier washing. |
| Cross-linker (e.g., DSS) | Crosslinks IP antibody to beads, preventing IgG heavy/light chain leakage in WB. |
| Duolink PLA Probes & Kits | Provide optimized, validated reagents for sensitive, low-background in situ detection. |
| Ubiquitin Knockout (KO) Cell Lysate | Critical negative control for antibody validation. Adsorb antibody to reduce non-specific signals. |
| Triton X-100 (vs. SDS) | Mild detergent for IP and PLA lysis. Preserves protein complexes and reduces non-specific denaturation. |
Troubleshooting Guide & FAQ
FAQ 1: Why is my ubiquitin smear signal weak or undetectable?
- Answer: Weak signal often stems from poor antigen retrieval, antibody dilution issues, or low transfer efficiency for high molecular weight poly-ubiquitin chains.
- Solution:
- Optimize heat-induced epitope retrieval (HIER) using citrate buffer (pH 6.0) or Tris-EDTA (pH 9.0). Increase retrieval time for heavily conjugated ubiquitin.
- Titrate your primary antibody. For endogenous detection, a higher concentration than recommended for overexpressed systems may be needed.
- Use a high-quality PVDF membrane and confirm transfer with reversible protein stains (e.g., Ponceau S) and a high molecular weight ladder.
- Ensure your lysis buffer contains strong denaturants (e.g., 1% SDS) and proteasome/deubiquitinase inhibitors (e.g., 10 µM MG132, 5 mM N-Ethylmaleimide) to preserve conjugates.
FAQ 2: How do I reduce high background across the entire lane, obscuring the smear?
- Answer: Non-specific antibody binding is the primary culprit, often due to insufficient blocking or antibody cross-reactivity.
- Solution:
- Block with 5% (w/v) non-fat dry milk or 3% BSA in TBST for 1 hour at room temperature. For phospho-ubiquitin, BSA is preferred.
- Increase the number and duration of washes post-primary and secondary antibody incubation (e.g., 4 x 10 min with vigorous agitation).
- Prepare fresh wash buffer and ensure correct pH (7.6) and salinity.
- Validate antibody specificity using a ubiquitin-deficient cell line (e.g., ∆UBQ HeLa) or siRNA knockdown control in your thesis context.
FAQ 3: My data is inconsistent between blots. How do I normalize the ubiquitin smear for quantification?
- Answer: Inconsistent loading and transfer make smear quantification unreliable without proper normalization.
- Solution:
- Use a total protein loading control. Stain the membrane with a total protein stain (e.g., Coomassie-based) after immunodetection and before densitometry.
- Normalize the densitometry value of your smear area (or specific molecular weight regions) to the total protein stain signal from the entire lane.
- Avoid common housekeeping proteins (e.g., GAPDH, Actin) for normalization in ubiquitination studies, as their levels/ modifications can change under proteotoxic stress.
FAQ 4: What is the best method to perform densitometry on a smear?
- Answer: Use lane profile analysis tools in software like ImageLab (Bio-Rad), ImageJ (Fiji), or Licor Image Studio.
- Step-by-Step Protocol:
- Define Regions: Draw identical rectangular regions encompassing the entire smear area for each lane, from just above unmodified protein to the top of the resolving gel.
- Subtract Background: Use a rolling ball or local background subtraction method. Select a background area adjacent to each lane.
- Generate Lane Profile: The software will plot signal intensity vs. migration distance.
- Quantify: Calculate the area under the curve (AUC) for the entire smear or binned regions of interest (e.g., High MW, Middle MW).
- Normalize: Divide the smear AUC by the AUC from the total protein stain for the corresponding lane.
Table 1: Common Ubiquitin Antibody Validation Controls
| Control Type | Purpose | Expected Outcome | Impact on Background Noise |
|---|---|---|---|
| siRNA Knockdown (e.g., UBA1, UBB/UBC) | Confirms antibody specificity for ubiquitin. | >70% reduction in smear signal. | High. Validates true signal vs. non-specific background. |
| Proteasome Inhibition (MG132, 10µM, 6h) | Positive control for poly-ubiquitin accumulation. | Increased high MW smear intensity. | Moderate. Helps identify specific smear regions. |
| Deubiquitinase Inhibition (NEM, 5mM in lysis) | Prevents conjugate disassembly post-lysis. | Preserves high MW species. | Low. Improves accuracy of smear representation. |
| Competition with Free Ubiquitin | Tests for epitope specificity. | Dose-dependent signal decrease. | High. Confirms antigen-antibody specificity. |
Table 2: Densitometry Normalization Methods Comparison
| Normalization Method | Procedure | Advantages | Limitations for Ubiquitin Smears |
|---|---|---|---|
| Total Protein Normalization | Stain membrane with Coomassie/REVERT post-blot. | Accounts for total lane protein load; most accurate for smears. | Requires fluorescent/colorimetric compatibility. |
| Housekeeping Protein (e.g., GAPDH) | Probe for a constitutive protein. | Standard, easy. | GAPDH can be ubiquitinated; levels may fluctuate under stress. |
| Unmodified Target Protein Band | Measure signal of the non-ubiquitinated protein band. | Directly relates conjugate to substrate pool. | Band may be very weak or absent if ubiquitination is efficient. |
| Ponceau S Stain | Stain membrane pre-antibody incubation. | Fast, inexpensive. | Less quantitative, can be washed off during processing. |
Experimental Protocols
Protocol: Optimized Western Blot for Endogenous Conjugated Ubiquitin Detection (Reduced Background)
I. Sample Preparation (Critical for Noise Reduction)
- Lyse cells directly in 1X Laemmli buffer (2% SDS, 10% glycerol, 60 mM Tris pH 6.8, 0.02% bromophenol blue) supplemented with 5 mM N-Ethylmaleimide (NEM) and 1X protease/phosphatase inhibitors. Boil immediately at 95°C for 10 minutes.
- Sonicate samples briefly to shear DNA and reduce viscosity.
- Perform a protein assay compatible with high SDS (e.g., RC DC Assay). Load 20-50 µg per lane.
II. Gel Electrophoresis & Transfer
- Use 4-12% Bis-Tris gradient gels for optimal separation of high MW conjugates.
- Run in MES or MOPS buffer at constant voltage (150V) until dye front exits.
- Transfer to PVDF membrane using a semi-dry or wet tank method at constant current (1-2 mA/cm²) for 90-120 minutes with cooling. Include a pre-stained high MW ladder.
III. Immunodetection (Key for Low Background)
- Block: Incubate membrane in 3% BSA in TBST (0.1% Tween-20) for 1 hour at RT.
- Primary Antibody: Dilute anti-ubiquitin antibody (e.g., P4D1, FK2) in 3% BSA/TBST as per titration. Incubate overnight at 4°C with gentle agitation.
- Wash: Wash membrane 4 times for 10 minutes each with TBST (0.1% Tween-20) with vigorous shaking.
- Secondary Antibody: Use HRP- or fluorophore-conjugated secondary antibody in 3% BSA/TBST for 1 hour at RT. Wash again as in step 3.
IV. Total Protein Normalization & Imaging
- Image for chemiluminescent or fluorescent signal.
- Wash membrane thoroughly in TBST.
- Stain with a compatible total protein stain (e.g., REVERT 700, Coomassie Fast) as per manufacturer's instructions.
- Image again using the appropriate channel.
- Analyze using densitometry as described in FAQ 4.
Diagrams
Ubiquitin-Proteasome Pathway & Key Inhibitors
The Scientist's Toolkit: Key Research Reagent Solutions
Table 3: Essential Reagents for Conjugated Ubiquitin Detection
| Reagent | Function & Purpose in Ubiquitin Smear Analysis | Example Product/Catalog # |
|---|---|---|
| Strong Denaturing Lysis Buffer | Immediately denatures proteases/DUBs, preserves ubiquitin conjugates post-lysis. Critical for accuracy. | 2% SDS Laemmli buffer, RIPA with 1% SDS. |
| Deubiquitinase (DUB) Inhibitor | Prevents artificial disassembly of poly-ubiquitin chains during sample prep. Reduces smear loss. | N-Ethylmaleimide (NEM, 5-20 mM), PR-619. |
| Proteasome Inhibitor | Positive control treatment. Accumulates poly-ubiquitinated proteins, enhancing smear signal. | MG132 (10-20 µM), Bortezomib. |
| Anti-Ubiquitin Antibody (Linkage-specific) | Detects specific poly-Ub chain linkages (K48, K63). Increases specificity over pan-ubiquitin antibodies. | Anti-Ubiquitin (K48-linkage) mAb (Apu2), Anti-K63-linkage Ubiquitin. |
| Pan-Ubiquitin Antibody | Detects mono- and poly-ubiquitin conjugates broadly. The standard for "total ubiquitin smear". | P4D1 (mouse mAb), FK2 (mouse mAb), Ub (P4G7). |
| PVDF Membrane (0.45 µm) | Superior protein retention, especially for high MW ubiquitin conjugates, compared to nitrocellulose. | Immobilon-P PVDF. |
| Total Protein Stain | Enables lane-specific normalization, superior to housekeeping proteins for ubiquitin studies. | REVERT 700, Stains-All, Coomassie Brilliant Blue. |
| HRP- or Fluorescent-conjugated Secondary Antibody | High-sensitivity detection required for endogenous ubiquitin levels. | Anti-mouse IgG, HRP-linked; IRDye 800CW. |
| Ubiquitin-deficient Cell Line | Critical negative control for antibody validation and background assessment. | ∆UBQ HeLa (UBA1 knockout). |
Conclusion
Achieving low-background detection of endogenous ubiquitin is a multifaceted challenge requiring a deep understanding of both the target's biology and immunoassay technique. By systematically addressing foundational sources of noise, implementing optimized and rigorous protocols, applying targeted troubleshooting, and validating results with appropriate controls, researchers can transform ambiguous smears into interpretable, high-quality data. Mastering these techniques is essential for advancing research into protein homeostasis, neurodegeneration, and cancer, where precise quantification of ubiquitin dynamics is critical. Future directions include the adoption of more specific monoclonal antibodies, improved chain-linkage selective reagents, and the integration of mass spectrometry for orthogonal validation, pushing the field toward ever-greater precision in ubiquitin biology.