Optimized Western Blotting for High Molecular Weight Ubiquitinated Proteins: A Complete Guide from Theory to Validation
This article provides a comprehensive guide for researchers and drug development professionals aiming to reliably detect high molecular weight ubiquitinated proteins via immunoblotting.
Optimized Western Blotting for High Molecular Weight Ubiquitinated Proteins: A Complete Guide from Theory to Validation
Abstract
This article provides a comprehensive guide for researchers and drug development professionals aiming to reliably detect high molecular weight ubiquitinated proteins via immunoblotting. Detecting these large ubiquitin conjugates is notoriously challenging due to inefficient transfer from gels and the inherent complexity of ubiquitin signaling. We address these hurdles by integrating foundational knowledge of ubiquitin biochemistry with optimized wet-lab protocols, advanced enrichment techniques, and rigorous validation strategies. Covering everything from SDS-PAGE optimization and affinity purification to troubleshooting smeared bands and confirming ubiquitination status, this resource delivers a complete methodological framework to advance research in cancer, neurodegeneration, and targeted protein degradation.
Understanding the Unique Challenges of High Molecular Weight Ubiquitinated Proteins
Why High MW Ubiquitinated Proteins Are Problematic in Western Blotting
Ubiquitination, the process where a small protein called ubiquitin is attached to a substrate protein, is a crucial post-translational modification regulating numerous cellular pathways. While studying this modification via Western blotting is common, researchers frequently encounter significant challenges, especially with high molecular weight (HMW) ubiquitinated proteins. These challenges stem from the inherent size of the proteins and the nature of the ubiquitin modification itself, often leading to unreliable data and failed experiments. This guide details the specific problems and provides targeted troubleshooting advice to improve the detection of these elusive targets.
FAQ: Understanding the Core Challenges
Q1: Why do I see smeared bands or ladders when blotting for ubiquitinated proteins?
This is a classic characteristic of ubiquitinated proteins and, paradoxically, a sign of successful detection. A ubiquitinated protein sample is not a uniform population. A single substrate protein can be modified by:
- Monoubiquitination: A single ubiquitin attachment.
- Polyubiquitination: A chain of ubiquitins attached to a single site.
- Multi-monoubiquitination: Multiple single ubiquitins attached to different sites on the same substrate.
Each of these states has a different molecular weight, causing the protein to run as a series of closely spaced bands that appear as a smear or ladder on the blot. Furthermore, polyubiquitin chains can be linked through different lysine residues, adding to the heterogeneity [1] [2].
Q2: Why is it particularly difficult to transfer high molecular weight ubiquitinated proteins to a membrane?
The transfer of proteins from the gel to the membrane is a major bottleneck for HMW targets. The primary reasons include:
- Slow Migration: Large proteins migrate more slowly through the dense gel matrix during electrophoresis and are less efficiently eluted from the gel during the transfer step [3] [4].
- Gel Entrapment: HMW proteins can become physically trapped in the gel matrix, failing to transfer onto the membrane at all. This is especially true if standard protocols designed for smaller proteins are used [5].
Q3: How can I be sure my antibody is specifically detecting ubiquitin?
A significant problem in the field is the variable quality of commercial ubiquitin antibodies. Different antibodies may have specific preferences; some are better at detecting free ubiquitin, while others are more sensitive to ubiquitinated proteins or specific polyubiquitin chain linkages [6]. Always check the validation data provided by the manufacturer and, if possible, use a positive control, such as purified ubiquitinated proteins, to verify antibody performance [6].
Troubleshooting Guide
The table below summarizes common issues, their causes, and solutions for detecting HMW ubiquitinated proteins.
| Problem | Possible Cause | Recommended Solution |
|---|---|---|
| Weak or No Signal | Incomplete transfer of HMW protein from gel to membrane [3] [4]. | - Use low-percentage acrylamide gels (e.g., 3-8% Tris-acetate) for better separation and transfer [3].- Increase transfer time; 8-10 minutes for rapid dry transfer, 3-4 hours for wet transfer [3] [7].- Add 0.01-0.05% SDS to the transfer buffer to help elute proteins from the gel [5] [8]. |
| Insufficient antigen (ubiquitinated protein) present [9]. | - Load more total protein (e.g., ≥20 µg per lane) [4] [7].- Enrich for ubiquitinated proteins prior to blotting using specific affinity resins (e.g., TUBEs, OtUBD) [10] [2]. | |
| High Background | Antibody concentration is too high [9] [8]. | Titrate both primary and secondary antibody concentrations to find the optimal dilution. |
| Incompatible or insufficient blocking [8] [7]. | - Optimize blocking time (1 hr at room temp or overnight at 4°C).- Test different blocking buffers (e.g., BSA vs. non-fat milk). Avoid milk when using primary antibodies derived from goat or sheep [9]. | |
| Smeared Bands | Natural heterogeneity of ubiquitin modifications [1] [2]. | This is often expected. To confirm specificity, treat samples with deubiquitinating enzymes (DUBs); the smear should collapse into a discrete lower molecular weight band [10]. |
| Protein degradation during sample preparation [7]. | - Always use fresh protease inhibitors (e.g., PMSF, leupeptin) in lysis buffer [7].- Include N-ethylmaleimide (NEM) to inhibit deubiquitinating enzymes and preserve ubiquitin conjugates [10]. |
Optimized Experimental Protocol for HMW Ubiquitinated Proteins
The following protocol is tailored to maximize the detection of HMW ubiquitinated proteins, integrating key optimizations from general troubleshooting guides.
Stage 1: Gel Electrophoresis
- Gel Selection: Use a 3-8% Tris-acetate gel or a low-percentage Bis-Tris gel. These gels have a more open matrix that allows for better separation and migration of HMW proteins compared to standard Tris-glycine gels [3].
- Sample Preparation:
- Use a lysis buffer containing 8 M urea or another strong denaturant to disrupt protein interactions and inhibit enzymes [6] [2].
- Include protease inhibitors and 10-20 mM NEM to inhibit deubiquitinating enzymes and preserve the ubiquitination state [10].
- Boil samples in SDS-PAGE loading buffer containing a reducing agent (e.g., DTT or β-mercaptoethanol) for 5-10 minutes [9].
- Loading and Running: Load at least 20-30 µg of total protein per lane [4] [7]. Run the gel using pre-chilled buffer and surround the tank with ice packs to prevent overheating, which can cause band smearing [4].
Stage 2: Membrane Transfer (Optimized for HMW Proteins)
- Gel Equilibration: After electrophoresis, equilibrate the gel in transfer buffer for 10-15 minutes. For gels other than Tris-acetate, a 10-minute equilibration in 20% ethanol can improve HMW protein transfer efficiency by adjusting the gel size and removing buffer salts [3].
- Membrane Preparation: Activate a PVDF membrane in 100% methanol for 15 seconds, then equilibrate it in transfer buffer along with the filter paper and sponges [4].
- Transfer Conditions: For a standard wet transfer system:
Stage 3: Immunodetection
- Blocking: Block the membrane for 1 hour at room temperature or overnight at 4°C with 5% non-fat dry milk or BSA in TBST [8] [7].
- Antibody Incubation:
- Primary Antibody: Incubate with a ubiquitin antibody that has been validated for detecting ubiquitinated proteins. Refer to the datasheet for the recommended dilution buffer (BSA or milk), as this can be antibody-specific [6] [7].
- Washing: Wash the membrane three times for 10 minutes each with TBST.
- Secondary Antibody: Incubate with an HRP-conjugated secondary antibody diluted in blocking buffer for 1 hour at room temperature [4].
- Detection: Use a high-sensitivity chemiluminescent substrate. For low-abundance targets, a femto-level substrate may be necessary [8].
The Scientist's Toolkit: Essential Research Reagents
The table below lists key reagents and tools essential for successful research on HMW ubiquitinated proteins.
| Reagent / Tool | Function in Research |
|---|---|
| Tris-Acetate Gels | Provides a more open gel matrix than Tris-glycine gels, enabling superior separation and transfer efficiency for HMW proteins [3]. |
| Ubiquitin Enrichment Tools (e.g., OtUBD, TUBEs) | Affinity resins used to selectively purify ubiquitinated proteins from complex lysates, enriching for low-abundance targets before Western blotting [10] [2]. |
| N-Ethylmaleimide (NEM) | A deubiquitinating enzyme (DUB) inhibitor. Added to lysis buffers to prevent the removal of ubiquitin from substrates during sample preparation, preserving the native ubiquitination state [10]. |
| Proteasome Inhibitors (e.g., MG-132) | Used in cell culture treatments to prevent the degradation of polyubiquitinated proteins by the proteasome, thereby increasing their intracellular levels for easier detection [6]. |
| Validated Ubiquitin Antibodies | Critical for specific detection. Antibodies should be chosen based on their validated performance for the specific application (e.g., detecting polyubiquitin chains vs. monoubiquitination) [6]. |
| PNGase F | An enzyme that removes N-linked glycans. Used to determine if a higher-than-expected molecular weight band is due to glycosylation rather than, or in addition to, ubiquitination [1] [7]. |
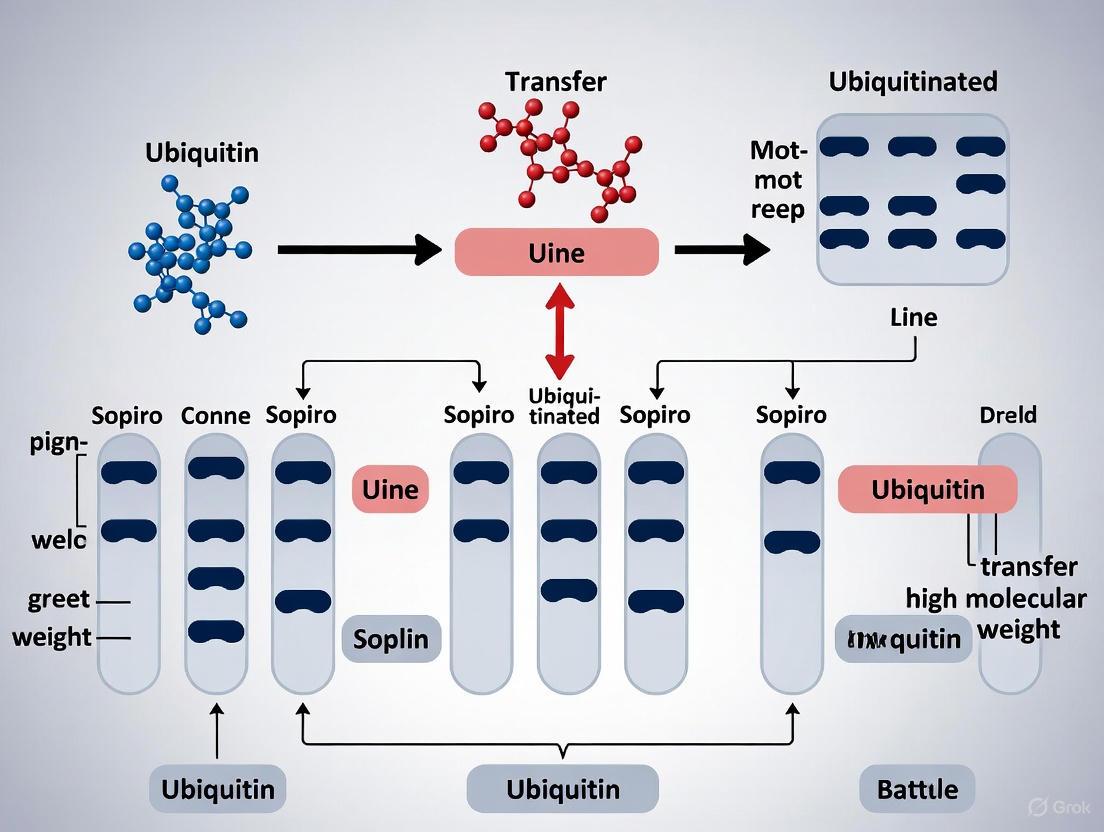
Visualizing the Workflow and Challenge
The following diagram illustrates the optimized workflow for detecting HMW ubiquitinated proteins, highlighting the key challenging steps.
Optimized HMW Ubiquitin Detection Workflow
The ubiquitination process is a crucial post-translational modification that regulates protein degradation and function via a cascade of E1 (activating), E2 (conjugating), and E3 (ligating) enzymes [11]. This process progresses from monoubiquitination to the assembly of complex polyubiquitin chains, with Lys48-linked chains primarily targeting proteins for degradation by the 26S proteasome [11]. For researchers studying these processes, western blotting presents significant technical challenges, particularly for high molecular weight (HMW) ubiquitinated proteins and protein complexes. Efficient transfer and immunodetection of these large targets require specialized methodologies beyond standard protocols. This technical support center addresses these specific experimental hurdles with targeted troubleshooting and optimized procedures to improve the reliability of ubiquitination research.
Troubleshooting Guides & FAQs
Protein Transfer Issues for HMW Ubiquitinated Proteins
Q: My high molecular weight ubiquitinated proteins (>150 kDa) show weak or no signal after transfer. What could be wrong?
A: This common problem typically stems from inefficient transfer out of the gel matrix. HMW proteins migrate more slowly and require optimized conditions for complete transfer [3].
- Increase Transfer Time: Standard transfer times are often insufficient. Extend transfer times to 3-4 hours for wet tank systems or 8-10 minutes for rapid dry transfer systems [12] [3].
- Optimize Transfer Buffer: Reduce methanol content to 5-10% to facilitate the movement of large proteins out of the gel [12]. For extremely large complexes (>250 kDa), consider adding 0.01-0.05% SDS to help proteins elute from the gel [8].
- Verify Transfer Efficiency: Always confirm successful transfer using reversible stains like Ponceau S or specific protein stains before proceeding to immunodetection [9] [13].
Q: I see smearing or poor resolution of polyubiquitin chains on my blots. How can I improve this?
A: Smearing can result from several factors, including incomplete denaturation, protein aggregation, or suboptimal gel conditions.
- Optimize Denaturation: Ensure complete protein denaturation by heating samples at 70-100°C for 10 minutes in Laemmli buffer [14]. For heat-sensitive proteins, consider longer incubation at lower temperatures (37°C for 30-60 minutes) [13].
- Use Appropriate Gel Chemistry: Standard Tris-glycine gels compress HMW proteins. Switch to Tris-acetate gels (3-8%) or low-percentage Bis-Tris gels (4-6%) for better separation [3] [14].
- Prevent Aggregation: Ensure samples contain adequate SDS and reducing agents (fresh DTT or β-mercaptoethanol) to disrupt non-covalent interactions [9].
Signal Detection Problems
Q: I get high background that obscures specific ubiquitin signals. How can I reduce this?
A: High background typically stems from non-specific antibody binding or suboptimal blocking.
- Optimize Blocking: Block membranes for at least 1 hour at room temperature or overnight at 4°C [15]. For phospho-specific antibodies, use BSA instead of milk-based blockers [8].
- Titrate Antibodies: High antibody concentrations cause background. Dilute primary and secondary antibodies to the minimum necessary concentration [9].
- Enhance Washing: Increase wash stringency with TBST (Tris-buffered saline with 0.1% Tween-20) rather than PBS, and include 0.05% Tween-20 in wash buffers [12] [8].
Q: My positive controls work, but my experimental samples show weak or no signal despite known ubiquitination. What should I check?
A: This discrepancy suggests issues with antigen accessibility or abundance in your specific samples.
- Verify Protein Integrity: Ubiquitinated proteins are susceptible to degradation. Always include fresh protease inhibitors (e.g., PMSF, leupeptin) and phosphatase inhibitors in lysis buffers [12] [16].
- Confirm Antigen Presence: Ensure sufficient protein loading (at least 20-30 μg for total proteins, up to 100 μg for modified targets in tissue extracts) [12].
- Check Membrane Compatibility: For low-abundance targets, use PVDF membranes with 0.2 μm pore size for better retention [4].
Specificity and Band Pattern Issues
Q: I see multiple unexpected bands when probing for ubiquitin. Are these non-specific?
A: Multiple bands may represent biologically relevant ubiquitin conjugates or technical artifacts.
- Understand Ubiquitination Patterns: Polyubiquitin chains can create laddering patterns due to different chain lengths [11]. Monoubiquitination or multi-monoubiquitination can also create discrete higher molecular weight species.
- Include Proper Controls: Run negative controls including (1) non-transfected cell lysates, (2) primary antibody omitted, and (3) secondary antibody only to identify non-specific bands [9].
- Confirm Antibody Specificity: Check antibody specifications for known cross-reactivities. Some ubiquitin antibodies may detect ubiquitin-like modifiers or related proteins [9].
Experimental Optimization Data Tables
Table 1: Transfer Conditions for Different Protein Sizes
| Protein Size Range | Gel Recommendation | Transfer Method | Transfer Time | Buffer Modifications |
|---|---|---|---|---|
| <50 kDa | 4-20% Tris-glycine | Semi-dry | 45-60 min | 20% methanol [13] |
| 50-150 kDa | 8-12% Bis-Tris | Wet tank | 1-2 hours | 10-15% methanol [4] |
| 150-300 kDa | 3-8% Tris-acetate | Wet tank | 3-4 hours | 5-10% methanol, 0.01% SDS [12] [3] |
| >300 kDa | 3-8% Tris-acetate | Wet tank | 4-16 hours | 5% methanol, 0.05% SDS [14] |
Table 2: Troubleshooting Signal Detection Issues
| Problem | Possible Causes | Recommended Solutions |
|---|---|---|
| No signal | Insufficient transfer | Increase transfer time; Verify with Ponceau S [9] |
| Low antigen abundance | Load more protein (up to 100 μg); Enrich via IP [12] | |
| Antibody concentration too low | Increase primary antibody concentration; Extend incubation [8] | |
| High background | Incomplete blocking | Extend blocking time; Change blocking reagent [8] |
| Antibody concentration too high | Titrate antibodies; Reduce concentration [9] | |
| Insufficient washing | Increase wash number/duration; Add Tween-20 [8] | |
| Multiple bands | Protein degradation | Add fresh protease inhibitors [12] |
| PTMs (glycosylation, phosphorylation) | Consult databases (PhosphoSitePlus); Use specific enzymes [12] | |
| Non-specific antibody binding | Include species-specific controls; Use cross-adsorbed secondaries [9] |
Detailed Experimental Protocols
Optimized Western Blot Protocol for HMW Ubiquitinated Proteins
Sample Preparation
- Lysis: Use RIPA buffer supplemented with fresh protease inhibitors (1 μg/ml leupeptin, PMSF) and phosphatase inhibitors (2.5 mM sodium pyrophosphate, 1.0 mM beta-glycerophosphate, 2.5 mM sodium orthovanadate) [12] [16].
- Denaturation: Heat samples at 70-100°C for 10 minutes in 2X Laemmli buffer [14].
- Protein Quantification: Use BCA assay to ensure equal loading of 20-100 μg per lane, depending on target abundance [16].
Gel Electrophoresis
- Gel Selection: Use 3-8% Tris-acetate gels or 4-6% Tris-glycine gels for optimal HMW protein separation [3] [14].
- Electrophoresis Conditions: Run at constant voltage (100-150V) with cooling to prevent overheating and smearing [13].
Protein Transfer
- Membrane Preparation: Activate PVDF membrane in methanol for 15 seconds, then equilibrate in transfer buffer [4].
- Transfer Stack Assembly: Assemble transfer stack in this order: cathode, sponge, filter papers, gel, membrane, filter papers, sponge, anode [15].
- Transfer Conditions: Use wet transfer at 4°C for 3-4 hours at 70V (200-250mA) in transfer buffer with 5-10% methanol [12] [4].
Immunodetection
- Blocking: Block with 5% BSA or non-fat dry milk in TBST for 1 hour at room temperature [12].
- Primary Antibody Incubation: Incubate with primary antibody diluted in recommended buffer (BSA or milk) overnight at 4°C with agitation [15].
- Washing: Wash 3 times for 10 minutes each with TBST [4].
- Secondary Antibody Incubation: Incubate with HRP-conjugated secondary antibody in blocking buffer for 1 hour at room temperature [15].
- Detection: Use enhanced chemiluminescence with appropriate exposure times [4].
Visualization of Key Concepts
Ubiquitination Enzymatic Cascade
Ubiquitination Enzymatic Cascade
HMW Protein Western Blot Workflow
HMW Protein Western Blot Workflow
The Scientist's Toolkit: Essential Research Reagents
Table 3: Key Reagents for Ubiquitination Immunoblotting
| Reagent Category | Specific Examples | Function in Experiment |
|---|---|---|
| Protease Inhibitors | PMSF, Leupeptin, Protease Inhibitor Cocktail | Prevent degradation of ubiquitinated proteins during extraction [12] [16] |
| Phosphatase Inhibitors | Sodium orthovanadate, Beta-glycerophosphate | Preserve phosphorylation states that may regulate ubiquitination [12] |
| Gel Systems | Tris-acetate gels (3-8%), Low-percentage Bis-Tris gels | Improve separation and resolution of HMW ubiquitin conjugates [3] |
| Transfer Membranes | PVDF (0.2μm pore), Nitrocellulose | Optimize retention of HMW proteins; PVDF offers better binding capacity [4] |
| Detection Substrates | Enhanced chemiluminescence, Fluorescent substrates | Enable sensitive detection of low-abundance ubiquitinated species [8] |
| Ubiquitin-specific Antibodies | Mono-Ub, K48-Ub, K63-Ub specific antibodies | Distinguish between different ubiquitination types and chain linkages [11] |
Mastering the biochemistry of ubiquitination from monoubiquitination to complex polyubiquitin chains requires careful attention to technical details in western blotting. The challenges inherent in working with high molecular weight ubiquitinated proteins can be systematically addressed through optimized transfer conditions, appropriate gel selection, and rigorous antibody validation. By implementing the troubleshooting strategies and detailed protocols outlined in this technical support guide, researchers can significantly improve the reliability and interpretability of their ubiquitination immunoblotting data, thereby advancing our understanding of this crucial regulatory pathway in cellular function and disease.
FAQs: Troubleshooting Common Western Blot Anomalies
FAQ 1: Why does my western blot show a ladder-like pattern of multiple discrete bands instead of a single sharp band?
A ladder-like pattern, a series of bands at regular molecular weight intervals, often indicates a specific biological process or an experimental artifact.
- Post-Translational Modification (PTM): The most common cause for a genuine ladder is the addition of multiple ubiquitin molecules, known as polyubiquitination. Each ubiquitin moiety adds approximately 8.6 kDa to the protein's mass [17]. Similar patterns, though less regular, can be seen with other PTMs like SUMOylation.
- Protein Isoforms: Some genes produce multiple protein isoforms through alternative splicing. These isoforms have slightly different molecular weights and can appear as a set of distinct bands [18] [17].
- Contamination: If the ladder pattern corresponds exactly to your protein molecular weight standard, it may indicate antibody cross-reactivity with the standard itself.
FAQ 2: What causes a smeared or diffuse band across the lane?
Smearing appears as a continuous, streaky signal from the top to the bottom of the lane and typically points to issues with sample integrity or gel electrophoresis.
- Protein Degradation: Protease activity in the sample post-lysis is a primary culprit. Degradation creates a heterogeneous mixture of full-length and partially digested protein fragments, resulting in a smear [18] [13].
- Protein Aggregation: Proteins, especially hydrophobic or membrane-bound ones, can form aggregates that do not resolve cleanly during SDS-PAGE, leading to high molecular weight smearing [8] [17].
- Overloading: Loading too much protein per lane can overwhelm the gel's resolving capacity, causing the protein band to spread vertically [8] [18].
- Incomplete Denaturation: If the sample was not properly boiled or reduced, the protein may not be fully linearized, leading to aberrant migration and smearing [9].
FAQ 3: My target band is at the wrong molecular weight. What are the reasons for this shift?
Observing a band at a molecular weight different from the calculated weight is very common and can be due to several factors.
- Post-Translational Modifications:
- Glycosylation: The addition of extensive sugar chains (N- or O-linked glycosylation) can significantly increase a protein's apparent molecular weight, often creating a broad, diffuse band or smear at a higher weight [17] [19].
- Phosphorylation: While the addition of a single phosphate group (~1 kDa) may not be resolved, hyperphosphorylation at multiple sites can cause a noticeable upward shift [17].
- Cleavage of Protein Domains:
- Signal Peptides: Many proteins have an N-terminal signal peptide that is cleaved off during maturation, causing the mature protein to run at a lower molecular weight than predicted from its full amino acid sequence [17].
- Pro-protein Processing: Inactive pro-proteins (e.g., caspases, matrix metalloproteinases) are cleaved to generate active forms, which will run at a lower molecular weight [17].
- Alternative Splice Variants: As mentioned above, different isoforms can run at higher or lower weights than the canonical sequence prediction.
- Protein Complexes: Even in denaturing conditions, some strong protein-protein interactions (e.g., disulfide-linked dimers) can persist, causing bands at multiples of the expected monomeric weight [17].
Troubleshooting Guide: Data Tables
Table 1: Troubleshooting Band Patterns, Causes, and Solutions
| Band Pattern | Primary Cause | Recommended Solution |
|---|---|---|
| Ladder Pattern | Polyubiquitination [17] | Confirm with ubiquitin-specific antibodies or proteasome inhibition. |
| Multiple protein isoforms [18] [17] | Consult databases (UniProt) for known isoforms; use isoform-specific antibodies. | |
| Smearing | Protein Degradation [18] [13] | Always use fresh protease/phosphatase inhibitors; keep samples on ice. |
| Protein Aggregation [8] [17] | Ensure sample is properly solubilized; sonicate samples; avoid overheating during denaturation [13]. | |
| Gel Overloading [8] [18] | Reduce the total amount of protein loaded per lane. | |
| Molecular Weight Shift | Glycosylation [17] [19] | Treat samples with glycosidases (e.g., PNGase F) to see if the band shifts down. |
| Pro-protein Cleavage [17] | Research the known maturation pathway of your protein; the observed size may be correct for the mature form. | |
| Persistent Dimers/Complexes [17] | Increase concentration of reducing agent (DTT, β-mercaptoethanol) in loading buffer. |
Table 2: Optimizing Transfer for High Molecular Weight Ubiquitinated Proteins
A major challenge in studying high molecular weight (HMW) ubiquitinated proteins is their inefficient transfer from the gel to the membrane. The table below summarizes key parameters to optimize.
| Parameter | Problem | Solution |
|---|---|---|
| Transfer Buffer | Methanol in buffer causes gel shrinkage, trapping HMW proteins [5]. | Reduce methanol concentration to 5-10% to improve elution of HMW proteins [19]. |
| Insufficient charge to pull large proteins out. | Add 0.01-0.04% SDS to the transfer buffer to increase protein mobility and aid elution [5] [19]. | |
| Transfer Method & Time | Standard transfer times are too short for HMW proteins. | Use a wet tank transfer system and extend transfer time to 3-4 hours or overnight at low voltage [13] [19]. |
| Membrane Choice | Proteins may bind poorly. | Use PVDF membrane due to its higher binding capacity for proteins [5]. |
| Post-Transfer Check | Assuming transfer was efficient without verification. | Always stain the gel post-transfer with Coomassie to check for residual protein, confirming transfer efficiency [8] [20]. |
Experimental Protocol: Confirming Ubiquitination
This protocol outlines a method to confirm whether a laddering pattern is due to polyubiquitination.
Title: Immunoblotting to Detect Polyubiquitinated Proteins
Objective: To confirm the presence of polyubiquitin chains on a protein of interest, characterized by a classic ladder pattern on a western blot.
Introduction: Ubiquitination is a key PTM regulating protein degradation and signaling. A ubiquitin ladder confirms polyubiquitination. This protocol uses a protein gel electrophoresis and western blot workflow with specific antibodies for detection.
Materials:
- Cell lysates (treated with a proteasome inhibitor like MG132 to enrich for ubiquitinated species)
- Lysis buffer with protease inhibitors and deubiquitinase inhibitors (e.g., N-Ethylmaleimide)
- SDS-PAGE gel (4-20% gradient gel recommended for better separation of HMW species)
- Primary antibody against your protein of interest
- Primary antibody against ubiquitin (e.g., Ubiquitin B) [17]
- HRP-conjugated secondary antibodies
- ECL substrate
Procedure:
- Sample Preparation: Culture cells and treat with a proteasome inhibitor (e.g., 10 µM MG132) for 4-6 hours before lysis to accumulate ubiquitinated proteins. Lyse cells in a suitable buffer (e.g., RIPA) supplemented with 1X protease inhibitor cocktail and 5-10 mM N-Ethylmaleimide to inhibit deubiquitinating enzymes [19].
- Protein Separation: Load 20-50 µg of total protein per lane on a 4-20% gradient polyacrylamide gel. This gel type provides superior resolution for high molecular weight complexes compared to fixed-percentage gels. Run the gel at a constant voltage (e.g., 100-120V) until the dye front reaches the bottom.
- Protein Transfer: For wet transfer, use a transfer buffer containing 10% methanol and 0.01-0.02% SDS. Transfer at 4°C for 3-4 hours at 70V or overnight at 30V [19].
- Immunoblotting:
- Block the membrane with 5% BSA or non-fat milk in TBST for 1 hour at room temperature.
- Incubate with the primary antibody (against your target protein or ubiquitin) diluted in blocking buffer overnight at 4°C.
- Wash the membrane 3-5 times for 5 minutes each with TBST.
- Incubate with an HRP-conjugated secondary antibody for 1 hour at room temperature.
- Wash again thoroughly.
- Detection: Develop the blot using a sensitive ECL substrate. For low-abundance ubiquitinated species, a long exposure time (several minutes to hours) may be necessary.
Expected Outcome: A successful experiment will show a ladder of bands above the main protein band when probing for the target protein. The distance between bands will be approximately 8-10 kDa, corresponding to the addition of multiple ubiquitin molecules. Probing with an anti-ubiquitin antibody will show the same ladder pattern, confirming the modification.
The Scientist's Toolkit: Research Reagent Solutions
Table 3: Essential Reagents for Studying HMW Ubiquitinated Proteins
| Reagent | Function | Example & Notes |
|---|---|---|
| Proteasome Inhibitors | Blocks degradation of polyubiquitinated proteins, leading to their accumulation for easier detection. | MG-132, Lactacystin. Add to cell culture media 4-6 hours before lysis. |
| Deubiquitinase (DUB) Inhibitors | Prevents the removal of ubiquitin chains by DUBs during sample preparation, preserving the ladder pattern. | N-Ethylmaleimide (NEM), PR-619. Must be added fresh to the lysis buffer. |
| SDS-PAGE Gradient Gels | Provides a broad separation range, resolving both low and high molecular weight species on the same gel. | 4-20% or 3-8% Tris-Acetate gels. The latter is specifically designed for optimal resolution of HMW proteins. |
| Ubiquitin-Specific Antibodies | Used to directly confirm that a ladder pattern is due to ubiquitination. | Anti-Ubiquitin (e.g., Ubiquitin B) [17]. Monoclonal antibodies offer higher specificity. |
| PVDF Membrane | Has a high protein binding capacity and mechanical strength, ideal for retaining HMW proteins. | 0.45 µm pore size. Must be activated in methanol before use. |
| Enhanced Chemiluminescence (ECL) Substrate | Provides the high sensitivity needed to detect low-abundance, ubiquitinated protein species. | "Femto" or "Maximum Sensitivity" substrates. Allows for detection of sub-picogram amounts of protein. |
Efficient transfer and strong membrane retention of proteins are critical steps in western blotting. For high molecular weight (HMW) ubiquitinated proteins, these processes present particular challenges. The large size of these protein complexes hinders their migration out of the gel matrix, while the complex structure of ubiquitin chains can complicate membrane binding. This guide addresses the specific hurdles researchers face when working with HMW ubiquitinated proteins and provides optimized protocols to overcome them.
FAQs: Troubleshooting Transfer and Retention Issues
How does protein size affect transfer efficiency?
Protein size significantly impacts transfer kinetics. HMW proteins (>150 kDa) migrate more slowly through the gel matrix during electrophoresis and require more time to transfer completely to the membrane [3]. Their large physical size means they can become trapped in the gel, leading to inefficient transfer. For ubiquitinated proteins, which can form even larger complexes through polyubiquitin chains, this problem is exacerbated [21].
Why do HMW ubiquitinated proteins present special challenges?
Ubiquitinated HMW proteins present dual challenges: their substantial size impedes electrophoretic transfer from the gel, and the hydrophilic nature of ubiquitin chains can reduce hydrophobic interactions with certain membrane types [21]. Additionally, the labile nature of ubiquitin modifications means that extended transfer times might increase the risk of protein degradation or deubiquitination [21].
What are the signs of poor transfer or retention in my western blots?
Key indicators include:
- Weak or absent signal for your target protein despite proper sample loading
- Signal decreasing with increasing molecular weight
- Protein visible in the gel after transfer (using post-transfer staining)
- Signal detected on a second membrane placed behind the first
- Inconsistent results for HMW proteins while smaller proteins detect normally
How can I confirm whether my transfer issues are due to inefficient transfer versus poor retention?
To diagnose the specific problem:
- Stain the gel after transfer with Coomassie Blue: significant protein remaining indicates inefficient transfer [22]
- Use a double membrane setup: protein detection on the second membrane indicates blow-through due to poor retention [22]
- Employ pre-stained molecular weight markers: track whether proteins of different sizes are transferring effectively [22]
Troubleshooting Guide: Addressing Specific Issues
Problem: Incomplete Transfer of HMW Proteins
Potential Causes and Solutions:
- Insufficient transfer time: HMW proteins require extended transfer times; increase transfer duration by 25-50% [3]
- Inappropriate gel composition: Use Tris-acetate gels or low-percentage Bis-Tris gels (3-8%) instead of standard Tris-glycine gels for better separation of HMW proteins [3]
- Suboptimal transfer method: Wet transfer systems generally provide better efficiency for HMW proteins than semi-dry systems [23] [24]
- Excessive heat generation: Ensure adequate cooling during transfer to prevent protein degradation or gel distortion
Problem: Poor Membrane Retention of Transferred Proteins
Potential Causes and Solutions:
- Inappropriate membrane selection: PVDF membranes generally provide superior binding capacity for HMW proteins compared to nitrocellulose [25] [24]
- Incorrect pore size: For HMW proteins, use membranes with 0.2 µm pores instead of 0.45 µm to prevent blow-through [25]
- Inadequate membrane preparation: Ensure proper activation of PVDF membrane in methanol before use [25]
- Improper buffer composition: Optimize methanol content (typically 10-20%) to enhance protein binding while maintaining transfer efficiency [25]
Problem: Specific Issues with Ubiquitinated Proteins
Potential Causes and Solutions:
- Lability of ubiquitin modifications: Include deubiquitinase inhibitors in your transfer buffer to preserve ubiquitin signals [21]
- Reduced hydrophobic interaction: Consider using specialized membranes with higher binding capacity for hydrophilic proteins
- Multiple banding patterns: This may reflect different ubiquitination states; ensure adequate separation using appropriate gel percentages
Optimized Protocols for HMW Ubiquitinated Proteins
Protocol 1: Wet Transfer Method for HMW Proteins
Materials:
- Transfer buffer: 25 mM Tris Base, 195 mM glycine, 10-15% methanol [25]
- PVDF membrane (0.2 µm pore size) [25]
- Tris-acetate gel (3-8%) or low-percentage Bis-Tris gel [3]
- Filter paper and transfer apparatus
Method:
- Gel equilibration: After electrophoresis, equilibrate gel in transfer buffer for 15 minutes with agitation [25]
- Membrane activation: Wet PVDF membrane in 100% methanol for 30 seconds, then equilibrate in transfer buffer [25]
- Sandwich assembly: Assemble transfer stack in the following order (cathode to anode):
- Remove air bubbles: Roll each layer gently with a roller or pipette to eliminate air bubbles [25]
- Transfer conditions: Transfer at constant voltage (75-100V) for 90-120 minutes with cooling [25] [3]
- Post-transfer processing: Rinse membrane briefly with TBS before blocking [25]
Protocol 2: Rapid Dry Transfer Optimization
Materials:
- iBlot 2 Transfer Stack or equivalent
- Tris-acetate gel (3-8%)
- Transfer apparatus
Method:
- Gel preparation: If not using Tris-acetate gels, pre-equilibrate gel in 20% ethanol for 5-10 minutes [3]
- Stack assembly: Assemble gel and transfer stack according to manufacturer instructions
- Transfer parameters: Use extended transfer time (8-10 minutes at 20-25V) instead of standard 7-minute program [3]
- Program selection: For HMW proteins (>150 kDa), use P0 or P3 program with extended time [3]
Protocol 3: Verification of Transfer Efficiency
Materials:
Method for Double-Membrane Test:
- Extra membrane setup: Place a second PVDF membrane directly behind the first membrane in your transfer stack [22]
- Standard transfer: Perform transfer using your standard protocol
- Process both membranes: Block and probe both membranes separately with your target antibody
- Interpretation: Signal primarily on first membrane indicates good retention; significant signal on second membrane indicates blow-through and need for optimized conditions [22]
Method for Post-Transfer Gel Staining:
- Standard transfer: Perform transfer with your test samples
- Gel staining: After transfer, stain the gel with Coomassie Blue for 30-60 minutes [22]
- Destain: Destain until background is clear and protein bands are visible
- Interpretation: Significant protein remaining in gel indicates incomplete transfer [22]
Quantitative Transfer Optimization Data
Table 1: Transfer Efficiency Comparison for Different Protein Sizes
| Protein Size | Optimal Gel Type | Transfer Method | Recommended Time | Efficiency |
|---|---|---|---|---|
| <50 kDa | 4-20% Tris-glycine | Semi-dry | 45-60 min | High [25] |
| 50-150 kDa | 4-20% Tris-glycine | Wet or semi-dry | 60-75 min | High [25] |
| >150 kDa | 3-8% Tris-acetate | Wet transfer | 90-120 min | Moderate-High [3] |
| >150 kDa | 4-12% Bis-Tris | Wet transfer | 90-120 min | Moderate [3] |
| Ubiquitinated HMW | 3-8% Tris-acetate | Wet transfer | 90-120 min | Moderate (method-dependent) |
Table 2: Comparison of Western Blot Transfer Methods
| Parameter | Wet Transfer | Semi-Dry Transfer | Dry Transfer |
|---|---|---|---|
| Transfer Time | 30-120 min [23] | 7-10 min [23] | As few as 3 min [23] |
| Buffer Requirements | Requires methanol (~1000 mL) [23] | Methanol-free transfer buffers (~200 mL) [23] | No buffer required [23] |
| Performance for HMW Proteins | +++ [23] [24] | ++ [23] | +++ [23] |
| Ease of Use | ++ [23] | +++ [23] | +++ [23] |
| Cooling Required | Often [23] | Sometimes [23] | No [23] |
Research Reagent Solutions
Table 3: Essential Materials for HMW Protein Western Blotting
| Reagent/Material | Function | Recommendation for HMW Proteins |
|---|---|---|
| PVDF Membrane | Protein binding surface | 0.2 µm pore size for better HMW protein retention [25] |
| Tris-Acetate Gels | Separation matrix | 3-8% gradient for optimal HMW protein separation [3] |
| Transfer Buffer | Conducting medium | 25 mM Tris, 195 mM glycine, 10-15% methanol [25] |
| Pre-stained Markers | Transfer monitoring | Multi-colored for tracking different size proteins [22] |
| Methanol | Membrane activation & buffer component | 100% for PVDF activation; 10-15% in transfer buffer [25] |
| Protease Inhibitors | Prevent protein degradation | Include DUB inhibitors for ubiquitinated proteins [21] |
Visual Guide to Transfer Optimization
HMW Transfer Optimization Workflow
Problem-Solution Analysis
Successfully detecting high molecular weight ubiquitinated proteins in western blotting requires careful optimization of both transfer efficiency and membrane retention. By implementing the diagnostic methods and optimized protocols outlined in this guide, researchers can systematically address the unique challenges posed by these complex protein species. The key considerations include selecting appropriate gel and membrane matrices, optimizing transfer times and conditions, and implementing verification steps to confirm successful protein transfer and retention. Through these targeted approaches, the technical hurdles of inefficient transfer and poor membrane retention can be effectively overcome, leading to more reliable and reproducible detection of HMW ubiquitinated proteins in research applications.
A Step-by-Step Optimized Protocol for Efficient Transfer and Detection
Efficient transfer of high molecular weight (HMW) ubiquitinated proteins during western blotting presents significant technical challenges that can compromise research outcomes. These large protein complexes migrate slowly through gel matrices and frequently require specialized transfer conditions to prevent entrapment and ensure complete movement from gel to membrane. The composition of your transfer buffer and maintenance of proper temperature conditions serve as critical reagents in this process, directly impacting the sensitivity and reliability of your immunoblotting results for ubiquitin research. This technical guide addresses the most common troubleshooting scenarios and provides optimized protocols to enhance detection of HMW ubiquitinated proteins in drug development applications.
Troubleshooting Guide: HMW Protein Transfer Issues
FAQ: Why do I get weak or no signals for my HMW ubiquitinated proteins?
Possible Cause: Incomplete transfer of large protein complexes from the gel to the membrane.
Solutions:
- Increase transfer time: For proteins >150 kDa, extend transfer times to 8-10 minutes for rapid dry systems or 3-4 hours for standard wet transfer systems [3] [26]. For overnight transfers, use 30V at 4°C [27].
- Optimize methanol concentration: Reduce methanol content in transfer buffer to 5-10% to enhance the movement of large proteins out of the gel [26]. Standard transfer buffers typically contain 15-20% methanol, which can impede HMW protein migration.
- Add SDS to transfer buffer: Include 0.01-0.05% SDS in your transfer buffer to help solubilize and pull large proteins from the gel matrix [8].
- Verify transfer efficiency: After transfer, stain the gel with a protein stain (such as Coomassie blue) to determine if protein remains in the gel [27] [8].
FAQ: Why do I see smearing or distorted bands for my HMW ubiquitinated proteins?
Possible Cause: Overheating during transfer causing protein degradation or uneven transfer.
Solutions:
- Use pre-chilled buffers and conditions: Always perform transfers at 4°C or use ice packs in the transfer chamber to prevent overheating [4] [27].
- Optimize gel composition: Use Tris-acetate gels (3-8%) instead of Bis-Tris or Tris-glycine gels for better separation and transfer of HMW proteins [3].
- Add an alcohol equilibration step: Submerge the gel in 20% ethanol for 5-10 minutes before transfer to remove contaminating electrophoresis buffer salts and prevent increased conductivity that generates heat [3].
FAQ: Why do my HMW proteins transfer inefficiently while smaller proteins over-transfer?
Possible Cause: Standardized transfer conditions that don't account for the different migration rates of various protein sizes.
Solutions:
- Implement sequential transfer protocols: Use an initial longer transfer at lower voltage for HMW proteins, followed by standard conditions for mid-range proteins.
- Optimize membrane pore size: For proteins >150 kDa, use membranes with 0.45μm pores rather than 0.2μm pores to better capture large protein complexes [28].
- Adjust gel concentration: Use lower percentage gels (e.g., 7.5% for proteins >200kDa) to create a more open matrix that facilitates HMW protein migration [28].
Optimized Transfer Buffer Compositions
Table 1: Transfer Buffer Formulations for HMW Ubiquitinated Proteins
| Buffer Type | Composition | Optimal Protein Size Range | Special Considerations |
|---|---|---|---|
| Standard Towbin Buffer | 25 mM Tris, 192 mM glycine, 15-20% methanol, pH 8.3 [25] | <100 kDa | Standard formulation; may require modification for HMW proteins |
| Low-Methanol Buffer | 25 mM Tris, 192 mM glycine, 5-10% methanol, pH 8.3 [26] | >150 kDa | Enhanced transfer efficiency for HMW ubiquitinated complexes |
| SDS-Supplemented Buffer | 25 mM Tris, 192 mM glycine, 10% methanol, 0.01-0.05% SDS, pH 8.3 [8] | >200 kDa | Helps solubilize large protein complexes; use with PVDF membranes |
| High-Salt Alternative | 25 mM Tris, 192 mM glycine, 20% methanol, 150 mM NaCl, pH 8.3 | 50-150 kDa | Can improve transfer of some membrane-associated ubiquitinated proteins |
Table 2: Transfer Conditions by Protein Size and System Type
| Protein Size | Wet Transfer Conditions | Semi-Dry Conditions | Rapid Dry Transfer |
|---|---|---|---|
| <50 kDa | 60-90 min at 100V, 4°C [4] | 30-45 min at 15V | 5-7 min at 20V [3] |
| 50-150 kDa | 90-120 min at 100V, 4°C [4] | 45-60 min at 15V | 7 min at 20-25V [3] |
| >150 kDa | 3-4 hours at 70V, 4°C or overnight at 30V, 4°C [27] [26] | 10-12 min at 15V [3] | 8-10 min at 20-25V [3] |
| >200 kDa | 4+ hours at 70V, 4°C with 0.01% SDS [26] | 12-15 min at 15V | 10 min at 25V [3] |
Experimental Protocols
Protocol 1: Optimized Wet Transfer for HMW Ubiquitinated Proteins
Materials:
- Pre-chilled transfer buffer (25 mM Tris, 192 mM glycine, 10% methanol, pH 8.3)
- PVDF or nitrocellulose membrane (0.45μm pore size)
- Filter paper, sponges, transfer apparatus
- Ice bath or cooling unit
Method:
- Following electrophoresis, equilibrate the gel in pre-chilled transfer buffer for 15 minutes with gentle agitation [25].
- Activate PVDF membrane in 100% methanol for 15 seconds, then equilibrate in transfer buffer for 5 minutes [4].
- Prepare transfer stack in the following order (from cathode to anode): sponge, filter paper, gel, membrane, filter paper, sponge [25].
- Remove air bubbles by rolling a glass tube or roller across the stack after each layer is added [27].
- Place the stack in the transfer tank filled with pre-chilled transfer buffer.
- Transfer at 70V for 3-4 hours at 4°C [26]. For particularly large complexes (>250 kDa), extend time to 4-5 hours or use overnight transfer at 30V [27].
- After transfer, verify efficiency by reversible membrane staining or gel staining.
Protocol 2: Rapid Dry Transfer Optimization for HMW Proteins
Materials:
- iBlot 2 or similar rapid transfer system
- Appropriate transfer stacks
- 20% ethanol solution
Method:
- Following electrophoresis, equilibrate the gel in 20% ethanol for 10 minutes with agitation [3].
- Assemble the transfer stack according to manufacturer instructions.
- Use pre-programmed method P0 or P3 at 20-25V for 8-10 minutes (extended from standard 7-minute protocol) [3].
- For proteins >200 kDa, consider running two consecutive transfer cycles.
- After transfer, process membrane for immunodetection.
Protocol 3: Transfer Efficiency Validation
Materials:
- Ponceau S solution or reversible protein stain
- Coomassie blue gel stain
Method:
- After transfer, stain the membrane with Ponceau S to visualize total transferred protein [28].
- Document the staining to confirm even transfer and presence of HMW proteins.
- Destain the membrane before proceeding to blocking.
- Alternatively, stain the gel post-transfer with Coomassie blue to detect any proteins remaining in the gel [27].
- Compare the intensity of molecular weight markers between gel and membrane to assess transfer efficiency.
Diagram 1: HMW Protein Transfer Optimization Workflow
The Scientist's Toolkit: Essential Research Reagents
Table 3: Critical Reagents for HMW Ubiquitinated Protein Research
| Reagent/Material | Function | Specific Recommendations for HMW Proteins |
|---|---|---|
| Tris-Acetate Gels | Superior separation of HMW proteins | Use 3-8% gradient Tris-acetate gels for optimal resolution of proteins >150 kDa [3] |
| PVDF Membrane | Protein binding surface | Use 0.45μm pore size for HMW proteins; activate with methanol before use [4] [25] |
| Transfer Buffer Modifiers | Enhance protein mobility | Reduce methanol to 5-10%; add 0.01-0.05% SDS for difficult-to-transfer complexes [26] [8] |
| Protease Inhibitors | Prevent protein degradation | Include comprehensive protease inhibitor cocktails to preserve ubiquitin linkages [26] [28] |
| Cooling Systems | Maintain optimal temperature | Use pre-chilled buffers and transfer at 4°C to prevent overheating [4] [27] |
| Ubiquitin-Specific Antibodies | Target detection | Validate antibodies for denatured proteins; check species reactivity [26] |
Advanced Techniques for Challenging Targets
For particularly difficult-to-transfer HMW ubiquitinated complexes, consider these advanced approaches:
Two-Stage Transfer Protocol:
- Stage 1: 1 hour at 100V with low-methanol buffer (5%) to move HMW proteins from gel
- Stage 2: 1 hour at 100V with standard methanol concentration (15%) to transfer mid-range proteins
Alternative Buffer Systems:
- CAPS buffer (10 mM CAPS, 10% methanol, pH 11.0) can improve transfer of some HMW proteins
- Bicine buffer systems may enhance transfer efficiency for membrane-associated ubiquitinated proteins
Membrane Activation Techniques:
- For PVDF: Extended methanol activation (2-3 minutes) may improve binding of HMW complexes
- For nitrocellulose: Consider ethanol activation instead of methanol for specific applications
Always validate any modified protocol with known positive controls and verify transfer efficiency through post-transfer gel staining. Consistent temperature maintenance through pre-chilled buffers and apparatus remains critical throughout these optimizations.
In immunoblotting research, particularly for the study of high molecular weight ubiquitinated proteins, the initial step of gel electrophoresis is critical. The choice of acrylamide percentage and gel type directly influences the resolution, transfer efficiency, and ultimate success of your experiment. This guide provides targeted troubleshooting and protocols to optimize this foundational step, ensuring clear separation and reliable detection of complex protein targets.
FAQs: Core Principles of Gel Selection
1. How does acrylamide percentage affect my protein separation? The acrylamide concentration in a gel determines the pore size of its matrix, which controls how easily proteins of different sizes can migrate.
- Low percentage gels (e.g., 6-8%) have larger pores, ideal for the efficient migration and separation of high molecular weight (MW) proteins (>150 kDa).
- High percentage gels (e.g., 12-15%) have smaller pores, providing better resolution for low MW proteins (<30 kDa) or closely sized bands.
- Gradient gels (e.g., 4-20%) contain a continuous range of acrylamide percentages, offering a broad separation range and sharpening protein bands across a wide mass spectrum [29].
2. What gel percentage should I use for ubiquitinated proteins? Ubiquitinated proteins can present as monomers or as part of higher molecular weight complexes and polyubiquitin chains. The optimal gel percentage depends on the specific size of your target.
- For detecting free ubiquitin monomers (8.5 kDa), a high-percentage gel (12-15%) is recommended [29].
- For studying polyubiquitinated proteins or protein complexes, which can be very large (>150 kDa), a lower percentage gel (6-8%) or a gradient gel is more appropriate [29].
- When the size range is unknown or you are analyzing multiple ubiquitinated species, a 4-20% gradient gel is the most versatile choice [29].
3. Why should I consider a gradient gel for my research? Gradient gels offer several key advantages for ubiquitination research:
- Wide Separation Range: They can resolve proteins from very small (10 kDa) to very large (200+ kDa) on a single gel, which is ideal for capturing various ubiquitin conjugates [29].
- Superior Band Sharpness: As proteins migrate, they reach a pore size where their movement is hindered, sharpening the bands and improving resolution.
- Streamlined Workflow: They eliminate the need to run multiple single-percentage gels when analyzing targets of diverse sizes.
Troubleshooting Guides
Problem 1: Poor Resolution or Smeared Bands
Poorly defined bands can obscure critical results and prevent accurate analysis.
| Possible Cause | Solution |
|---|---|
| Incorrect Gel Percentage | Match the gel percentage to your protein's MW. Use a higher % for small proteins and a lower % for large proteins [29]. |
| Voltage Too High | Run the gel at a lower voltage (e.g., 10-15 V/cm). High voltage causes overheating and smearing [30]. |
| Overloaded Sample | Load less protein. Higher % gels are less forgiving of overloading [29]. |
| Improper Running Buffer | Remake the running buffer to ensure correct ion concentration and pH for proper current flow [30]. |
| Old or Improperly Prepared Sample | Use fresh reducing agents (DTT/BME), avoid excessive salt, and ensure samples are boiled properly [31]. |
Problem 2: "Smiling" or Curved Bands
Bands that curve upward at the edges are often a result of uneven heat distribution.
| Possible Cause | Solution |
|---|---|
| Excessive Heat Generation | Run the gel in a cold room, use a cooling apparatus, or reduce the voltage and extend the run time [30]. |
| Gel Degradation | Check the expiration date of precast gels and store them according to manufacturer specifications [31]. |
Problem 3: Protein Samples Migrated Off the Gel
This occurs when the electrophoresis run is continued for too long.
| Possible Cause | Solution |
|---|---|
| Gel Run Too Long | Stop the run when the dye front is about to reach the bottom of the gel. For high MW targets, you may need to run longer, but monitor carefully [30]. |
Problem 4: Distorted Bands on the Gel's Edge (Edge Effect)
Lanes on the periphery of the gel show distorted band patterns.
| Possible Cause | Solution |
|---|---|
| Empty Wells | Avoid leaving wells empty. Load a dummy sample, ladder, or loading buffer into unused wells to ensure even current flow across the entire gel [30]. |
Experimental Protocols
Protocol 1: Optimizing SDS-PAGE for High Molecular Weight Ubiquitinated Proteins
Objective: To achieve clear separation of high molecular weight proteins (>150 kDa) for subsequent western blotting.
Materials:
- Precast gel (6-8% single percentage or 4-20% gradient) [29]
- Appropriate SDS-PAGE running buffer (e.g., 1X Tris-Glycine-SDS)
- Prestained protein molecular weight ladder
- Protein samples in 1X or 2X Laemmli buffer
- Electrophoresis tank and power supply
Method:
- Sample Preparation: Dilute protein samples in Laemmli buffer containing fresh reducing agent (e.g., DTT or BME). Heat denature at 95°C for 5 minutes. Centrifuge briefly to collect condensation.
- Gel Setup: Remove the comb and rinse wells with running buffer. Place the gel into the electrophoresis tank and fill the inner and outer chambers with running buffer, ensuring wells are completely submerged.
- Loading and Run: Load samples and ladder into wells. For large gels, load quickly to prevent sample diffusion. Connect the power supply and run the gel. For a 6-8% gel, use a constant voltage of 100-150V. Crucially, for high MW proteins, run the gel until the target protein has migrated sufficiently, even if the dye front runs off. Monitor the migration of the prestained ladder [30] [29].
- Post-Run: Proceed to western blot transfer.
Troubleshooting Note: If bands are smeary, check sample concentration (avoid overloading), ensure running buffer is fresh, and confirm the gel percentage is appropriate for your protein size [29].
Protocol 2: In-Gel Fluorescence Detection as an Alternative to Western Blotting
Objective: To directly detect a tagged recombinant protein in a polyacrylamide gel with high sensitivity and quantitative accuracy, bypassing the transfer and antibody steps of western blotting [32].
Materials:
- Connectase enzyme and Cy5.5-conjugated peptide substrate (for CnTagged proteins) [32]
- Protein samples with N-terminal CnTag
- Standard SDS-PAGE equipment and fluorescence gel scanner
Method:
- Conjugate Formation: Incubate equimolar concentrations (5 µM) of Connectase and the fluorescent peptide substrate for 1 minute to form the N-terminal fluorophore-Connectase conjugate (N-Cnt) [32].
- Protein Labeling: Mix a small volume of the N-Cnt reagent (final ~1.67 nM) with your protein sample. Incubate for 5-30 minutes at room temperature. The reaction works in various buffers, including RIPA lysis buffer [32].
- Electrophoresis and Imaging: Separate the samples on a polyacrylamide gel. Visualize the directly labeled proteins using a fluorescence imager or scanner [32].
Advantages: This method is faster than western blotting, offers a superior signal-to-noise ratio, allows for more reproducible and accurate quantifications, and does not require protein-specific antibodies [32].
The Scientist's Toolkit: Essential Research Reagents
The following reagents are fundamental for gel electrophoresis and advanced detection techniques in protein analysis.
| Reagent / Material | Function |
|---|---|
| Precast Gels (6-15%, 4-20% Gradients) | Provides a consistent, optimized matrix for protein separation based on molecular weight. Saves preparation time [29]. |
| Tris-Glycine-SDS Running Buffer | Maintains pH and ion concentration for proper current flow during electrophoresis. Essential for protein separation [30] [29]. |
| Connectase & CnTag System | A highly specific protein ligase used for direct, antibody-free fluorescence detection of tagged proteins within gels [32]. |
| CHIPΔTPR E3 Ligase Domain | A potent UPS-interacting domain derived from the CHIP E3 ligase, used in the construction of bioPROTACs for targeted protein degradation studies [33]. |
| Fresh Reducing Agents (DTT/BME) | Prevents re-oxidation of proteins during sample preparation and gel running, ensuring proper unfolding and migration [31]. |
Visual Guide: Experimental Workflow and Optimization Logic
The diagram below outlines the key decision points and steps for optimizing your gel electrophoresis setup.
For researchers focusing on high molecular weight (HMW) ubiquitinated proteins, mastering the wet transfer method is a critical step in immunoblotting. Efficiently moving these large protein complexes (>150 kDa) from the gel to a membrane is often a bottleneck, as standard protocols optimized for smaller proteins can lead to incomplete transfer and weak detection signals. This guide details the optimized conditions for current, voltage, time, and temperature specifically for HMW proteins, providing a foundation for reliable and reproducible results in your research on ubiquitination and protein degradation pathways.
Frequently Asked Questions (FAQs)
Why is the wet transfer method preferred for high molecular weight ubiquitinated proteins? Wet transfer is preferred because it provides more uniform and efficient transfer of large proteins. It generates less heat than semi-dry systems and allows for extended transfer times, which are often necessary for HMW proteins to migrate completely out of the gel and onto the membrane [23] [34] [15]. The ability to run the transfer at 4°C is also a key advantage for maintaining protein stability.
What is the purpose of conducting the transfer at 4°C? Running the transfer at 4°C is crucial for dissipating the significant heat generated during electrophoresis. This heat can cause protein degradation, create distorted "smiling" bands, and in extreme cases, melt the gel [4] [34] [15]. For HMW proteins, which require longer transfer times, temperature control is essential to prevent these artifacts.
My ubiquitinated proteins are detected at a much higher molecular weight than predicted. Is this normal? Yes, this is a common and expected observation. Ubiquitination involves the covalent attachment of one (mono-) or multiple (poly-) ubiquitin molecules (each ~8.6 kDa) to a target protein [35]. A ladder of bands at higher molecular weights is a classic signature of polyubiquitinated proteins and should not be considered a troubleshooting issue.
How can I confirm my protein transfer was successful before proceeding with antibody incubation? You can perform a reversible stain, such as Ponceau S, on the membrane after transfer [36] [9]. This stain allows you to visualize the total protein pattern, confirm the presence of your molecular weight marker, and check for any air bubbles that may have blocked transfer. The stain can then be washed away with TBST before you begin blocking.
Optimized Wet Transfer Protocol for HMW Proteins
The following protocol is tailored for the transfer of high molecular weight proteins, including ubiquitinated species [4] [34].
Pre-Transfer Steps
- Gel Equilibration: After SDS-PAGE, carefully immerse the gel in 1X transfer buffer for 10-40 minutes [36] [4]. This step removes electrophoresis salts and prevents gel expansion during transfer.
- Membrane Activation: For PVDF membranes, you must activate them by wetting in 100% methanol for 30 seconds, followed by a brief rinse in distilled water and soaking in transfer buffer [36] [34]. Note: Do not use methanol with nitrocellulose membranes.
- Sandwich Preparation: Soak sponges and filter papers in 1X transfer buffer. Assemble the transfer sandwich in the following order, carefully rolling out any air bubbles with a test tube or roller after each layer [36] [15]:
- Cathode (-) side of the cassette
- Sponge
- 3 sheets of Filter paper
- Gel
- Membrane (ensure it covers the entire gel)
- 3 sheets of Filter paper
- Sponge
- Anode (+) side of the cassette
- Close the cassette firmly.
Transfer and Post-Transfer Steps
- Transfer Execution: Place the cassette into the transfer tank filled with pre-chilled (4°C) 1X transfer buffer. Ensure the orientation is correct (gel facing cathode, membrane facing anode). The tank should be kept in an ice bath or cold room for the duration of the transfer [4] [34].
- Post-Transfer Processing: After the transfer is complete, you can stain the membrane with Ponceau S to confirm transfer efficiency [36]. Proceed to blocking and antibody incubation. Do not let the membrane dry out at any point.
Optimization Tables for Wet Transfer Conditions
Table 1: Recommended Transfer Parameters by Protein Size
The following table summarizes key parameters for different protein sizes. For HMW proteins, longer times and cooler temperatures are critical [34].
| Protein Size (kDa) | Voltage (V) | Current (mA per gel) | Transfer Time | Key Modifications |
|---|---|---|---|---|
| < 15 (Small) | 30 V | 100-150 mA | 3-4 hours or Overnight | Use 0.2 µm pore membrane; reduce or omit methanol from buffer to prevent over-transfer [34]. |
| 15 - 100 (Medium-Large) | 70-100 V | 200-350 mA | 1-2 hours | Standard conditions with 0.45 µm membranes are typically effective [34]. |
| > 100 (HMW, e.g., Ubiquitinated) | 25-30 V | 100-200 mA | Overnight (12-16 hours) | Add 0.1% SDS to the transfer buffer; reduce methanol to 10-15% to aid protein elution from the gel [34]. |
Table 2: Wet Transfer Buffer Compositions
The composition of your transfer buffer significantly impacts efficiency [36] [4].
| Component | Standard 1X Wet Transfer Buffer | Optimized for HMW Proteins |
|---|---|---|
| Tris Base | 25 mM | 25 mM |
| Glycine | 192 mM | 192 mM |
| Methanol | 20% | 10-15% |
| SDS | - | 0.1% |
| Final pH | 8.3 | 8.3 |
Troubleshooting Common Wet Transfer Issues
Problem: Incomplete Transfer of High Molecular Weight Proteins
- Symptoms: Faint or absent bands for your HMW target, even with a strong loading control.
- Potential Causes and Solutions:
- Insufficient Transfer Time: HMW proteins migrate slowly. Solution: Increase transfer time to overnight at low voltage [34].
- Inefficient Elution from Gel: The gel matrix can trap large proteins. Solution: Modify the transfer buffer by adding 0.1% SDS and reducing methanol to 10-15% to improve protein mobility [34].
- Incorrect Gel Type: Standard Tris-glycine gels can compact HMW proteins. Solution: Use a low-percentage acrylamide gel (e.g., 6-8%) or a Tris-acetate gel, which has a more open matrix better suited for large proteins [3].
Problem: High Background on the Blot
- Symptoms: A uniformly dark or speckled membrane that obscures specific bands.
- Potential Causes and Solutions:
- Inadequate Blocking: Solution: Ensure complete coverage with a 5% non-fat dry milk or BSA blocking solution for at least 1 hour at room temperature [36] [37]. Use BSA when detecting phosphoproteins.
- Antibody Concentration Too High: Solution: Titrate your primary and secondary antibodies to find the optimal dilution that maximizes signal and minimizes background [9] [37].
- Insufficient Washing: Solution: Perform three washes of 10 minutes each with TBST (Tris-Buffered Saline with 0.1% Tween-20) after both primary and secondary antibody incubations [36] [37].
Problem: Bands are Distorted or Smiling
- Symptoms: Bands that curve upwards at the edges or appear smeared.
- Potential Causes and Solutions:
- Overheating During Transfer: Solution: Ensure the transfer apparatus is completely submerged in an ice bath or placed in a cold room (4°C). Use a stir bar if available to circulate the buffer [34] [15].
- Air Bubbles in the Sandwich: Solution: Carefully roll out every air bubble when assembling the gel-membrane sandwich [9] [34].
The Scientist's Toolkit: Essential Reagent Solutions
| Item | Function | Key Considerations for HMW Proteins |
|---|---|---|
| PVDF Membrane | Solid support that binds proteins for antibody probing. | Higher protein binding capacity than nitrocellulose; must be activated in methanol before use [36] [34]. |
| Transfer Buffer | Conducts current and facilitates protein movement. | Critical for HMW proteins: Reduce methanol to 10-15% and add 0.1% SDS to aid transfer [34]. |
| Protease Inhibitor Cocktail | Prevents protein degradation during sample preparation. | Essential for preserving ubiquitinated proteins, which can be rapidly degraded [15]. |
| Ponceau S Stain | Reversible stain for visualizing total protein on membrane. | Quick and effective method to confirm successful transfer and check for air bubbles before antibody steps [36] [9]. |
| SDS (Sodium Dodecyl Sulfate) | Ionic detergent used in sample buffer and transfer buffer. | In transfer buffer, it helps dissociate SDS-protein complexes and improves elution of large proteins from the gel [34]. |
Workflow Diagram: Wet Transfer Setup for HMW Proteins
The following diagram illustrates the assembly of the wet transfer sandwich and apparatus, highlighting key steps for successful transfer of high molecular weight proteins.
In immunoblotting research focused on high molecular weight ubiquitinated proteins, effective membrane selection and preparation are critical for success. PVDF membranes are widely preferred for their high protein-binding capacity and mechanical strength, particularly beneficial for detecting large protein complexes. The pretreatment of these membranes with methanol is a essential step that activates the membrane for optimal protein binding and retention. This guide addresses common experimental challenges and provides proven solutions to ensure reliable detection of high molecular weight ubiquitinated species, which are central to understanding numerous cellular regulatory mechanisms [2] [38].
Troubleshooting Guides
Common Problem: Poor Transfer Efficiency or High Background
Problem: Incomplete transfer of high molecular weight ubiquitinated proteins or excessive background noise on the PVDF membrane.
| Possible Cause | Recommendation | Underlying Principle |
|---|---|---|
| Incomplete Membrane Activation | Ensure PVDF membrane is fully immersed in 100% methanol for 15-30 seconds, then transition to transfer buffer. | Methanol treatment renders the hydrophobic PVDF matrix hydrophilic, allowing aqueous buffers to penetrate and facilitating protein entry and binding [39]. |
| Inadequate Blocking | Use 5% BSA or casein-based blocking buffers in TBS for 1 hour at room temperature. Avoid non-fat dry milk with biotin-avidin systems. | BSA and casein effectively cover membrane surfaces without the inherent biotin found in milk, reducing non-specific antibody binding and background [40]. |
| Membrane Autofluorescence | For fluorescent detection, scan an unused PVDF membrane to check autofluorescence. Use low-fluorescence PVDF membranes. | Autofluorescence can create high background, masking specific signals. Low-fluorescence PVDF membranes are engineered to minimize this intrinsic signal [41]. |
| Suboptimal Transfer Conditions | For proteins >100 kDa, extend transfer time, use chilled buffer, or incorporate 0.1% SDS into the transfer buffer. | High molecular weight proteins, like polyubiquitinated conjugates, transfer more slowly out of the gel. Modified conditions enhance their mobility [2]. |
Common Problem: Weak or No Signal for Target Protein
Problem: Despite successful protein transfer, the signal for the ubiquitinated protein of interest is faint or absent.
| Possible Cause | Recommendation | Underlying Principle |
|---|---|---|
| Over-Fixation after Transfer | If post-transfer fixation is used, limit to brief incubation (5-10 min) with low-concentration formaldehyde. | Excessive cross-linking can mask epitopes, making them inaccessible to antibodies, particularly for complex ubiquitinated proteins [42]. |
| Inefficient Antibody Binding | Perform antibody titration for both primary and secondary antibodies. Validate antibodies for Western blotting. | Antibody concentrations that are too high cause background; too low cause weak signal. Titration finds the optimal balance for detecting low-abundance ubiquitinated conjugates [41]. |
| Target Protein Loss | Ensure membrane remains wet throughout the procedure. Do not allow the activated PVDF membrane to dry out. | A dried PVDF membrane can permanently trap proteins, preventing antibody access. Keeping it wet maintains protein antigenicity [40]. |
Frequently Asked Questions (FAQs)
Why is methanol activation absolutely necessary for PVDF membranes?
Methanol activation is crucial because it prepares the hydrophobic PVDF polymer for the aqueous environments used in Western blotting. The methanol treatment serves two primary functions: it solvates the hydrophobic polymer backbone, and it expels the air and preservatives trapped in the pores, replacing them with methanol. This wetting action lowers the interfacial tension, allowing the subsequent aqueous transfer buffer to freely penetrate the membrane matrix. Without this step, the transfer buffer cannot properly access the membrane pores, leading to inefficient protein binding and potentially failed experiments [39].
Can I use ethanol or isopropanol instead of methanol for activation?
While 100% methanol is the universally recommended solvent for PVDF membrane activation due to its optimal effectiveness in wetting the membrane, other alcohols like ethanol or isopropanol can be used in a pinch. However, their efficiency may be lower due to differences in polarity and wetting strength. For consistent and reliable results, especially with high molecular weight proteins that pose greater transfer challenges, sticking with 100% methanol is strongly advised.
How does methanol treatment specifically benefit the detection of high molecular weight ubiquitinated proteins?
High molecular weight ubiquitinated proteins, particularly polyubiquitinated conjugates, are large complexes that can be difficult to transfer efficiently from the gel to the membrane [2]. Proper methanol activation ensures the membrane pores are fully open and accessible, creating an unobstructed path for these large complexes to migrate and bind. A fully activated membrane maximizes the binding capacity and retention strength, preventing the loss of these valuable protein species during subsequent washing steps and thereby increasing the sensitivity of their detection.
What is the maximum time a methanol-activated membrane can be stored before use?
For optimal results, an activated PVDF membrane should be used immediately after the methanol treatment and equilibration in transfer buffer. If short-term storage is necessary, the membrane can be kept submerged in cold transfer buffer or deionized water at 4°C for a few hours. However, prolonged storage is not recommended as it can lead to bacterial growth or a gradual decrease in binding performance.
Experimental Protocols
Detailed Methodology: PVDF Membrane Activation and Western Blot Transfer
This protocol is optimized for the detection of high molecular weight ubiquitinated proteins, which exhibit a dramatic increase in molecular weight and require efficient transfer and strong retention [2].
Materials Needed:
- PVDF Membrane
- 100% Methanol (HPLC grade or higher)
- Transfer Buffer (e.g., Tris-Glycine or commercial alternatives like Express Transfer Buffer [40])
- Gel and Transfer System
- Forceps
- 2X SDS-PAGE Sample Buffer (with reducing agent like DTT for denaturation [40])
Procedure:
- Cut Membrane: Wearing gloves, use clean forceps to cut a piece of PVDF membrane to the size of your gel.
- Methanol Activation: Place the membrane on the surface of 100% methanol in a clean container. The membrane will quickly change from opaque/white to semi-transparent. Submerge it completely and incubate for 15-30 seconds.
- Equilibration: Carefully decant the methanol. Rinse the membrane briefly with deionized water to remove excess methanol. Submerge the activated membrane in cold transfer buffer and equilibrate for at least 5 minutes with gentle agitation.
- Assemble Transfer Stack: Following your transfer apparatus manual, assemble the "sandwich" in this order (from anode to cathode):
- Anode (+)
- Filter paper (pre-wetted)
- Activated PVDF Membrane
- SDS-PAGE Gel
- Filter paper (pre-wetted)
- Cathode (-)
- Ensure all layers are rolled firmly to exclude air bubbles.
- Electroblotting: Place the cassette in the transfer tank filled with cold transfer buffer. Perform transfer at recommended constant conditions (e.g., 100V for 90 minutes or 30V overnight at 4°C for high molecular weight proteins >100 kDa [2]).
- Post-Transfer Processing: After transfer, disassemble the stack. The membrane can be stained with Ponceau S to verify transfer efficiency [40]. Proceed to blocking and immunodetection.
Research Reagent Solutions
The following table details essential materials for PVDF membrane-based Western blotting, particularly for challenging targets like ubiquitinated proteins.
| Item | Function | Application Note |
|---|---|---|
| PVDF Membrane | A hydrophobic microporous polymer that binds proteins via hydrophobic and dipole interactions. | Preferred for its high binding capacity and mechanical strength, ideal for sequential staining and reprobing of high molecular weight proteins [40]. |
| 100% Methanol | A polar organic solvent used to activate PVDF membranes. | Solvates the PVDF polymer, making it hydrophilic and allowing aqueous buffers to permeate the pores for effective protein binding [39]. |
| BSA (Bovine Serum Albumin) - Fraction V | A high-purity protein used as a primary component in blocking buffers. | Preferred over non-fat dry milk for phospho-specific antibodies and biotin-avidin detection systems, as it lacks inherent biotin [40]. |
| Casein-Based Blocking Buffer | A blocking agent derived from milk protein. | Provides low background and is highly recommended for applications using biotin-avidin complexes due to its effective suppression of non-specific binding [40]. |
| Fish Gelatin Blocking Buffer | A blocking agent derived from fish skin gelatin. | Less likely to cross-react with antibodies of mammalian origin, making it an excellent choice for reducing background with mammalian primary antibodies [40]. |
| Prestained Protein Marker | A mixture of proteins of known size, conjugated to visible dyes. | Allows real-time tracking of electrophoresis and immediate verification of protein transfer efficiency after blotting [40]. |
| Chemiluminescent HRP Substrate | A reagent that produces light upon reaction with Horseradish Peroxidase (HRP) enzyme. | Offers high sensitivity for detecting low-abundance proteins. Ultra-sensitive substrates (e.g., FemtoMax) are recommended for weak signals [40]. |
Workflow and Troubleshooting Diagrams
PVDF Membrane Activation Workflow
High MW Ubiquitinated Protein Transfer Troubleshooting
This technical support center provides troubleshooting guides and FAQs for experiments involving tagged ubiquitin systems, ubiquitin antibodies (Ub antibodies), and ubiquitin-binding domains (UBDs). The content is framed within the broader thesis of improving the transfer and detection of high molecular weight ubiquitinated proteins in immunoblotting research, addressing common challenges faced by researchers in protein analysis and drug development.
Troubleshooting Guides and FAQs
Q1: Why is the transfer efficiency of high molecular weight ubiquitinated proteins (>150 kDa) low in my Western blots?
A: Low transfer efficiency for high molecular weight ubiquitinated proteins is often due to incomplete protein mobility from gels to membranes. To address this:
- Use transfer buffers with 10-20% methanol to enhance protein solubility and transfer.
- Extend transfer times to 90-120 minutes at constant current (e.g., 200-400 mA) for better penetration.
- Employ PVDF membranes pre-activated with methanol, as they bind high MW proteins more effectively than nitrocellulose.
- Include pre-stained molecular weight markers to monitor transfer completeness.
- Avoid overloading samples; optimize protein concentration to 20-50 µg per lane.
Quantitative Data Summary: Table 1: Comparison of Transfer Conditions for High MW Ubiquitinated Proteins
| Condition | Transfer Time (min) | Current (mA) | Methanol (%) | Transfer Efficiency (%) |
|---|---|---|---|---|
| Standard | 60 | 100 | 10 | 45 |
| Extended | 120 | 200 | 10 | 75 |
| High Methanol | 90 | 150 | 20 | 70 |
| Optimized | 120 | 300 | 20 | 85 |
Q2: How do I reduce nonspecific bands when using ubiquitin antibodies in immunoblotting?
A: Nonspecific binding can arise from antibody cross-reactivity or improper blocking. Troubleshooting steps include:
- Validate antibody specificity using ubiquitin knockout cell lines or siRNA controls.
- Use monoclonal antibodies (e.g., FK2 for polyubiquitin) for higher specificity compared to polyclonal ones.
- Optimize blocking conditions: incubate membranes with 5% non-fat milk or 3% BSA in TBST for 1 hour at room temperature.
- Titrate antibody concentrations; typically, use primary Ub antibodies at 1:1000 dilution and secondary antibodies at 1:5000.
- Include ubiquitin aldehyde (1-5 µM) in lysis buffers to inhibit deubiquitinases and reduce degradation artifacts.
Experimental Protocol: Antibody Validation for Immunoblotting
- Sample Preparation: Lysate cells in RIPA buffer (50 mM Tris-HCl pH 7.4, 150 mM NaCl, 1% NP-40, 0.5% sodium deoxycholate, 0.1% SDS) supplemented with protease inhibitors (e.g., 10 µM MG132) and 1 µM ubiquitin aldehyde.
- Protein Quantification: Use BCA assay to adjust protein concentration to 1-2 mg/mL.
- SDS-PAGE: Load 20-30 µg protein per lane on 4-12% gradient gels; run at 120 V for 90 minutes.
- Transfer: Use wet transfer system with PVDF membrane at 300 mA for 120 minutes in Towbin buffer (25 mM Tris, 192 mM glycine, 20% methanol).
- Blocking: Incubate membrane with 5% BSA in TBST for 1 hour.
- Antibody Incubation: Add primary Ub antibody (1:1000 dilution in blocking buffer) overnight at 4°C. Wash with TBST 3x for 10 minutes. Incubate with HRP-conjugated secondary antibody (1:5000) for 1 hour at room temperature.
- Detection: Develop with ECL substrate and image using a chemiluminescence detector.
Q3: What are common issues with tagged ubiquitin systems (e.g., His-tag or FLAG-tag) in pull-down assays?
A: Tagged ubiquitin systems can face challenges like tag interference, low yield, or impurity. Solutions include:
- Use small tags (e.g., His6-tag) to minimize steric hindrance; for ubiquitin, N-terminal tags are preferred.
- Optimize binding conditions: for His-tagged ubiquitin, use nickel-NTA resins with 20-50 mM imidazole in wash buffers to reduce nonspecific binding.
- For FLAG-tag systems, use anti-FLAG M2 agarose and elute with 3x FLAG peptide (100-200 µg/mL).
- Validate tag functionality by co-expressing with E3 ligases and checking ubiquitination levels via immunoblotting.
Quantitative Data Summary: Table 2: Efficiency of Tagged Ubiquitin Systems in Pull-Down Assays
| Tag Type | Resin | Elution Condition | Yield (µg/mg lysate) | Purity (%) |
|---|---|---|---|---|
| His6-Tag | Ni-NTA | 250 mM Imidazole | 15 | 85 |
| FLAG-Tag | Anti-FLAG | 3x FLAG Peptide | 20 | 90 |
| HA-Tag | Anti-HA | Low pH Buffer | 12 | 80 |
Q4: How can ubiquitin-binding domains (UBDs) be used to enrich ubiquitinated proteins, and what are typical pitfalls?
A: UBDs (e.g., UIM, UBA domains) are used in affinity purification to isolate ubiquitinated proteins. Common pitfalls include low binding affinity or co-purification of non-ubiquitinated proteins. To optimize:
- Use tandem UBD constructs (e.g., GST-tandem UIM) for higher avidity.
- Incubate lysates with UBD-coupled beads (e.g., glutathione sepharose for GST-UBD) for 2-4 hours at 4°C with gentle agitation.
- Wash beads stringently with high-salt buffers (e.g., 500 mM NaCl) to reduce nonspecific interactions.
- Elute with SDS sample buffer or competitive eluents like ubiquitin peptides (1-2 mg/mL).
Experimental Protocol: UBD-Based Enrichment Assay
- UBD Preparation: Express GST-tandem UBD (e.g., from Vps27) in E. coli and purify using glutathione sepharose 4B.
- Lysate Preparation: Lyse cells in NP-40 buffer (50 mM Tris-HCl pH 7.5, 150 mM NaCl, 1% NP-40) with protease inhibitors and 10 mM N-ethylmaleimide (to inhibit DUBs).
- Incubation: Incubate 1 mg of lysate with 50 µL GST-UBD beads for 3 hours at 4°C.
- Washing: Wash beads 3x with lysis buffer containing 500 mM NaCl, then 1x with low-salt buffer.
- Elution: Boil beads in 2x Laemmli buffer for 10 minutes to elute proteins.
- Analysis: Analyze by SDS-PAGE and immunoblotting with Ub antibodies.
Diagrams
Diagram 1: Ubiquitin Immunoblotting Workflow
Diagram 2: Ubiquitination Signaling Pathway
Diagram 3: UBD Enrichment Strategy
The Scientist's Toolkit
Table 3: Essential Research Reagents for Ubiquitin Experiments
| Reagent | Function | Example Product |
|---|---|---|
| Anti-Ubiquitin Antibody | Detects ubiquitinated proteins in blots | Monoclonal FK2 (Millipore) |
| His-Tagged Ubiquitin | For pull-down assays and reconstitution | Recombinant Human His-Ub (R&D Systems) |
| GST-Tandem UBD Protein | Enriches ubiquitinated proteins via affinity | GST-Tandem UIM (Vps27) |
| Proteasome Inhibitor | Prevents degradation of ubiquitinated proteins | MG132 (Sigma-Aldrich) |
| Deubiquitinase Inhibitor | Preserves ubiquitin signals | N-ethylmaleimide (NEM) |
| Nickel-NTA Resin | Binds His-tagged ubiquitin for purification | Ni-NTA Superflow (Qiagen) |
| PVDF Membrane | High binding capacity for high MW proteins | Immobilon-P (Millipore) |
| ECL Substrate | Chemiluminescent detection for blots | Clarity ECL (Bio-Rad) |
Solving Common Problems: From Smeared Bands to Weak Signals
Troubleshooting Poor Transfer Efficiency and Incomplete Protein Migration
In immunoblotting research focused on high molecular weight (HMW) ubiquitinated proteins, efficient transfer from gel to membrane is a pivotal yet challenging step. Poor transfer efficiency and incomplete protein migration can significantly compromise data quality, leading to weak signals, false negatives, and unreliable quantification. This guide addresses the specific challenges researchers face when working with HMW protein complexes, providing targeted troubleshooting methodologies to optimize transfer conditions and ensure reproducible results.
Frequently Asked Questions
What are the primary causes of poor transfer efficiency for HMW ubiquitinated proteins? The main causes include: (1) Gel pore size restriction – HMW proteins get trapped in standard-percentage gels; (2) Inefficient transfer parameters – standard transfer times and voltages are insufficient for large proteins to migrate; (3) Suboptimal buffer composition – methanol content that is too high can shrink gel pores and impede HMW protein elution [3] [43].
How can I confirm whether my transfer was inefficient? Several direct methods can verify transfer efficiency:
- Post-transfer gel staining: Stain the SDS-PAGE gel with Coomassie Blue after transfer. Significant protein remaining in the gel indicates incomplete transfer [20] [22].
- Ponceau S membrane staining: Reversible staining of the membrane post-transfer reveals the total protein pattern and confirms successful migration from the gel [9].
- Dual-membrane technique: Place a second membrane behind the first during transfer. Protein detection on the second membrane indicates "blow-through" from over-transfer [22].
My HMW proteins won't transfer, but smaller proteins do. What should I optimize first? For HMW proteins (>150 kDa), prioritize these optimizations:
- Increase transfer time: Extend transfer durations [3] [34].
- Modify buffer composition: Add SDS (0.01-0.1%) to facilitate protein elution and reduce methanol to 10-15% to minimize gel pore shrinkage [5] [43].
- Use appropriate gel chemistry: Switch to low-percentage Tris-acetate gels (e.g., 3-8%) for better separation and transfer of HMW proteins [3].
Why do I see uneven or "smiling" bands on my blot after transfer? Uneven bands typically result from heat generation during transfer causing irregular protein migration. This can be caused by buffer with excessively high ionic strength or incorrect buffer pH. To resolve, ensure proper buffer preparation and use a cooling system or perform transfers at 4°C [9] [5].
Troubleshooting Guide
Problem: Incomplete Transfer of High Molecular Weight Proteins
| Possible Cause | Diagnostic Method | Solution |
|---|---|---|
| Gel Entrapment | Proteins remain at top of gel with Coomassie post-stain [3]. | Use low-percentage (3-8%) Tris-acetate gels for better separation and transfer [3]. |
| Insufficient Transfer Time | Pre-stained ladder bands for HMW standards remain in gel [22]. | Increase transfer time: O/N (12-16 hr) for wet transfer; 8-12 min for rapid dry transfer [3] [34]. |
| High Methanol Buffer | Poor transfer efficiency confirmed via post-stain; affects proteins >100 kDa [5] [43]. | Reduce methanol to 5-10%; add SDS (0.01-0.1%) to transfer buffer [43]. |
| Inefficient Transfer Method | Inconsistent transfer across different protein sizes [24] [34]. | For HMW proteins, use wet/tank transfer over semi-dry methods [24]. |
Problem: Complete or Partial Loss of Proteins Through Membrane ("Blow-Through")
| Possible Cause | Diagnostic Method | Solution |
|---|---|---|
| Over-Transfer | Protein detected on a second membrane placed behind the primary membrane [22]. | Reduce transfer time in 15-30 minute increments; avoid excessive voltage [5]. |
| Membrane Pore Size Too Large | Loss of low molecular weight proteins (<15-20 kDa); small proteins missing [5] [43]. | Use 0.2 µm pore size membranes instead of standard 0.45 µm [5] [43]. |
| Methanol Concentration Too Low | Proteins, especially small ones, pass through membrane; confirmed with dual-membrane test [5]. | Increase methanol to 15-20% to enhance protein binding to PVDF/nitrocellulose [5]. |
Problem: Uneven or Distorted Transfer Patterns
| Possible Cause | Diagnostic Method | Solution |
|---|---|---|
| Air Bubbles | Blank, circular spots on Ponceau S-stained membrane [9]. | Roll a glass tube or pipette over each layer during sandwich assembly [34]. |
| Improper Gel-Membrane Contact | Swirling, diffuse, or wavy banding patterns [5]. | Replace worn blotting pads/filter paper; ensure proper sandwich compression [5]. |
| Overheating | "Smiling" bands, distorted patterns, gelatinous melted gel [9] [5]. | Use a cooling system or perform transfer at 4°C; check buffer concentration and pH [5] [34]. |
Experimental Protocols
Protocol 1: Optimizing Transfer Efficiency for HMW Proteins (>150 kDa)
This protocol systematically addresses the challenge of transferring large protein complexes, such as ubiquitinated proteins, which are frequently encountered in proteasome and signaling research [3] [43].
Materials:
- Gel Chemistry: 3-8% Tris-acetate gels [3]
- Transfer Buffer: Towbin buffer (25 mM Tris, 192 mM glycine) with 10% methanol and 0.01% SDS [43]
- Membrane: PVDF or nitrocellulose, 0.45 µm [24]
- Transfer System: Wet/tank transfer apparatus [24]
Method:
- Post-Electrophoresis Gel Equilibration: Incubate gel in transfer buffer for 10-15 minutes [3].
- Membrane Preparation: Pre-wet PVDF membrane in 100% methanol for 15 seconds, then equilibrate in transfer buffer [34].
- Sandwich Assembly: Assemble transfer stack in this sequence (cathode to anode):
- Sponge
- Filter paper
- Gel
- Membrane
- Filter paper
- Sponge Roll carefully with glass tube to eliminate air bubbles [34].
- Transfer Conditions:
- Efficiency Verification: Stain gel with Coomassie Blue post-transfer to confirm protein removal [22].
Protocol 2: Dual-Membrane Transfer Test for Optimization
This diagnostic protocol determines optimal transfer time and detects "blow-through" of proteins through the membrane [22].
Materials:
- Two identical membranes (PVDF or nitrocellulose)
- Standard transfer buffer
- Ponceau S stain or immunoblotting reagents
Method:
- Sandwich Assembly: Create transfer stack with two membranes placed sequentially behind the gel.
- Transfer: Run under standard conditions.
- Analysis: After transfer, separate and label membranes ("primary" and "secondary").
- Detection: Process both membranes identically through immunoblotting or stain with Ponceau S.
- Interpretation:
- Ideal: Strong signal on primary membrane, minimal on secondary.
- Under-transfer: Significant protein remaining in gel (confirmed by gel staining).
- Over-transfer: Strong signal on secondary membrane [22].
Research Reagent Solutions
| Reagent | Function & Application | Special Considerations |
|---|---|---|
| Tris-Acetate Gels (3-8%) | Optimized pore size for HMW protein separation and transfer [3]. | Superior to Bis-Tris or Tris-glycine for proteins >150 kDa [3]. |
| PVDF Membrane | High binding capacity for proteins; mechanical strength for reprobing [24]. | Requires pre-wetting in methanol; higher background potential [24] [22]. |
| Nitrocellulose Membrane | Traditional choice with strong protein affinity [24]. | No methanol pre-treatment; suitable for most applications except very small proteins [24]. |
| Towbin Transfer Buffer | Standard buffer (25 mM Tris, 192 mM glycine) with 20% methanol [44]. | Methanol concentration should be adjusted (5-20%) based on protein size [43]. |
| CAPS Transfer Buffer | (10 mM CAPS, 20% methanol, pH 11.0) for proteins >50 kDa [44]. | Especially useful for high molecular weight and basic proteins [44]. |
| SDS (0.01-0.1%) | Added to transfer buffer to facilitate elution of HMW proteins from gel [43]. | Higher concentrations can prevent protein binding to membrane [5]. |
Experimental Workflow for Transfer Optimization
The following diagram illustrates the systematic approach to troubleshooting and optimizing protein transfer.
Transfer Method Comparison
Key Technical Recommendations
For researchers focusing on HMW ubiquitinated proteins, these evidence-based recommendations will significantly improve transfer efficiency:
- Gel Selection is Critical: Use 3-8% Tris-acetate gels specifically designed for HMW proteins rather than standard Tris-glycine gels [3].
- Buffer Optimization: Implement a transfer buffer with reduced methanol (5-10%) and added SDS (0.01-0.02%) for HMW proteins [43].
- Extended Transfer Times: For wet transfer, run for 3-4 hours at 70V or overnight at 30V for proteins >100 kDa [34] [43].
- Verification Methods: Always confirm transfer efficiency using post-transfer gel staining or dual-membrane techniques before proceeding to detection [22].
Systematic optimization of these parameters will ensure complete and efficient transfer of HMW ubiquitinated proteins, providing reliable data for your immunoblotting research and drug development applications.
Troubleshooting Guides
Why am I seeing smearing or high background on my blot?
Problem: Diffuse, nonspecific bands or high background obscuring results for high molecular weight ubiquitinated proteins.
| Possible Cause | Solutions & Rationale |
|---|---|
| Antibody concentration too high [8] | Decrease concentration of primary and/or secondary antibody to reduce nonspecific binding. |
| Too much protein loaded [8] | Reduce the amount of total protein lysate loaded per lane. Perform a protein gradient to determine the optimal, linear range for your detection system [13]. |
| Incomplete transfer [8] | For high molecular weight proteins (>100 kDa), add 0.01–0.05% SDS to the transfer buffer to help pull proteins from the gel [8]. Consider using a wet transfer method with an extended transfer time for better efficiency [13]. |
| Overheating during electrophoresis [13] | Run the gel at a lower voltage (e.g., 10-15 V/cm of gel). If overheating persists, run the gel in a cold room or use ice packs in/around the gel box to prevent protein aggregation and "smiley face" gels [13]. |
| Protein aggregation during sample prep [8] [13] | Avoid boiling samples at 95°C if aggregation is suspected. Instead, incubate at 70°C for 10-20 minutes or at 37°C for 30-60 minutes [13]. Shear genomic DNA by sonication to reduce sample viscosity [8]. |
How can I optimize sample preparation to prevent aggregation?
Problem: Protein aggregation during sample preparation leads to uneven lanes and poor resolution.
| Issue to Diagnose | Optimization Strategy |
|---|---|
| Sample Viscosity & DNA Contamination [8] | Shear genomic DNA by sonication or benzonase treatment to reduce viscosity before loading the sample. |
| High Salt Concentration [8] | Ensure salt concentration does not exceed 100 mM. Perform dialysis or use a concentrator to desalt and resuspend samples in a lower-salt buffer. |
| Incompatible Lysis Buffer [8] | High concentrations of nonionic detergents (e.g., Triton X-100) can interfere with SDS-PAGE. Maintain an SDS to nonionic detergent ratio of at least 10:1. Dilute samples to lower the final concentration of lysis buffer. |
| Incorrect Sample Heating [13] | If proteins aggregate at 95°C, alter the incubation temperature. Use a longer incubation (10–20 min) at 70°C, or a lengthier incubation (30–60 min) at 37°C. |
What are the best transfer methods for high molecular weight ubiquitinated proteins?
Problem: Inefficient transfer of large protein complexes leads to weak or no signal.
| Transfer Challenge | Recommended Solution |
|---|---|
| Proteins not transferring from gel [8] [13] | Method: Use a wet transfer system for better efficiency with large proteins [13]. Buffer: Add 0.01-0.05% SDS to the transfer buffer to increase protein mobility [8]. Membrane: Use a 0.45 µm pore size membrane for larger proteins [13]. |
| Over-transfer of small proteins [13] | Method: A semi-dry transfer may be sufficient and can prevent small proteins from passing through the membrane. Buffer: Increase the amount of alcohol (methanol) and decrease SDS in the transfer buffer to slow small proteins and improve membrane binding [13]. |
| Confirming Transfer Efficiency [8] [13] | After transfer, stain the gel with a total protein stain (e.g., Coomassie) to confirm proteins left the gel. Alternatively, use a reversible membrane stain (e.g., Ponceau S) to confirm successful protein capture on the membrane [8] [13]. |
Experimental Protocols
Protocol: Optimizing Sample Preparation for High Molecular Weight Proteins
This protocol is designed to minimize protein aggregation and maintain the integrity of high molecular weight ubiquitinated complexes.
Cell Lysis:
- Perform all steps at 4°C or on ice.
- Lyse cells using RIPA or an appropriate SDS-containing detergent buffer [13].
- Include a protease inhibitor cocktail and phosphatase inhibitors in the lysis buffer to prevent degradation [13].
- For nuclear or DNA-binding proteins, sonicate lysates on ice to shear genomic DNA and release bound proteins [8] [13].
Sample Denaturation:
- Mix lysate with an appropriate volume of 2X or 4X SDS-PAGE sample buffer.
- Instead of boiling at 95°C, incubate the samples at 70°C for 10–20 minutes [13]. This gentler heating helps prevent the aggregation of large protein complexes while ensuring denaturation.
Post-Prep Clarification:
- Centrifuge the denatured samples at >12,000 x g for 5-10 minutes to pellet any insoluble aggregates.
- Carefully transfer the supernatant to a new tube for gel loading.
Protocol: Wet Transfer for High Molecular Weight Proteins
This protocol uses SDS-enhanced buffer and extended transfer time to efficiently move large proteins onto the membrane.
Gel Equilibration: After electrophoresis, equilibrate the gel in cold transfer buffer for 5-10 minutes.
Membrane Preparation:
- For PVDF membrane, activate it by briefly soaking in 100% methanol, then rinse in transfer buffer.
- For nitrocellulose, hydrate in transfer buffer.
- Mark the membrane with a pencil in a corner for orientation [13].
Transfer Stack Assembly (Cathode to Anode):
- Cathode (-): Sponge / Filter paper / Gel / Membrane / Filter paper / Sponge
- Ensure no air bubbles are trapped between the gel and membrane.
Transfer Conditions:
- Buffer: Standard Tris-Glycine transfer buffer with 20% methanol, supplemented with 0.02% SDS [8] [13].
- Temperature: Perform the transfer in a cold room or submerge the transfer apparatus in an ice-water bath.
- Settings: Use a constant 100V for 90 minutes or a lower voltage (e.g., 30V) overnight for very large complexes (>250 kDa) [8] [13].
Post-Transfer Validation:
- Stain the membrane with a reversible protein stain like Ponceau S to confirm uniform transfer and total protein loading [13].
Visualizing the Troubleshooting Workflow
The following diagram outlines a logical, step-by-step process for diagnosing and resolving smearing in western blots.
The Scientist's Toolkit: Research Reagent Solutions
| Reagent / Material | Function in Experiment |
|---|---|
| Protease Inhibitor Cocktail | Added to lysis buffer to prevent protein degradation by cellular proteases during sample preparation [13]. |
| SDS-PAGE Sample Buffer (with DTT/β-ME) | Denatures proteins and adds a negative charge for electrophoresis. Keep final [DTT] < 50 mM to prevent shadowing [8]. |
| RIPA Lysis Buffer | An SDS-containing detergent buffer effective for lysing cells and solubilizing membrane-bound or nuclear proteins [13]. |
| 0.45 µm Pore Size Membrane (PVDF/Nitrocellulose) | Standard pore size for efficient capture of high molecular weight proteins during transfer [13]. |
| Ponceau S Stain | A reversible stain used post-transfer to quickly visualize protein bands on the membrane and confirm transfer efficiency [13]. |
| Tris-Buffered Saline with Tween 20 (TBST) | Common wash and antibody dilution buffer. The Tween 20 (0.05%) helps minimize nonspecific binding and background [8]. |
| Protein-free Blocking Buffer | For detecting phosphoproteins or when using avidin-biotin systems, as milk contains phosphoproteins and biotin that cause high background [8]. |
Frequently Asked Questions (FAQs)
My high molecular weight ubiquitinated protein is not transferring well. What can I do?
Inefficient transfer is a common hurdle. To improve the transfer of large complexes, modify your transfer buffer by adding 0.01–0.05% SDS. This increases the negative charge on the proteins, helping pull them from the gel [8]. Additionally, switch to a wet transfer system and use a longer transfer time, potentially overnight at a low voltage [8] [13]. Always confirm transfer efficiency by staining your gel post-transfer or using a reversible stain on your membrane [8].
I suspect my samples are aggregating. How can I change my sample prep?
Protein aggregation can be mitigated by altering the sample denaturation temperature. Avoid boiling at 95°C. Instead, incubate your samples at 70°C for 10–20 minutes, or even at 37°C for 30–60 minutes [13]. Furthermore, if your sample is viscous, it may be contaminated with genomic DNA. Shearing the DNA by brief sonication before loading will reduce viscosity and prevent aggregation that affects migration [8].
My blot has a high background. How can I reduce it?
High background is often related to antibody concentration or blocking conditions. First, titrate your primary and secondary antibodies; high concentrations are a common cause of background [8]. Second, ensure you are using a compatible blocking buffer. For example, do not use milk-based blockers when detecting phosphoproteins or with avidin-biotin systems. Instead, use BSA or a protein-free blocker in Tris-buffered saline [8]. Finally, do not skimp on blocking time; block for at least one hour at room temperature [13].
What are the key differences when detecting ubiquitinated proteins vs. regular western blotting?
Ubiquitinated proteins, especially poly-ubiquitinated chains, can form very high molecular weight complexes that are prone to aggregation and difficult to transfer. This places a greater emphasis on gentle sample preparation (avoiding boiling) and optimized transfer protocols for high molecular weight species [45] [46]. Furthermore, the dynamic nature of ubiquitination, which is counterbalanced by deubiquitinating enzymes (DUBs), means sample integrity and the use of appropriate protease and DUB inhibitors during lysis are critical to preserving the ubiquitination state you wish to detect [45].
Technical FAQs and Troubleshooting Guides
FAQ: How does the choice of blocking buffer specifically impact the detection of high molecular weight ubiquitinated proteins?
The choice of blocking buffer is critical, as an inappropriate blocker can mask your target antigen, increase non-specific background, or directly interfere with your detection system. For high molecular weight ubiquitinated proteins, which are often of low abundance and require high sensitivity, this is particularly important [47].
- Milk-Based Blockers: While inexpensive and effective for many applications, non-fat dry milk contains casein (a phosphoprotein) and endogenous biotin [47] [48]. This can lead to high background when detecting phosphoproteins or when using avidin-biotin detection systems. Furthermore, the multitude of proteins in milk can sometimes obstruct the antigenic epitope for your primary antibody, reducing the signal for your target protein [47].
- BSA-Based Blockers: Bovine Serum Albumin (BSA) is a single-protein blocker that is preferred for detecting phosphoproteins and is compatible with biotin-streptavidin systems [47] [49]. However, standard grades of BSA can contain trace amounts of bovine immunoglobulins (IgG) [9] [48]. If your primary antibody was raised in goat or sheep, these antibodies may cross-react with the bovine IgG in the blocker, causing significant background. Using IgG-free, protease-free BSA is recommended to avoid this issue [9] [48].
- Specialized Blockers: Normal serum from the host species of your labeled secondary antibody (e.g., 5% v/v) is an excellent blocking agent that minimizes cross-reactivity [9] [48]. Commercial, purified protein-based blockers (e.g., casein or proprietary formulations) are also excellent choices as they provide consistent, high-performance blocking with fewer chances of cross-reaction [47].
FAQ: What are the primary causes of high background in fluorescent western blotting, and how can they be mitigated?
High background in fluorescent western blotting is often caused by autofluorescence, which can stem from buffers, detergents, or the membrane itself [47] [8].
- Buffer and Detergent Autofluorescence: Phosphate-based buffers (PBS) and common detergents can autofluoresce, increasing non-specific background noise [47] [49]. To mitigate this, use Tris-buffered saline (TBS) instead of PBS for all buffers (washing, blocking, and antibody dilution) [47]. Limit the use of detergents during the blocking step, and ensure all buffers are high-quality and filtered to remove particulates that can settle on the membrane and create fluorescent artifacts [47].
- Membrane Handling: Nitrocellulose membranes generally have lower autofluorescence than PVDF membranes in fluorescent applications [9]. Always handle membranes with gloves or tweezers to avoid contamination, and ensure the membrane does not dry out during incubation steps, as this can increase background [9] [8].
- Antibody Concentration: Excessive concentration of the primary or secondary antibody is a common cause of high background [8] [37]. Titrate both antibodies to determine the optimal concentration that provides a strong specific signal with minimal background. For fluorescent secondaries, the optimal concentration is often between 1–10 μg/mL; higher concentrations can drastically increase background fluorescence [50].
FAQ: Why might my observed protein molecular weight differ from the predicted value, and what does this mean for ubiquitinated proteins?
It is common to observe a difference between the calculated molecular weight of a protein and its migration on a western blot. For ubiquitinated proteins, this discrepancy is expected and can be informative [51].
- Post-Translational Modifications (PTMs): Ubiquitination itself is a PTM that involves the covalent attachment of ubiquitin (a ~8.6 kDa protein) to a target protein [51]. A single ubiquitination event (monoubiquitination) will increase the apparent molecular weight by approximately 8-10 kDa. Proteins can also be modified with chains of ubiquitin (polyubiquitination), leading to even larger shifts, often appearing as a characteristic "ladder" or smear on the blot [51].
- Other Common PTMs: Glycosylation adds significant mass through carbohydrate chains, causing proteins to run higher than predicted [51]. Phosphorylation adds a smaller mass shift (~1 kDa per group) that may not be easily resolved, but multiple phosphorylation events can cause a noticeable shift [51].
- Protein Cleavage: Many proteins are synthesized as inactive precursors (pro-proteins) containing signal peptides or pro-peptides that are cleaved off to form the mature, active protein. This processing results in a mature protein that runs at a lower molecular weight than the full-length precursor [51].
- Protein Complexes: If your sample is not fully denatured, some proteins may remain in stable homo- or hetero-complexes even in the presence of SDS, causing them to run at a much higher molecular weight than the monomeric form. Ensuring complete reduction with fresh DTT or β-mercaptoethanol can help dissociate these complexes [51].
Troubleshooting Guide: Common Western Blot Issues and Solutions
| Observation | Possible Cause | Recommended Solution |
|---|---|---|
| No or Faint Bands [9] [8] [37] | Insufficient antigen transfer (large proteins). | Add SDS (0.01-0.05%) to transfer buffer; increase transfer time/voltage [8]. Stain gel/membrane post-transfer to confirm efficiency [9]. |
| Inadequate antibody concentration or activity. | Increase primary/secondary antibody concentration; include positive control; avoid sodium azide in buffers with HRP [9] [8] [37]. | |
| Blocking buffer masking the epitope. | Reduce blocker concentration, use a different blocker (e.g., BSA instead of milk), or add a wash step after blocking [48]. | |
| High Background [9] [8] [37] | Incomplete or improper blocking. | Use normal serum (5%) from the secondary antibody host species; avoid BSA/milk with anti-goat/sheep antibodies; increase blocking time [9] [48]. |
| Antibody concentration too high. | Titrate primary and secondary antibodies to optimal dilution [9] [8]. For fluorescent secondaries, optimal range is often 1-10 μg/mL [50]. | |
| Insufficient washing. | Increase wash volume, duration, and frequency; include 0.05-0.1% Tween 20 in wash buffer [9] [8]. | |
| Non-Specific or Extra Bands [9] [51] [8] | Non-specific antibody binding. | Use antigen-affinity purified primary antibodies; run a secondary-only control; optimize salt concentration (0.15-0.5M NaCl) in antibody solutions [8] [37]. |
| Protein degradation or aggregation. | Use fresh protease inhibitors; briefly centrifuge samples before loading; ensure complete reduction with fresh DTT/β-mercaptoethanol [51] [37]. | |
| Protein isoforms or PTMs. | Consult literature/databases for known isoforms or modifications (e.g., glycosylation, ubiquitination). These can cause multiple specific bands [51]. | |
| Smearing or Diffuse Bands [8] | Overloaded gel. | Reduce the amount of total protein loaded per lane [8]. |
| Protein aggregation. | Ensure sample is properly reduced and denatured; shear genomic DNA if sample is viscous [8]. | |
| Inefficient transfer. | Ensure good contact in transfer stack; expel all air bubbles [9]. |
Experimental Protocols for Optimization
Protocol 1: Titration of Primary and Secondary Antibodies
Purpose: To determine the optimal concentration of primary and secondary antibodies that yields the strongest specific signal with the lowest background, thereby maximizing the signal-to-noise (S/N) ratio [50].
Materials:
- Blocked membrane with transferred protein (positive and negative control lysates are ideal).
- Primary antibody stock.
- Secondary antibody stock (HRP-conjugated or fluorescently conjugated).
- Appropriate blocking buffer (e.g., TBST with 1% BSA or a compatible commercial blocker).
- Wash buffer (TBST or TBST).
- Detection reagents (e.g., ECL substrate or fluorescence imager).
Method:
- Prepare Antibody Dilutions: Prepare a series of dilutions for the primary antibody (e.g., 1:500, 1:1000, 1:2000, 1:5000) in blocking buffer. Similarly, prepare dilutions for the secondary antibody (e.g., 1:1000, 1:2500, 1:5000, 1:10000). The optimal concentration for many fluorescent secondary antibodies falls between 1–10 μg/mL [50].
- Incubate with Primary Antibody: Cut the membrane into strips, each containing your positive and negative control lanes. Incubate each strip with a different dilution of the primary antibody for 1 hour at room temperature or overnight at 4°C with gentle agitation.
- Wash: Wash all membrane strips 3-5 times for 5 minutes each with wash buffer.
- Incubate with Secondary Antibody: Incubate each strip with a different dilution of the secondary antibody for 1 hour at room temperature protected from light (if fluorescent).
- Wash and Detect: Wash again as in step 3. Proceed with your chosen detection method.
- Analysis: Identify the antibody combination that provides the strongest specific signal for your target protein with the cleanest background in the negative control. Use this combination for future experiments.
Protocol 2: Systematic Evaluation of Blocking Buffers
Purpose: To empirically determine the most effective blocking buffer for a specific antibody-antigen pair, which is crucial for sensitive detection of low-abundance targets like high molecular weight ubiquitinated proteins [47].
Materials:
- Membrane with transferred protein (a dilution series of a positive control lysate is optimal).
- Candidate blocking buffers (e.g., 5% non-fat milk in TBST, 2-5% BSA in TBST, 5% normal serum in TBST, and a commercial blocking buffer).
- Validated primary and secondary antibodies at their optimized concentrations.
Method:
- Block: Cut the membrane into sections. Block each section with a different candidate blocking buffer for 1 hour at room temperature with agitation.
- Probe with Antibodies: Incubate all sections with the same diluted primary antibody (prepared in a neutral buffer like TBST or the respective blocking buffer) followed by the diluted secondary antibody, using consistent wash steps between incubations.
- Detect and Compare: Detect the signal and compare the results. An ideal blocking buffer will show:
- High Sensitivity: A strong, clear signal for your target protein, even at low loading amounts.
- Low Background: Minimal to no signal in the negative control lanes or in areas of the membrane without protein.
- No Masking: The blocker should not prevent the antibody from binding to its epitope.
Experimental Workflows and Signaling Pathways
S/N Optimization Workflow
Ubiquitin Detection Logic
The Scientist's Toolkit: Research Reagent Solutions
| Reagent | Function / Rationale |
|---|---|
| IgG-Free BSA [47] [48] | A single-protein blocking agent essential for phosphoprotein detection and biotin-free systems. The IgG-free grade prevents background with antibodies raised in related species (e.g., goat, sheep). |
| Normal Serum [9] [48] | Serum from the host species of the secondary antibody (e.g., 5% v/v). Often the most effective blocker to prevent non-specific binding of the secondary antibody. |
| Tween 20 [9] [47] [8] | A non-ionic detergent added (0.05-0.1%) to buffers (TBST/PBST) to reduce hydrophobic interactions and non-specific binding, lowering background in both washing and antibody incubation steps. |
| Cross-Adsorbed Secondary Antibodies [8] | Secondary antibodies that have been purified to remove antibodies that could cross-react with immunoglobulins from other species. Critical for multiplex blots and reducing non-specific bands. |
| Protease Inhibitor Cocktails [51] [37] | Added to lysis buffers to prevent protein degradation by endogenous proteases during sample preparation, which can cause smearing or unexpected lower molecular weight bands. |
| PNGase F [51] | An enzyme used in deglycosylation experiments to remove N-linked glycans. Used to confirm if a higher molecular weight shift is due to glycosylation. |
| Anti-Ubiquitin Antibodies [51] | Specific antibodies for detecting ubiquitin. Can be used to confirm the identity of high molecular weight smears/ladders as ubiquitinated species. |
Accurate analysis of high molecular weight (HMW) ubiquitinated proteins via immunoblotting is often compromised by two major experimental artifacts: protein degradation and deubiquitination during sample preparation. The ubiquitin-proteasome system (UPS) and deubiquitinating enzymes (DUBs) remain highly active in cell lysates, potentially altering the ubiquitination status of your proteins of interest before detection. This guide provides targeted troubleshooting strategies to prevent these artifacts, ensuring the reliability of your data within the broader context of ubiquitination research.
Frequently Asked Questions (FAQs)
FAQ 1: Why are proteasome inhibitors and DUB inhibitors necessary in my lysis buffer when studying ubiquitination? Even after cell lysis, active proteasomes can degrade polyubiquitinated proteins, while DUBs can catalyze the removal of ubiquitin chains from your substrates. This can lead to the loss of signal or misleading patterns on your western blot. Using inhibitors preserves the native ubiquitination state of proteins at the moment of lysis [52] [53] [54].
FAQ 2: I still get smeared or weak signals for high molecular weight ubiquitinated proteins, even with inhibitors. What could be wrong? This is a common challenge. The issue may lie not in your inhibitors, but in the inefficient transfer of these large proteins from the gel to the membrane. HMW proteins (>150 kDa) transfer poorly with standard western blot protocols. Please refer to the "Troubleshooting Guide" below for optimized transfer conditions [3].
FAQ 3: How can I confirm that my DUB inhibitor is working effectively in a cellular context? While direct cellular validation can be complex, you can use a functional assay. Treat cells with your inhibitor, harvest lysates, and look for an accumulation of high molecular weight, polyubiquitinated proteins via western blotting. A successful inhibition should result in a stronger, smeared signal in the high MW range compared to the untreated control [53] [54].
Troubleshooting Guide: Common Problems and Solutions
Problem: Faint or Absent Signal for Polyubiquitinated Proteins
| Potential Cause | Recommended Solution | Principle |
|---|---|---|
| Protein Degradation Post-Lysis | Add a combination of proteasome inhibitors (e.g., MG132 at 10-20 µM) to the lysis buffer immediately. | MG132 is a potent, reversible proteasome inhibitor that prevents the degradation of polyubiquitinated proteins, allowing for their accumulation and detection [52]. |
| Deubiquitination Post-Lysis | Include a broad-spectrum DUB inhibitor (e.g., 1-10 µM of a cell-permeable inhibitor like PR-619) in your lysis buffer. | DUB inhibitors prevent the cleavage of ubiquitin chains from protein substrates, thereby preserving the polyubiquitin signal [53] [54]. |
| Inhibitor Instability | Prepare fresh inhibitor stocks and add them to pre-chilled lysis buffer immediately before use. Ensure the lysis buffer is kept on ice. | Many inhibitors are unstable at room temperature or in aqueous solutions for prolonged periods. |
Problem: Poor Transfer of High Molecular Weight Ubiquitinated Proteins
| Potential Cause | Recommended Solution | Principle |
|---|---|---|
| Inefficient Transfer from Gel | Use a low-percentage Tris-acetate gel (e.g., 3-8%) instead of a standard Tris-glycine gel. | Tris-acetate gels have a more open matrix that allows large proteins to migrate farther and be transferred more efficiently [3]. |
| Insufficient Transfer Time | Increase the transfer time. For a rapid dry transfer system (e.g., iBlot 2), increase time from 7 min to 8-10 min at 25V. | HMW proteins migrate more slowly and require more time to exit the gel and bind to the membrane [3]. |
| Suboptimal Gel Chemistry | If not using a Tris-acetate gel, add a gel equilibration step in 20% ethanol for 5-10 minutes before transfer. | Ethanol removes buffer salts and can help shrink the gel, improving the transfer efficiency of HMW proteins [3]. |
Detailed Experimental Protocol
Validating Proteasome Inhibitor Efficacy Using MG132
This protocol assesses the effectiveness of MG132 in inducing the accumulation of polyubiquitinated proteins by disrupting proteostasis.
Materials:
- Cell line of interest (e.g., breast cancer cell lines as in [52])
- Proteasome inhibitor: MG132 (prepared in DMSO as a stock solution)
- Lysis Buffer (RIPA buffer supplemented with fresh protease inhibitors and DUB inhibitors)
- Standard Western Blot equipment and reagents
- Antibodies: Anti-polyubiquitin antibody, anti-β-Actin (loading control)
Method:
- Cell Treatment: Culture cells and split into two treatment groups.
- Experimental Group: Treat with 10-20 µM MG132 for 4-6 hours.
- Control Group: Treat with an equal volume of DMSO vehicle.
- Cell Lysis: Harvest cells using ice-cold, supplemented lysis buffer. Incubate on ice for 15-30 minutes, then centrifuge at 14,000 x g for 15 minutes at 4°C to clear the lysate.
- Protein Quantification and Immunoblotting:
- Determine protein concentration of the supernatant.
- Separate 20-40 µg of total protein by SDS-PAGE. For optimal resolution of HMW proteins, use a 3-8% Tris-acetate gel [3].
- Transfer proteins to a nitrocellulose membrane using an extended transfer time (8-10 minutes for dry systems) [3].
- Probe the membrane with an anti-polyubiquitin antibody.
- Expected Outcome: Successful MG132 treatment will result in a significant increase in high molecular weight smearing on the immunoblot from the experimental group, indicating accumulation of polyubiquitinated proteins, compared to the faint signal in the DMSO control [52].
Workflow Diagram: Proteasome Inhibition & Detection
Signaling Pathways in Proteostasis Disruption
Combining proteasome and DUB inhibitors can synergistically disrupt protein homeostasis (proteostasis), leading to cell death, a promising strategy in cancer research. The following diagram illustrates the key signaling pathways involved.
Pathway Diagram: Proteotoxicity & Apoptosis
The Scientist's Toolkit: Key Research Reagents
The following table lists essential reagents for studying ubiquitination and preventing artifacts.
| Reagent | Function & Mechanism | Example & Key Details |
|---|---|---|
| Proteasome Inhibitors | Reversibly or irreversibly block the catalytic activity of the 20S proteasome, preventing the degradation of polyubiquitinated proteins. | MG132: A potent, reversible, and cell-permeable aldehyde peptide inhibitor. Commonly used at 10-20 µM in cell culture [52]. |
| DUB Inhibitors | Inhibit the activity of deubiquitinating enzymes, preventing the cleavage of ubiquitin chains from protein substrates and stabilizing ubiquitin signals. | PR-619: A broad-spectrum, cell-permeable inhibitor of many cysteine-dependent DUBs. Used at 1-10 µM in cell-based assays [53] [54]. |
| Specialized Gels | Provide a larger pore size for better separation and resolution of high molecular weight (HMW) proteins during SDS-PAGE. | Tris-Acetate Gels (e.g., 3-8%): Recommended over standard Tris-Glycine gels for superior separation and transfer of proteins >150 kDa [3]. |
| Ubiquitin Probes | Activity-based probes used for profiling DUB activity and specificity in vitro or in complex samples. | Diubiquitin Isomers: Unmodified diubiquitin chains (e.g., K48, K63-linked) used as physiological substrates in DUB activity assays [54]. |
The integrity of ubiquitination research, particularly for high molecular weight proteins, hinges on robust experimental design. The consistent use of fresh, effective proteasome and DUB inhibitors is non-negotiable for preserving the native state of your proteins. Furthermore, coupling this with optimized electrophoretic and transfer techniques specifically designed for HMW targets will ensure that your immunoblots accurately reflect the cellular reality, thereby preventing artifacts and yielding reliable, publication-quality data.
This guide provides targeted solutions for researchers detecting high molecular weight (HMW) ubiquitinated proteins, a technically challenging area in immunoblotting. The following FAQs, protocols, and checklists consolidate optimized parameters to improve transfer efficiency and detection sensitivity for your experiments.
Frequently Asked Questions & Troubleshooting
1. Why is my high molecular weight ubiquitinated protein signal weak or absent?
Weak signals for HMW ubiquitinated proteins typically result from inefficient transfer out of the gel or poor antibody accessibility.
- Inefficient Transfer: Proteins >150 kDa migrate slowly and may not fully transfer to the membrane under standard conditions [55] [4]. Solution: Increase transfer time, use low-percentage acrylamide or Tris-acetate gels, and ensure proper membrane pore size [55] [13].
- Poor Antibody Accessibility: Ubiquitination can mask epitopes or alter protein conformation. Solution: Optimize antibody incubation conditions. For ubiquitination detection, ensure lysis buffers contain protease and deubiquitinase inhibitors (e.g., N-ethylmaleimide) to preserve modifications.
2. How can I prevent smeared or distorted bands for large proteins?
Smearing often indicates incomplete denaturation, overheating during electrophoresis, or over-transferring.
- Solution: Use fresh reducing agents (DTT or β-mercaptoethanol) in sample buffer and ensure complete denaturation [56] [57]. For proteins that aggregate at 95°C, incubate at 70°C for 10-20 minutes or 37°C for 30-60 minutes [13]. Perform electrophoresis at lower voltages in a cold room or with ice packs to prevent overheating [4] [13].
3. My blot has high background. How can I improve the signal-to-noise ratio?
High background is frequently caused by insufficient blocking or non-optimal antibody concentrations.
- Solution: Extend blocking time to at least one hour at room temperature or overnight at 4°C using a protein-based blocker like 5% non-fat dry milk or BSA [58] [4] [57]. Run antibody concentration gradients to determine the optimal dilution that maximizes signal and minimizes background [13].
Optimized Experimental Parameters for HMW Ubiquitinated Proteins
The tables below summarize key optimized conditions.
Table 1: Gel and Electrophoresis Selection Guide
| Parameter | Standard Condition | Optimized for HMW Proteins (>150 kDa) |
|---|---|---|
| Gel Type | 4-20% Tris-Glycine Gradient | 3-8% Tris-Acetate Gradient [55] [57] |
| Gel Buffer | Tris-Glycine | Tris-Acetate [55] |
| Recommended Total Protein Load | 10-40 µg [57] | ≥20 µg [4] |
| Electrophoresis | Constant 150-200 V | Lower voltage, extended time; cool with ice packs [4] [13] |
Table 2: Transfer Conditions Optimization
| Parameter | Standard Condition | Optimized for HMW Proteins |
|---|---|---|
| Membrane Type | Nitrocellulose or PVDF | PVDF (activated in methanol) [4] |
| Membrane Pore Size | 0.45 µm | 0.2 µm or 0.45 µm [13] |
| Transfer Method | Semi-dry or standard wet transfer | Wet transfer at 4°C [4] [13] |
| Transfer Time | 1 hour (wet) or 7 min (rapid dry) | 8-12 minutes (dry); 60-90 minutes (wet) [55] [4] |
| Buffer Additives | Standard Tris-Glycine buffer | Add 0.1% SDS to help elute large proteins [13] |
Detailed Protocols for Key Experiments
Protocol 1: Optimized Wet Transfer for HMW Proteins
This protocol is designed for the efficient transfer of proteins over 150 kDa [4].
Materials:
- Lysis Buffer (e.g., RIPA) with protease and phosphatase inhibitors [56] [57]
- 3-8% Tris-Acetate or low-percentage Bis-Tris gel [55] [57]
- PVDF membrane (0.45 µm)
- Methanol
- Transfer Buffer: 25 mM Tris, 192 mM Glycine, pH 8.3 [4]
- Pre-chilled (4°C) running and transfer buffers
Steps:
- Sample Preparation: Lyse cells or tissues in cold lysis buffer with inhibitors. Centrifuge to pellet debris and determine protein concentration. Denature samples in Laemmli buffer containing DTT at 70°C for 10-20 minutes to avoid aggregation [57] [13].
- Gel Electrophoresis: Load ≥20 µg total protein per lane on a 3-8% Tris-Acetate gel. Run at a constant, lower voltage (e.g., 150 V) with cooling to prevent overheating and smearing [4] [13].
- Gel Equilibration (Optional but Recommended): After electrophoresis, submerge gel in 20% ethanol for 5-10 minutes with shaking. This removes salts and shrinks the gel for better transfer [55].
- Membrane Activation: Immerse PVDF membrane in 100% methanol for 15 seconds, then equilibrate in transfer buffer for 30 minutes [4].
- Assembly and Transfer: Assemble the gel/membrane sandwich in a wet transfer apparatus filled with pre-chilled transfer buffer. Transfer at high current (e.g., 500 mA) for 1-2 hours at 4°C [4].
- Post-Transfer Validation: Stain the membrane with a reversible protein stain like Ponceau S to confirm efficient transfer and equal loading [58] [13].
Protocol 2: Detecting Protein Ubiquitination
This protocol outlines critical considerations for specifically detecting ubiquitinated proteins, particularly HMW species.
Key Reagents:
- Lysis Buffer: Use strong denaturing buffers (e.g., containing 1% SDS) to disrupt non-covalent interactions and preserve ubiquitination. Include 5-10 mM N-ethylmaleimide (NEM) to inhibit deubiquitinases [59].
- Agarose-Conjugated Ubiquitin Antibodies: For ubiquitinated protein enrichment via immunoprecipitation.
- Primary Antibodies: High-quality anti-ubiquitin antibody and antibody for your protein of interest.
- Secondary Antibodies: HRP- or fluorescently-conjugated antibodies for detection.
Steps:
- Rapid Denaturing Lysis: Lyse cells directly in hot 1% SDS lysis buffer containing NEM to instantly denature enzymes and freeze ubiquitination states.
- Immunoprecipitation (IP): Dilute the lysate with a non-ionic detergent buffer to reduce SDS concentration. Incubate with agarose-conjugated antibody against your target protein to pull down the protein complex.
- Western Blotting: Resuspend IP beads in loading buffer, boil, and run on an optimized HMW protein gel system. Transfer using HMW-optimized conditions. Probe with anti-ubiquitin antibody to detect ubiquitinated forms, which will appear as higher molecular weight smears or discrete bands above the unmodified protein.
The Scientist's Toolkit: Essential Research Reagents
Table 3: Key Reagent Solutions for HMW Ubiquitination Studies
| Reagent | Function | Example & Notes |
|---|---|---|
| Protease Inhibitor Cocktail | Prevents protein degradation during lysis | Use broad-spectrum cocktails (e.g., targeting serine, cysteine, acid proteases) [56] [57]. |
| Phosphatase Inhibitors | Preserves phosphorylation states | Sodium orthovanadate (tyrosine phosphatases), Sodium fluoride (serine/threonine phosphatases) [56]. |
| Deubiquitinase (DUB) Inhibitors | Prevents loss of ubiquitin signal | N-Ethylmaleimide (NEM) is commonly used [59]. |
| Strong Denaturing Lysis Buffer | Efficiently solubilizes HMW complexes, inactivates enzymes | RIPA Buffer or 1% SDS buffer [56]. |
| Tris-Acetate Gels | Superior separation of HMW proteins | 3-8% gradient gels provide a more open matrix than Bis-Tris or Tris-Glycine gels [55]. |
| PVDF Membrane | High protein binding capacity for HMW proteins | Activate with methanol prior to use [4]. |
| Validated Ubiquitin Antibodies | Specific detection of ubiquitin conjugates | Select antibodies validated for western blotting. |
Workflow Visualization
The following diagram illustrates the critical decision points and optimization path for successful immunoblotting of high molecular weight ubiquitinated proteins.
Confirming Specificity: How to Validate Your Ubiquitination Signal
For researchers studying high molecular weight (HMW) ubiquitinated proteins, traditional immunoblotting often presents significant challenges, particularly the frustrating "smear" that can obscure results. This technical support guide explores advanced validation techniques that move beyond conventional western blotting to provide more precise, comprehensive analysis of the ubiquitinome. We focus on mass spectrometry (MS)-based proteomics for system-wide ubiquitination profiling and optimized western blotting protocols specifically designed for HMW ubiquitinated proteins, enabling more reliable research outcomes in drug development and basic science.
MS-Based Proteomics for Ubiquitinome Analysis
Frequently Asked Questions
What is the primary advantage of MS-based proteomics for studying ubiquitination? MS-based proteomics enables the unbiased, system-wide identification and quantification of ubiquitination sites, unlike antibody-based methods which target specific proteins or ubiquitin chain types. Modern workflows can identify over 70,000 unique ubiquitinated peptides in single MS runs, providing a comprehensive view of ubiquitination signaling networks [60].
How does DIA-MS improve upon traditional DDA methods for ubiquitinomics? Data-Independent Acquisition (DIA) MS coupled with neural network-based data processing (DIA-NN) significantly outperforms traditional Data-Dependent Acquisition (DDA) methods. DIA more than triples identification numbers (to ~70,000 ubiquitinated peptides versus ~21,434 with DDA) while dramatically improving quantitative precision and reproducibility across sample replicates [60].
What sample preparation method yields the best results for ubiquitinome profiling? Sodium deoxycholate (SDC)-based lysis buffer supplemented with chloroacetamide (CAA) outperforms conventional urea-based buffers, yielding approximately 38% more ubiquitinated peptide identifications with better reproducibility. The protocol involves immediate sample boiling after lysis to rapidly inactivate deubiquitinases (DUBs) and preserve the native ubiquitination state [60].
Can MS methods distinguish between different ubiquitin chain linkages? Yes, advanced MS workflows can characterize ubiquitin chain architecture, including homotypic chains (K48, K63, etc.), mixed linkages, and branched chains. This is crucial as different linkage types encode distinct cellular signals—K48-linked chains often target proteins for proteasomal degradation, while K63-linked chains typically regulate protein-protein interactions and kinase activation [61] [62].
Experimental Protocol: Deep Ubiquitinome Profiling by DIA-MS
- Cell Lysis and Protein Extraction: Use SDC lysis buffer (2% SDC, 100 mM Tris-HCl pH 8.5, 10 mM TCEP, 40 mM CAA) with immediate sample boiling at 95°C for 10 minutes to denature proteins and inactivate DUBs [60].
- Protein Digestion: Digest proteins with Lys-C (1:100 enzyme-to-protein ratio) for 3 hours at 37°C, followed by trypsin digestion (1:50 ratio) overnight at 37°C [60].
- Peptide Cleanup: Acidify samples to pH < 3 with trifluoroacetic acid (TFA), precipitate SDC by centrifugation, and desalt peptides using C18 solid-phase extraction cartridges [60].
- K-ε-GG Peptide Enrichment: Enrich diglycine (K-ε-GG) remnant peptides using anti-K-ε-GG antibody-conjugated beads. Incubate peptides with beads for 2 hours at room temperature, wash extensively, and elute with 0.2% TFA [60] [62].
- LC-MS Analysis: Analyze enriched peptides using a nanoflow liquid chromatography system coupled to a high-resolution mass spectrometer. Employ a 75-minute organic solvent gradient for peptide separation [60].
- Data Acquisition: Use DIA methods with optimized mass isolation windows (see Table 1 for specific parameters). Set MS1 resolution to 120,000 and MS2 resolution to 30,000 [60].
- Data Processing: Process raw data using DIA-NN software in "library-free" mode against appropriate protein sequence databases. Use the built-in scoring module for modified peptides to ensure confident identification of K-GG peptides [60].
Table 1: Quantitative Performance Comparison of Ubiquitinomics Methods
| Method Parameter | Traditional DDA-MS | Advanced DIA-MS | Ub-Tagging Approach |
|---|---|---|---|
| Typical Peptide IDs | ~21,000 peptides/sample | ~68,000 peptides/sample | ~750 sites (Strep-tag) [62] |
| Quantitative Precision | Moderate (high missing values) | Excellent (median CV ~10%) | Variable |
| Throughput | Medium | High | Medium |
| Key Advantage | Established methodology | Comprehensive coverage, precision | Genetic targeting possible |
| Main Limitation | Limited reproducibility in large series | Complex data processing | Cannot be used in human tissues |
Research Reagent Solutions for Ubiquitinomics
- Anti-K-ε-GG Antibody: Enables immunoaffinity purification of ubiquitinated peptides from complex tryptic digests; essential for MS-based ubiquitinome studies [60] [62].
- SDC Lysis Buffer: Superior detergent for protein extraction in ubiquitination studies; enhances peptide identification and quantitative reproducibility compared to urea buffers [60].
- Chloroacetamide (CAA): Alkylating agent that rapidly inactivates cysteine deubiquitinases without causing di-carbamidomethylation artifacts that can interfere with K-GG peptide identification [60].
- DIA-NN Software: Deep neural network-based data processing software specifically optimized for DIA ubiquitinomics data; enables library-free analysis with high sensitivity [60].
- Linkage-Specific Ub Antibodies: Antibodies recognizing specific ubiquitin chain linkages (K48, K63, M1, etc.); allow targeted studies of particular ubiquitin signaling pathways [62].
Optimized Western Blotting for HMW Ubiquitinated Proteins
Troubleshooting Guide
Problem: Poor or Inefficient Transfer of HMW Proteins (>150 kDa)
- Possible Causes: Gel pore size too small; insufficient transfer time; precipitation of HMW proteins in gel; incorrect transfer buffer composition [3] [63].
- Solutions:
- Use low-percentage Tris-acetate gels (3-8%) or Bis-Tris gels (4-6%) instead of standard Tris-glycine gels to improve protein separation and transfer [3].
- Extend transfer time significantly—overnight wet transfer at 4°C is recommended for proteins >150 kDa [63].
- Add SDS to a final concentration of 0.1% in transfer buffer to discourage protein precipitation [64] [3].
- Reduce methanol concentration to 10% or less (or eliminate entirely for PVDF membranes) to promote gel swelling and improve HMW protein migration [64] [3].
Problem: High Background or Non-Specific Bands
- Possible Causes: Insufficient blocking; antibody concentration too high; membrane contamination; insufficient washing [15] [65].
- Solutions:
- Extend blocking time to 2-5 hours using BSA-based blocking buffers (especially for phosphorylated proteins) [58] [63].
- Titrate primary antibody to optimal concentration; too high can cause non-specific binding [65].
- Ensure thorough washing (3 × 10 minutes) with TBST between antibody incubation steps [15] [63].
- Use PVDF membranes for HMW proteins as they offer better protein retention, but ensure proper activation in methanol before use [64] [3].
Problem: Weak or No Signal
- Possible Causes: Incomplete transfer; protein degradation; inactive antibodies; insufficient protein loading [65].
- Solutions:
- Verify transfer efficiency using reversible protein stains like Ponceau S [64] [58].
- Include protease inhibitors (including DUB inhibitors) in lysis buffer to prevent protein degradation [15].
- Use fresh aliquots of primary and secondary antibodies and verify their activity [65].
- Load 80-100 μg of tissue lysate per lane to ensure sufficient target protein [63].
Experimental Protocol: Optimized Western Blot for HMW Ubiquitinated Proteins
- Sample Preparation: Lyse cells or tissues in RIPA buffer supplemented with protease inhibitor cocktail and DUB inhibitors (e.g., N-ethylmaleimide). Denature samples in Laemmli buffer at 70-100°C for 10 minutes [15] [63].
- Gel Electrophoresis: Use Tris-acetate (3-8%) or low-percentage Tris-glycine (4-6%) gels. Run gels at low voltage (100-150V) to prevent overheating and ensure proper separation of HMW proteins [3] [63].
- Protein Transfer: Use wet transfer system for optimal results. Assemble transfer stack in the order: sponge > filter paper > gel > PVDF membrane > filter paper > sponge. Transfer at constant current (100 mA) for 16-20 hours at 4°C [3] [63].
- Membrane Blocking: Block membrane with 3-5% BSA in TBST for 2-5 hours at room temperature with gentle agitation [58] [63].
- Antibody Incubation: Incubate with primary antibody diluted in 1% BSA/TBST overnight at 4°C with agitation. Follow with appropriate HRP-conjugated secondary antibody in 1% BSA/TBST for 1 hour at room temperature [15] [63].
- Detection: Use enhanced chemiluminescence (ECL) detection system. For low-abundance targets, use high-sensitivity ECL substrates and optimize exposure time to capture signal without introducing background noise [58] [63].
Table 2: Transfer Conditions Optimization for HMW Proteins
| Transfer Method | Recommended Conditions | Optimal Protein Size Range | Special Considerations |
|---|---|---|---|
| Wet Transfer | 100 mA, 16-20 hours, 4°C | Ideal for proteins >150 kDa | Highest efficiency for HMW proteins; requires cooling [63] |
| Semi-Dry Transfer | 25 V, 10-12 minutes | Best for proteins <150 kDa | Faster but less efficient for HMW proteins [3] |
| Rapid Dry Transfer | 25 V, 8-10 minutes | Proteins <100 kDa | Fastest method; preprogrammed methods available [3] |
Optimized Western Blot Workflow for HMW Proteins
Research Reagent Solutions for HMW Protein Immunoblotting
- Tris-Acetate Gels: Specialized gels with larger pore sizes (3-8%) that allow better separation and migration of HMW proteins compared to standard Tris-glycine gels [3].
- Protease and DUB Inhibitors: Essential additives to lysis buffers that prevent degradation of ubiquitinated proteins during sample preparation; includes N-ethylmaleimide, iodoacetamide, or specific DUB inhibitors [15].
- PVDF Membranes: Hydrophobic membranes that offer superior protein binding capacity for HMW proteins compared to nitrocellulose; require methanol activation before use [64] [3].
- BSA-Based Blocking Buffers: Preferred over milk-based blockers for reducing background, especially when studying phosphorylation or using phospho-specific antibodies [58].
- High-Sensitivity ECL Substrates: Enhanced chemiluminescence reagents that provide stronger signals for low-abundance HMW proteins without requiring excessive protein loading [63].
DIA-MS Workflow for Comprehensive Ubiquitinome Profiling
The integration of MS-based proteomics and optimized western blotting protocols provides researchers with powerful complementary tools for studying HMW ubiquitinated proteins. While MS methods offer unprecedented system-wide coverage of ubiquitination events, refined western blotting techniques remain essential for validating specific targets and assessing protein size and abundance. By implementing these advanced validation techniques, researchers can overcome the limitations of traditional approaches and generate more reliable, reproducible data on ubiquitin signaling pathways, ultimately accelerating drug discovery and development efforts targeting the ubiquitin-proteasome system.
Using Linkage-Specific Ubiquitin Antibodies to Decode Chain Topology
Ubiquitination is a critical post-translational modification where single ubiquitin molecules or polyubiquitin chains are attached to target proteins. The topology of these chains—defined by the specific lysine residues used for linkage—creates a complex "ubiquitin code" that determines the functional outcome for the modified protein, directing processes ranging from proteasomal degradation to DNA repair and kinase activation [66]. Decoding this topology is essential for understanding diverse cellular signaling pathways. Linkage-specific ubiquitin antibodies have emerged as powerful tools for this task, enabling researchers to decipher chain architecture via immunoblotting. However, the accurate detection of high molecular weight ubiquitinated species presents significant technical challenges, including inefficient transfer, masked epitopes, and the dynamic nature of ubiquitination itself. This guide provides troubleshooting and methodological support for researchers employing these specialized reagents, with particular emphasis on optimizing systems for detecting large ubiquitin conjugates.
FAQs: Core Concepts and Troubleshooting
1. What does linkage-specific ubiquitin antibody detection tell me about my protein of interest?
Linkage-specific antibodies are designed to recognize unique structural features of polyubiquitin chains connected through particular lysine residues (e.g., K48, K63) or linear linkages. A positive signal indicates that your target protein is modified with, or associated with, a polyubiquitin chain of that specific topology. This is vital for inferring the protein's likely fate or function; for instance, K48-linked chains typically target proteins for proteasomal degradation, whereas K63-linked chains are often involved in non-proteolytic signaling in DNA repair and inflammation [66].
2. Why do I see a smear or high molecular weight ladder instead of a discrete band?
A characteristic high molecular weight smear is the hallmark of a polyubiquitinated protein and is expected. Ubiquitination is a heterogeneous modification—a target protein can be modified with chains of varying lengths (from one to dozens of ubiquitins) and at multiple lysine sites. This heterogeneity causes the protein population to run as a continuous ladder or smear on an SDS-PAGE gel, with each "rung" representing the addition of another ~8.6 kDa ubiquitin molecule [67] [68]. A discrete band at a higher molecular weight could instead indicate a different post-translational modification, such as SUMOylation or NEDDylation.
3. My positive control works, but I get no signal for my immunoprecipitated protein of interest. What are the most likely causes?
This is a common frustration. The issue most likely lies in the sample preparation or immunoprecipitation (IP) steps before the blot.
- Protein Degradation: Ubiquitinated proteins are inherently unstable and are rapidly deubiquitinated by active deubiquitinases (DUBs) in the lysate. It is critical to use fresh, hot SDS lysis buffer (containing 2% SDS) and boil samples immediately to denature and inactivate DUBs [69] [68].
- Low Abundance: The fraction of your target protein that is ubiquitinated at any given time can be very low. You may need to increase the amount of starting lysate for your IP (up to 1-2 mg) and ensure high transfection efficiency if expressing ubiquitin [68].
- Masked Epitopes: The ubiquitin chains on your protein might be physically obscured. Using linkage-specific antibodies for immunoprecipitation (rather than just detection) can sometimes help enrich for the relevant species.
4. I see multiple non-specific bands with my linkage-specific antibody. How can I improve specificity?
Non-specific bands often arise from antibody cross-reactivity or overloading.
- Titrate Antibodies: The most effective step is to titrate both your primary and secondary antibodies. Using an antibody concentration that is too high is a primary cause of non-specific binding [70] [37].
- Optimize Blocking and Buffers: Ensure you are using the recommended blocking agent (often 5% BSA or non-fat milk in TBS-Tween) and that your wash buffers contain a detergent like 0.1% Tween-20. Increasing the salt concentration (up to 0.5M NaCl) in the antibody dilution and wash buffers can disrupt weak, non-specific ionic interactions [24] [37].
- Include Controls: Always run a negative control where the primary antibody is omitted to confirm the secondary antibody is not causing the background. If possible, use a knockdown or knockout cell line as a biological negative control.
Troubleshooting Guide: Key Issues and Solutions
The table below summarizes common problems, their causes, and recommended solutions when working with linkage-specific ubiquitin antibodies.
Table 1: Troubleshooting Guide for Ubiquitin Immunoblotting
| Problem | Possible Cause | Recommended Solution |
|---|---|---|
| No Signal / Weak Signal | Rapid deubiquitination [69] | Use fresh, hot SDS lysis buffer; boil samples immediately; add DUB inhibitors (N-ethylmaleimide, Ub-aldehyde) [68]. |
| Low abundance of ubiquitinated species [69] | Increase protein load for IP (up to 1-2 mg); overexpress epitope-tagged ubiquitin; enrich sample via IP. | |
| Inefficient transfer of high MW proteins [24] | Use wet transfer method; reduce methanol in transfer buffer to 5-10%; extend transfer time (3-4 hrs) [70]. | |
| Epitope masking | Include a denaturing step in IP protocol; try different antibody clones for IP vs. detection. | |
| High Background | Antibody concentration too high [37] | Titrate primary and secondary antibodies to find optimal dilution. |
| Inadequate blocking or washing [9] | Extend blocking time; increase number/duration of washes with TBS-Tween; ensure membrane stays wet. | |
| Non-fat dry milk interference | Use BSA (3-5%) as blocking agent, especially for phospho- or goat/sheep-derived antibodies [9] [24]. | |
| Non-Specific Bands | Cross-reactivity of primary antibody [70] | Titrate antibody; use affinity-purified antibodies; increase stringency with higher salt/Tween in buffers [37]. |
| Protein degradation [70] | Use fresh protease inhibitors (PMSF, leupeptin); avoid repeated freeze-thaw cycles of lysates. | |
| Overloaded gel | Reduce total protein load per lane (< 30 μg for whole cell lysate) [70]. | |
| Smiling or Uneven Bands | Gel running too hot | Run gel at lower voltage; use an ice pack or cold room [9]. |
| Improper gel polymerization | Ensure gels are cast properly and are fully polymerized before use. |
Optimizing Transfer of High Molecular Weight Ubiquitinated Proteins
The efficient transfer of large polyubiquitinated complexes from the gel to the membrane is one of the most critical and challenging steps. Standard transfer conditions often fail with proteins >150 kDa. Below is a proven workflow to optimize this process, incorporating key verification steps.
Diagram: Experimental workflow for optimizing protein transfer, incorporating verification steps to ensure efficient transfer of high molecular weight ubiquitinated proteins.
Detailed Protocol for Enhanced Wet Transfer
The following protocol is optimized for the transfer of high molecular weight ubiquitinated proteins.
Materials:
- Transfer apparatus for tank/wet transfer
- PVDF membrane (0.45 µm pore size)
- Pre-stained protein molecular weight marker
- Transfer buffer: 25 mM Tris, 192 mM Glycine, 10% Methanol [70]
- Filter paper
- Ponceau S stain
Method:
- Prepare Membrane: Cut the PVDF membrane to the size of your gel. Activate it by immersing it in 100% methanol for 15 seconds, then equilibrate in transfer buffer for at least 5 minutes.
- Assemble Transfer Stack: In a tray filled with transfer buffer, assemble the "transfer sandwich" in the following order (from cathode (-) to anode (+)):
- Execute Transfer: Place the cassette into the tank filled with cold transfer buffer. For high MW proteins, run at a constant 70V for 3-4 hours at 4°C. Reducing the methanol content from the standard 20% to 5-10% can improve the elution of large proteins from the gel [70].
- Verify Efficiency:
- Check the Ladder: The pre-stained marker should be clearly visible on the membrane. If the high molecular weight bands are faint, the transfer time should be increased.
- Ponceau S Stain: After transfer, reversibly stain the membrane with Ponceau S. The presence of many pink/red bands confirms successful protein transfer from the gel to the membrane [9].
- Coomassie Stain the Gel: After transfer, stain the polyacrylamide gel with Coomassie Blue. A mostly clear gel indicates efficient protein transfer, while prominent blue bands suggest proteins remain trapped [22].
Critical Protocols for Detecting Protein Ubiquitination
Protocol 1: Detecting Ubiquitination in Cultured Cells (In Vivo)
This protocol uses stringent conditions to isolate covalently ubiquitinated proteins and minimize deubiquitination [68].
Materials:
- Complete cell lysis buffer (2% SDS, 150 mM NaCl, 10 mM Tris-HCl, pH 8.0)
- Protease inhibitors (e.g., PMSF, leupeptin) and DUB inhibitors (e.g., N-ethylmaleimide)
- Dilution buffer (10 mM Tris-HCl, pH 8.0, 150 mM NaCl, 2 mM EDTA, 1% Triton X-100)
- Protein A/G agarose beads
- Antibody against the target protein for immunoprecipitation
- Linkage-specific anti-ubiquitin antibody for immunoblotting
Method:
- Lyse Cells: Transfect cells with your protein and ubiquitin plasmids if necessary. Lyse cells directly in 100-200 µL of hot, complete SDS lysis buffer per 6 cm dish. Immediately scrape and transfer the lysate to a microfuge tube and boil for 10 minutes [68].
- Dilute and Clarify: Cool the sample, then dilute it 10-fold with dilution buffer. Incubate on a rotator at 4°C for 30 minutes. Centrifuge at 20,000 x g for 30 min to remove insoluble material.
- Immunoprecipitate: Measure protein concentration. Incubate 500-1500 µg of the supernatant with an antibody against your target protein that is pre-bound to Protein A/G beads. Rotate overnight at 4°C.
- Wash Stringently: Pellet the beads and wash them twice with a high-salt wash buffer (e.g., 10 mM Tris-HCl, pH 8.0, 1 M NaCl, 1 mM EDTA, 1% NP-40) [68].
- Elute and Analyze: Perform a final wash, aspirate all liquid, and elute the proteins by boiling the beads in 2X SDS sample buffer. Load the supernatant onto an SDS-PAGE gel for western blotting, probing first with your linkage-specific ubiquitin antibody, then stripping and re-probing for your target protein.
Protocol 2: In Vitro Ubiquitination Assay
This cell-free assay allows you to test whether your protein is a direct substrate for a specific E3 ligase and ubiquitin chain topology [68].
Materials:
- 5X Ubiquitination Buffer (100 mM Tris-HCl, pH 7.5, 25 mM MgCl₂, 2.5 mM DTT, 10 mM ATP)
- Purified/recombinant proteins: E1 activating enzyme, E2 conjugating enzyme, E3 ligase, Ubiquitin, Target protein
Method:
- Set Up Reactions: For a 40 µL reaction, mix:
- 8 µL 5X Ubiquitination Buffer
- 250 ng E1 enzyme
- 500 ng E2 enzyme
- 0.5 µg E3 ligase (if testing specificity)
- 0.5 µg Ubiquitin
- 0.5 µg Target protein
- Water to 40 µL
- Crucially, set up control reactions missing individual components (e.g., -E1, -E3, -Ubiquitin) to confirm the specificity of the reaction [68].
- Incubate: Incubate the reaction mixture at 37°C for 1-3 hours.
- Terminate and Analyze: Stop the reaction by adding SDS-PAGE sample buffer and boiling for 10 minutes. Analyze by immunoblotting with your target protein antibody or linkage-specific ubiquitin antibodies.
The Scientist's Toolkit: Essential Reagents
Table 2: Key Research Reagents for Ubiquitination Studies
| Reagent / Tool | Function / Application | Key Considerations |
|---|---|---|
| Linkage-Specific Ubiquitin Antibodies | Detect specific polyubiquitin chain topologies (K48, K63, K11, etc.) in Western blotting and IP. | Must be validated for application (e.g., WB vs. IP). Can have varying specificity; include controls. |
| Epitope-Tagged Ubiquitin (HA, Myc, FLAG) | Overexpression to enhance detection; allows pulldown of all ubiquitinated proteins. | Tag can potentially interfere with native function; use wild-type ubiquitin as control. |
| Deubiquitinase (DUB) Inhibitors (N-ethylmaleimide, Ubiquitin Aldehyde) | Preserve ubiquitin signals by inhibiting deubiquitinating enzymes in lysates. | Add fresh to all lysis and buffer solutions. NEM is light-sensitive. |
| Protease Inhibitor Cocktails | Prevent general protein degradation during sample preparation. | Essential for all protein work. Use broad-spectrum cocktails. |
| E1, E2, and E3 Enzymes | Reconstitute the ubiquitination cascade in in vitro assays. | Purified recombinant proteins are available commercially. |
| PVDF Membrane | Blotting membrane for immunodetection. | Higher protein binding capacity than nitrocellulose; must be pre-wet in methanol. |
Advanced Methodological Notes
For the most rigorous analysis, combining linkage-specific antibodies with mass spectrometry (MS) is becoming the gold standard. Top-down tandem MS strategies are universally applicable to all linkage types and can provide definitive characterization of chain architecture without relying on antibody specificity [66]. Furthermore, new synthetic biology tools like the "Ubiquiton" system, which allows inducible, linkage-specific polyubiquitylation in cells, provide powerful new ways to validate antibody specificity and study the functional consequences of specific chain types [71]. When interpreting results, always be aware that heterotypic (mixed-linkage) and branched chains exist, and a single antibody may not capture the full complexity of the ubiquitin modification on your target protein.
The analysis of ubiquitinated proteins, particularly high molecular weight (HMW) species, is crucial for understanding diverse cellular functions and pathologies, including cancer and neurodegenerative diseases. Ubiquitination is a complex post-translational modification involving the covalent attachment of ubiquitin to substrate proteins, which can range from a single ubiquitin monomer to polymers with different lengths and linkage types. The reliable detection of these proteins via immunoblotting requires effective enrichment strategies to overcome the challenge of low stoichiometry under normal physiological conditions. This technical guide provides a comparative analysis of the three primary enrichment methodologies—tagged ubiquitin, antibody-based approaches, and ubiquitin-binding domain (UBD)-based tools—focusing on their application for improving the transfer and detection of high molecular weight ubiquitinated proteins in immunoblotting research.
Methodologies and Technical Comparison
The following table summarizes the core characteristics, advantages, and limitations of the three primary enrichment methods.
Table 1: Comparative Overview of Ubiquitinated Protein Enrichment Methods
| Method | Core Principle | Best For | Throughput | Specificity | Key Limitations |
|---|---|---|---|---|---|
| Tagged Ubiquitin [21] | Ectopic expression of affinity-tagged Ub (e.g., His, Strep) in cells; purification of conjugated substrates. | Screening ubiquitinated substrates in engineered cell lines; low-cost profiling. | Medium | General Ubiquitination | Cannot be used on tissues; potential artifacts from tagged Ub expression; co-purification of non-target proteins. |
| Antibody-Based [21] | Immunoaffinity purification using anti-ubiquitin antibodies (pan-specific or linkage-specific). | Profiling endogenous ubiquitination in tissues/clinical samples; studying specific chain linkages. | Medium to High | General or Linkage-Specific | High cost of quality antibodies; potential for non-specific binding. |
| UBD-Based [21] [72] | Affinity purification using engineered proteins or domains (e.g., TUBEs, ThUBDs) that bind ubiquitin with high affinity. | Protecting ubiquitinated proteins from deubiquitinases and proteasomal degradation; sensitive detection of endogenous targets. | Medium | General Ubiquitination | Requires optimization of UBD affinity; early-stage commercial availability for some tools. |
The workflow for selecting and applying an enrichment method involves several key decision points, as illustrated below.
Troubleshooting High Molecular Weight Ubiquitinated Protein Immunoblotting
Efficiently transferring and detecting HMW ubiquitinated proteins is a common challenge. The following FAQs address specific issues researchers may encounter.
FAQ 1: Why is my signal for high molecular weight ubiquitinated proteins weak or absent after enrichment and blotting?
Potential Causes and Solutions:
- Inefficient Transfer: HMW proteins migrate slowly and can be difficult to elute from the gel matrix.
- Solution: Optimize transfer conditions. Use a low-percentage Tris-acetate gel or a low-percentage Bis-Tris gel instead of a standard Tris-glycine gel for better separation and transfer [3]. Increase transfer time; for dry transfer systems, increase from 7 minutes to 8-10 minutes [3]. For wet transfer, consider including 0.05% SDS in the transfer buffer and decreasing the methanol concentration to facilitate protein elution [27].
- Protein Aggregation: HMW complexes and membrane proteins may aggregate.
- Low Abundance: The target ubiquitinated protein may be of low abundance.
- Solution: Concentrate protein samples using TCA/acetone precipitation or increase the amount of protein loaded. The use of UBD-based tools (TUBEs) can significantly enhance the sensitivity for detecting endogenous targets [72].
FAQ 2: I see a smear instead of a distinct band for my protein of interest. Is this a problem?
Answer: Not necessarily. A smear is often the expected result for ubiquitinated proteins. Ubiquitination is a heterogeneous modification where a target protein can be modified by ubiquitin chains of different lengths and linkage types, resulting in a ladder or smear of higher molecular weight species [21] [27]. This pattern is a positive indicator of successful enrichment and detection of poly-ubiquitinated proteins.
FAQ 3: How can I confirm that my enrichment method is specific for ubiquitinated proteins?
Solution: Implement rigorous experimental controls [73].
- Genetic Controls: Compare your sample with a knockout or knockdown cell/animal model for your target protein to verify the correct molecular weight and specificity of the signal.
- Antibody Controls: Include a control that lacks the primary antibody to rule out non-specific binding of the secondary antibody.
- Competition Controls: Use a blocking peptide for the antibody (if available) to confirm that the signal is eliminated.
- Validation with Multiple Methods: Correlate your results using two or more independent antibodies targeting different epitopes of the same protein, or use an alternative enrichment method for validation [73].
Essential Protocols for Method Evaluation
Protocol 1: Evaluating Transfer Efficiency for HMW Proteins
This protocol is critical after enrichment to ensure proteins are successfully moved to the membrane.
- Post-Transfer Gel Staining: After transfer, stain the polyacrylamide gel with a protein stain like Coomassie Blue. The absence of high molecular weight bands in the gel indicates successful transfer [27].
- Membrane Staining: Stain the blot membrane with a reversible total protein stain, such as Ponceau S, before blocking and antibody incubation. This confirms the presence of transferred proteins and serves as a superior loading control compared to a single housekeeping protein [73].
- Optimization for Dry Transfer: When using a dry transfer system (e.g., iBlot), pretreat non-Tris-acetate gels with 20% ethanol for 5-10 minutes before transfer. This step removes buffer salts and adjusts gel size, significantly improving the transfer efficiency of HMW proteins [3].
Protocol 2: Rapid Semi-Dry Transfer for HMW Proteins
For semi-dry systems like the Power Blotter, the standard protocol can be adapted for HMW proteins [3].
- Gel Preparation: Use a 3-8% Tris-acetate gel for optimal HMW protein separation.
- Assembly: Cut the membrane and filter paper precisely to the size of the gel without overhangs. Equilibrate the gel and filter paper in transfer buffer.
- Transfer Parameters: Use a high ionic strength, methanol-free transfer buffer. Extend the transfer time to 10-12 minutes at constant current to allow slower-migrating HMW proteins to elute completely [3].
The Scientist's Toolkit: Key Research Reagents
The following table lists essential materials and their functions for studying ubiquitinated proteins.
Table 2: Essential Reagents for Ubiquitination Research
| Reagent / Tool | Function / Application | Key Considerations |
|---|---|---|
| Tris-Acetate Gels [3] | Electrophoretic separation of HMW proteins (>150 kDa). | The open gel matrix allows HMW proteins to migrate further, improving resolution and subsequent transfer. |
| TUBEs (Tandem Hybrid UBDs) [72] | High-affinity enrichment of endogenous ubiquitinated proteins; protects from deubiquitination and degradation. | Ideal for capturing labile ubiquitination events and for use with native tissues. |
| Linkage-Specific Antibodies [21] | Immunoaffinity purification or detection of ubiquitin chains with a specific linkage (e.g., K48, K63). | Crucial for determining the functional consequence of ubiquitination. |
| PVDF Membrane (0.2 µm) [27] | Solid support for transferred proteins during western blotting. | The smaller pore size is essential for retaining low molecular weight proteins that might otherwise blow through. |
| Proteasome Inhibitors (e.g., Epoxomicin) [74] | Promotes accumulation of ubiquitinated proteins by blocking their degradation. | Used during cell lysis to preserve the ubiquitinated pool of proteins. |
| Ponceau S Stain [73] | Reversible total protein stain for membranes. | Provides a reliable method for assessing transfer efficiency and normalizing protein load across lanes. |
The relationship between these tools and the experimental workflow for successful detection of HMW ubiquitinated proteins is summarized below.
Core Concepts & Frequently Asked Questions (FAQs)
FAQ 1: What is the purpose of using lysine-less (K0) ubiquitin mutants in functional validation? K0 ubiquitin, where all lysine residues are mutated to arginine, serves as a nonextendable or "chain-termination" mutant. Its expression in cells perturbs the ubiquitin landscape by trapping substrates that would normally be polyubiquitinated, allowing for the affinity purification and identification of ubiquitination targets. This is particularly useful for mapping the ubiquitinome and distinguishing between the ubiquitin-proteasome system and the ubiquitin trafficking system. [75]
FAQ 2: How do single-lysine (K-only) ubiquitin mutants help determine chain linkage specificity? Single-lysine mutants, in which all but one lysine residue are mutated to arginine, restrict polyubiquitin chain formation to a single linkage type. By expressing these mutants in vivo or using them in in vitro assays, researchers can determine the functional consequences of a specific ubiquitin chain topology (e.g., Lys48-linked for proteasomal degradation or Lys63-linked for trafficking and signaling) and identify the substrates modified by that particular chain type. [75]
FAQ 3: Why do high molecular weight (HMW) ubiquitinated proteins often appear as smears or fail to transfer in western blots? Ubiquitinated proteins, especially polyubiquitinated species, can form large complexes that are difficult to resolve. The smear is characteristic of heterogeneous modifications with varying numbers of ubiquitin moieties (each ~8.6 kDa). [76] Furthermore, HMW proteins (>150 kDa) are notoriously difficult to transfer efficiently from the gel to the membrane. They can become trapped in the gel matrix if standard transfer protocols are used, leading to weak or no signal. [3] [77]
FAQ 4: What are the key optimization strategies for detecting HMW ubiquitinated proteins by western blot? Successful detection requires optimization at multiple steps:
- Gel Choice: Use low-percentage Tris-acetate gels or low-gradient Bis-Tris gels, which have a more open pore structure that better resolves HMW proteins compared to standard Tris-glycine gels. [3]
- Transfer Method: Increase transfer time and/or voltage. For rapid dry transfer systems, extend time to 8-10 minutes. For semi-dry systems, 10-12 minutes may be needed. [3] Heated transfer buffer (70-75°C) without methanol can also dramatically improve the elution and transfer of HMW proteins from the gel. [77]
- Membrane and Buffer: Ensure proper membrane activation. Adding a low concentration of SDS (0.01-0.05%) to the transfer buffer can help pull large proteins from the gel. [8]
Troubleshooting Guides
Problem 1: Weak or No Signal for High Molecular Weight Ubiquitinated Proteins
This is a common issue where the target HMW ubiquitinated species are not efficiently transferred to the membrane.
| Possible Cause | Verification Method | Solution |
|---|---|---|
| Inefficient Transfer | Stain the gel post-transfer with Coomassie blue to check for residual proteins. [8] | - Use low-percentage Tris-acetate gels. [3]- Increase transfer time (8-10 min for dry systems) and/or voltage. [3]- Use heated (70-75°C) transfer buffer without methanol. [77] |
| Protein Aggregation | Analyze sample preparation conditions. | Ensure fresh reducing agents (DTT, β-Mercaptoethanol) are used in the sample buffer to disrupt non-covalent interactions. [76] |
| Antigen Masked | Try a different blocking buffer (e.g., BSA instead of milk). | Decrease the concentration of protein in the blocking buffer. [8] |
Experimental Protocol: Heat-Mediated Electrophoretic Transfer for HMW Proteins [77] This protocol is optimized for transferring HMW proteins from 0.75-1.5 mm gels to nitrocellulose membranes.
- Post-Electrophoresis: Following SDS-PAGE, carefully open the gel plates and rinse the gel with deionized water.
- Heat Transfer Buffer: Heat the transfer buffer (0.025 mM Tris, 192 mM glycine, without methanol) to 70–75°C in a glass beaker.
- Prepare Stack: Cut membrane and filter papers to size. Immerse in the heated transfer buffer. Create a transfer stack in this order (from cathode to anode):
- Sponge
- 3 Filter Papers
- Gel
- Nitrocellulose Membrane
- 3 Filter Papers
- Sponge Ensure no air bubbles are trapped between the gel and membrane.
- Transfer: Place the stack in the transfer apparatus filled with pre-heated buffer. Place the apparatus on a magnetic stirrer with a stir bar to circulate buffer. Transfer at constant voltage for 10-20 minutes, depending on gel thickness and percentage.
Problem 2: High Background or Nonspecific Bands
| Possible Cause | Verification Method | Solution |
|---|---|---|
| Antibody Concentration Too High | Titrate the primary and/or secondary antibody. | Perform a dilution series to find the optimal antibody concentration that maximizes signal-to-noise. [9] [8] |
| Ineffective Blocking | Check for even staining across the membrane. | Increase blocking time to at least 1 hour at RT or overnight at 4°C. Use 5% non-fat milk or 3-5% BSA in TBST. Avoid milk if using anti-goat/sheep secondaries. [9] [8] |
| Insufficient Washing | Observe if background is evenly distributed. | Increase wash volume, duration, and number of washes (e.g., 3 x 10 mins) with TBST containing 0.05% Tween-20. [9] |
Problem 3: Ubiquitinated Protein Bands at Unexpected Molecular Weights
| Observation | Possible Explanation | Experimental Validation |
|---|---|---|
| Band higher than predicted | Protein is polyubiquitinated. Each ubiquitin moiety adds ~8.6 kDa. [76] | Compare to samples expressing K0 Ub, which should show a shift to lower molecular weights (more monoubiquitination). [75] |
| Multiple discrete bands | Protein exists in different ubiquitinated states (e.g., mono, di, tri-ubiquitinated) or is partially degraded. | Use protease inhibitors during lysis. Express single-lysine Ub mutants to simplify the banding pattern. [75] [8] |
| Band lower than predicted | The protein may be cleaved (e.g., by proteases or caspases) and the antibody epitope is retained on a fragment. [76] | Check sample integrity and use fresh protease inhibitors. Research known cleavage events for your protein of interest. |
The Scientist's Toolkit: Research Reagent Solutions
| Reagent / Material | Function in Ubiquitin Research |
|---|---|
| K0 (Lysine-less) Ubiquitin | A nonextendable mutant used to trap ubiquitinated substrates, identify novel targets via affinity purification/MS, and perturb the ubiquitin landscape to study pathway-specific functions. [75] |
| Single-Lysine Ubiquitin Mutants | Mutants (e.g., K48-only, K63-only) used to define the cellular outcome of a specific ubiquitin chain linkage type and to direct cellular ubiquitination toward that topology. [75] |
| Tris-Acetate Gels | Polyacrylamide gels with an open matrix structure ideal for the separation and resolution of high molecular weight proteins and protein complexes prior to western blotting. [3] |
| Ubp2 Deubiquitinase | A deubiquitinating enzyme that specifically cleaves Lys63-linked ubiquitin chains; useful for validating the presence of K63 linkages on substrates. [75] |
Experimental Workflows and Signaling Pathways
Ubiquitin Mutant Experimental Workflow
High MW Ubiquitin Protein Immunoblotting
Ubiquitin Linkage Function & Mutant Application
Frequently Asked Questions
Q1: A significant portion of my putative ubiquitinated proteins did not show a molecular weight shift. Should I consider them all false positives? Not necessarily, but they require further validation. In a systematic analysis, only about 30% of candidate ubiquitin-conjugates identified via affinity purification and mass spectrometry were validated after applying a molecular weight shift filter, despite using denaturing conditions. This suggests a high rate of potential false positives in initial pull-downs. Proteins without a clear molecular weight increase should be treated with skepticism and confirmed with additional methods [2].
Q2: What is the most definitive method to confirm a protein is ubiquitinated? The most definitive method is the direct mapping of ubiquitination sites via mass spectrometry. Trypsin digestion of ubiquitinated proteins leaves a di-glycine remnant (a mass shift of 114.0429 Da) on modified lysine residues. Identifying this signature via LC-MS/MS provides strong evidence for ubiquitination. However, this approach often has low coverage, successfully mapping sites for less than 10% of identified proteins in large-scale studies, so it should be complemented with other techniques [2].
Q3: My immunoblot for a ubiquitinated protein shows a smear rather than a discrete band. Does this indicate a problem with the experiment? No, a smear or laddering pattern is a characteristic and often expected result for ubiquitinated proteins, particularly those that are polyubiquitinated. This heterogeneity reflects proteins with varying numbers of ubiquitin chains attached. A clean, discrete band at a higher molecular weight could instead indicate a non-specific signal [2] [78].
Q4: What are the essential controls for verifying the specificity of my primary antibody in an immunoblot? A comprehensive set of controls is crucial for confirming antibody specificity [79]:
- No Primary Antibody Control: Incubate the membrane with antibody diluent instead of the primary antibody. Any signal indicates non-specific binding of your secondary antibody.
- Isotype Control: Use a non-immune immunoglobulin of the same class (e.g., IgG) as your primary antibody at the same concentration. This checks for non-specific binding of the immunoglobulin itself to the membrane.
- Absorption Control (Pre-adsorption): Pre-incubate your primary antibody with the peptide antigen used to generate it before applying it to the membrane. A significant reduction or loss of signal confirms the specificity of the antibody-antigen interaction.
Q5: When transferring high molecular weight ubiquitinated proteins, what is a key indicator of successful transfer and specific detection? The most reliable indicator is a demonstrable increase in the experimental molecular weight compared to the unmodified protein's theoretical weight, consistent with the addition of ubiquitin (approximately 8 kDa for monoubiquitination and more for polyubiquitination). Computational "virtual Western blot" approaches reconstruct this from geLC-MS/MS data, but in the wet lab, you should see a shift or smear above the expected size. Using the controls from Q4 ensures the detected high-molecular-weight signal is specific [2] [79].
Experimental Protocols
Protocol 1: Distinguishing Ubiquitinated Proteins from Contaminants via Molecular Weight Validation
This protocol uses a virtual Western blot approach to validate ubiquitin-conjugates identified by affinity purification and mass spectrometry, leveraging the predictable molecular weight shift caused by ubiquitination [2].
Sample Preparation and Gel Electrophoresis:
- Resolve the affinity-purified ubiquitin-conjugate sample and a total cell lysate control by 1D SDS-PAGE on a 6-12% gradient gel to maximize resolution.
- Run the gel at 200V for approximately 4 hours.
- Stain with Coomassie blue and document the Rf values for each gel band and MW marker [2].
In-Gel Digestion and Mass Spectrometry:
Data Analysis and Molecular Weight Calculation:
- Search MS/MS spectra against the appropriate database using algorithms like SEQUEST. Use a dynamic modification of +114.0429 Da on lysine to identify ubiquitination sites [2].
- For each protein identified, compute its experimental molecular weight from the gel. This is done by analyzing the value and distribution of its spectral counts across the gel bands using a Gaussian curve-fitting approach [2].
- Compare the experimental molecular weight to the theoretical weight of the unmodified protein.
Validation by Molecular Weight Shift:
- Apply a stringent threshold to accept a protein as a true ubiquitin-conjugate. The threshold should incorporate the mass of ubiquitin and experimental variation.
- Accept only proteins whose experimental MW is significantly higher than the theoretical MW. This single filter can reduce accepted candidates to around 30%, with an estimated false discovery rate of ~8% [2].
Protocol 2: Controls for Antibody Specificity in Immunoblotting
This protocol outlines key controls to ensure the signal in your immunoblot is specific to your target protein, which is critical for interpreting shifts from ubiquitination [79].
No Primary Antibody Control:
- Prepare your membrane with protein samples as usual.
- Instead of the primary antibody, incubate the membrane with the antibody diluent buffer alone.
- Proceed with the rest of the protocol (blocking, secondary antibody incubation, detection).
- Interpretation: The complete absence of signal confirms that your secondary antibody does not bind non-specifically to the membrane or proteins [79].
Isotype Control:
- This control is critical for monoclonal antibodies.
- Prepare a solution containing a non-immune immunoglobulin of the same species, class (e.g., IgG), and subclass as your primary antibody. Use the same concentration as your primary antibody.
- Incubate the membrane with this isotype control solution instead of the primary antibody.
- Proceed with the rest of the immunoblotting protocol.
- Interpretation: The absence of signal confirms that the detection is not due to non-specific Fc receptor or protein binding by the immunoglobulin framework [79].
Absorption Control (Pre-adsorption):
- Pre-incubate your primary antibody with a five- to ten-fold molar excess of the specific peptide antigen used to generate the antibody for 30-60 minutes at room temperature.
- Centrifuge the mixture if necessary to remove any precipitates.
- Use this pre-adsorbed antibody solution to incubate with your membrane.
- Interpretation: A significant reduction or elimination of the specific signal confirms that the antibody is binding specifically to its intended epitope [79].
Data Presentation
Table 1: Thresholds for Validating Ubiquitin-Conjugates by Molecular Weight Shift [2]
| Threshold Category | Description | Purpose | Impact on Validation |
|---|---|---|---|
| Stringent Molecular Weight Filter | Incorporates the mass of ubiquitin and experimental variation. Accepts only proteins with a significant MW increase. | To minimize false positives by requiring clear evidence of modification. | ~30% of initial candidates accepted; estimated FDR of ~8%. |
| Ubiquitinated Lysine (GG-) Site Identification | Direct MS/MS identification of a lysine residue with a +114.0429 Da mass shift. | To provide definitive evidence of ubiquitination at a specific site. | ~95% of proteins with a defined GG-site show a convincing MW shift. |
Table 2: Essential Research Reagent Solutions for Immunoblot Specificity [79]
| Reagent / Control | Function and Role in Specificity Testing |
|---|---|
| Positive Control Lysate | A sample known to express the target protein. Validates that the entire immunoblotting protocol is working correctly. |
| Negative Control Lysate | A sample known not to express the target protein (e.g., from a knockout cell line). Confirms the specificity of the primary antibody. |
| Non-Immune Isotype Control | A non-specific immunoglobulin matching the host species and class of the primary antibody. Identifies background from non-specific antibody binding. |
| Specific Peptide Antigen | The peptide used to generate the primary antibody. Used in absorption controls to competitively inhibit specific binding and confirm signal specificity. |
Experimental Workflow and Logic Diagrams
Validation Workflow
Control Selection Logic
Conclusion
Mastering the immunoblotting of high molecular weight ubiquitinated proteins requires a synergistic approach that combines a deep understanding of ubiquitin biology with meticulously optimized laboratory techniques. By implementing the specialized protocols for gel electrophoresis, membrane transfer, and target enrichment outlined in this guide, researchers can overcome the primary obstacles of inefficient transfer and poor detection. Crucially, employing rigorous validation methods is essential to confidently interpret the characteristic high-MW ladders and smears, transforming them from experimental frustrations into reliable data. As research into ubiquitination continues to expand in areas like targeted protein degradation and biomarker discovery, these robust and reproducible methods will be foundational for uncovering new biological mechanisms and developing novel therapeutics for cancer, neurodegenerative diseases, and beyond.
References
- 1. Western Blot Troubleshooting: Why Does The Observed ... [https://www.ptglab.com/support/western-blot-protocol/western-blot-troubleshooting-why-does-the-observed-protein-molecular-weight-mw-differ-from-the-calculated-one/?srsltid=AfmBOoqJUj8FHabuv-WC3qcXex6onPmsyEHxWJxpSr7-nqw1nngd009Y]
- 2. Systematic approach for validating the ubiquitinated proteome [https://pmc.ncbi.nlm.nih.gov/articles/PMC2673951/]
- 3. Successful Transfer High Molecular Weight Proteins during ... [https://www.thermofisher.com/us/en/home/life-science/protein-biology/protein-biology-learning-center/protein-biology-resource-library/protein-biology-application-notes/successful-transfer-high-mw-proteins-western-blotting.html]
- 4. Western blot protocol for high molecular weight proteins [https://www.abcam.com/en-us/technical-resources/protocols/western-blot-for-high-molecular-weights]
- 5. – Troubleshooting | Thermo Fisher Scientific - US Western Blotting [https://www.thermofisher.com/us/en/home/technical-resources/technical-reference-library/protein-electrophoresis-western-blotting-support-center/western-blotting-support/western-blotting-support-troubleshooting.html]
- 6. Inaccuracies with Unverified Antibodies: Need for... Western Blotting [https://pmc.ncbi.nlm.nih.gov/articles/PMC4545415/]
- 7. Western Blotting Troubleshooting Guide [https://www.cellsignal.com/learn-and-support/troubleshooting/western-blot-troubleshooting-guide?srsltid=AfmBOorFO9j1hbGMCr30TeJPUR6mfIQJ6ws6lAZCl71M2NV5ohiYfvy6]
- 8. Western Blot Troubleshooting [https://www.thermofisher.com/us/en/home/life-science/protein-biology/protein-biology-learning-center/protein-gel-electrophoresis-information/western-blot-troubleshooting.html]
- 9. Western blot troubleshooting guide! [https://www.jacksonimmuno.com/secondary-antibody-resource/technical-tips/western-blot-trouble-shooting/]
- 10. Use of a High -Affinity Ubiquitin-Binding Domain to Detect and Purify... [https://bio-protocol.org/en/bpdetail?id=5426&type=0]
- 11. Polyubiquitin chain assembly and organization determine ... [https://pmc.ncbi.nlm.nih.gov/articles/PMC3901042/]
- 12. Western Blotting Troubleshooting Guide [https://www.cellsignal.com/learn-and-support/troubleshooting/western-blot-troubleshooting-guide?srsltid=AfmBOoqWNpu6-C-MCbRfDYcFCRgeA_HlBPOSUhNB0RvFpKLtaRefJQxP]
- 13. Troubleshooting and Optimizing a Western Blot [https://blog.addgene.org/troubleshooting-and-optimizing-a-western-blot]
- 14. Western Blot (WB) Protocol for High Molecular Weight ... [https://www.alomone.com/info/western-blot-protocol-for-high-molecular-weight-hmw-proteins?srsltid=AfmBOoqBEUfFKKycHS7mnNAALosuyLo7q_zTzC7Q22RhIi3EJvEMHvKq]
- 15. Western Blot: Technique, Theory, and Trouble Shooting [https://pmc.ncbi.nlm.nih.gov/articles/PMC3456489/]
- 16. Optimizing Western blotting immunodetection [https://pmc.ncbi.nlm.nih.gov/articles/PMC11513134/]
- 17. Western Blot Troubleshooting: Why Does The Observed ... [https://www.ptglab.com/support/western-blot-protocol/western-blot-troubleshooting-why-does-the-observed-protein-molecular-weight-mw-differ-from-the-calculated-one/?srsltid=AfmBOorogz6FiejUu0PZlKTFQtsFM6iR8l8KeXvITrrEGXYSG5Seb58j]
- 18. Western Blotting Troubleshooting [https://www.southernbiotech.com/troubleshooting-tips-for-western-blotting/]
- 19. Western Blotting Troubleshooting Guide [https://www.cellsignal.com/learn-and-support/troubleshooting/western-blot-troubleshooting-guide?srsltid=AfmBOoqFgdalfo8kLbIBNnwZ7ExSqOO8uwJdGuZSERZYtlRpg-Je9NQU]
- 20. The 8 Western Blot Failures and How to Prevent Them (2025 ... [https://wildtypeone.substack.com/p/the-8-western-blot-failures-and-how?utm_campaign=post&triedRedirect=true]
- 21. Current methodologies in protein ubiquitination ... [https://pmc.ncbi.nlm.nih.gov/articles/PMC9373315/]
- 22. 3 Hot Tips to Optimize Your Western Blot Transfers [https://bitesizebio.com/7356/optimize-your-western-blot/]
- 23. Western Blot Transfer Methods [https://www.thermofisher.com/us/en/home/life-science/protein-biology/protein-biology-learning-center/protein-biology-resource-library/pierce-protein-methods/western-blot-transfer-methods.html]
- 24. Optimizing Protein Transfer and Detection in Western Blotting [https://www.labx.com/resources/optimizing-protein-transfer-and-detection-in-western-blotting/5568]
- 25. Western blot transfer condition protocols [https://www.cytoskeleton.com/western-blot-transfer]
- 26. Western Blotting Troubleshooting Guide [https://www.cellsignal.com/learn-and-support/troubleshooting/western-blot-troubleshooting-guide?srsltid=AfmBOorzk4lFmIMpsb5mWtFhg_ibETL6tfK_z5CNhg-pM6ewBBfQhX0H]
- 27. Western Blot Troubleshooting [https://www.antibodies.com/applications/western-blotting/western-blot-troubleshooting]
- 28. An overview of technical considerations for Western ... [https://pmc.ncbi.nlm.nih.gov/articles/PMC5138151/]
- 29. How to Choose the Right Gel % for Your Protein Sample [https://nusep.us/blogs/precast-gel-education-center/how-to-choose-the-right-gel-for-your-protein-sample?srsltid=AfmBOorqsan_E1Z88D-5FwTCYTlmPKG4h7pCk4ay5ScQG__TxugyApkE]
- 30. Troubleshooting SDS-PAGE Gel Running Issues [https://www.goldbio.com/blogs/articles/troubleshooting-sds-page-gel-running-issues?srsltid=AfmBOorbQNNPc_-kX0t-Rcum1kV--353kdXyDN_f6Yw1xZ66l60kz-Ga]
- 31. Protein Gel 1D Electrophoresis Support—Troubleshooting [https://www.thermofisher.com/us/en/home/technical-resources/technical-reference-library/protein-electrophoresis-western-blotting-support-center/protein-gel-1d-electrophoresis-support1/protein-gel-1d-electrophoresis-support-troubleshooting.html]
- 32. Specific, sensitive and quantitative protein detection by in- ... [https://www.nature.com/articles/s41467-023-38147-8]
- 33. Molecular features defining the efficiency of bioPROTACs [https://pmc.ncbi.nlm.nih.gov/articles/PMC12181330/]
- 34. Western blot transfer techniques [https://www.abcam.com/en-us/knowledge-center/western-blot/western-blot-transfer-methods]
- 35. Western Blot Troubleshooting: Why Does The Observed ... [https://www.ptglab.com/support/western-blot-protocol/western-blot-troubleshooting-why-does-the-observed-protein-molecular-weight-mw-differ-from-the-calculated-one/?srsltid=AfmBOoqXPOj_4UShMtWgdjStMkylFAGI9RZm6LKZOe3ZVMOS9-RLF7-Q]
- 36. General Western Blot Protocol Overview [https://www.novusbio.com/support/support-by-application/western-blot/protocol.html?srsltid=AfmBOopgJCcSQvIfblLkp9ZMs8xfrcRSvlIre72WISFDLmEIKnlY2PEk]
- 37. Western Blot Troubleshooting Guide [https://www.rndsystems.com/resources/technical/troubleshooting-guide-western-blot]
- 38. The Ubiquitin Tale: Current Strategies and Future Challenges [https://pmc.ncbi.nlm.nih.gov/articles/PMC11406696/]
- 39. The State of the Art on PVDF Membrane Preparation for ... [https://pmc.ncbi.nlm.nih.gov/articles/PMC12029554/]
- 40. Guide to Western Blot Reagents [https://www.rockland.com/resources/guide-to-western-blot-reagents/?srsltid=AfmBOooqOGxemHSFtvx-gQtS5OaMwW6EU6IFF6xi0unJqn7dnH5Kn5ir]
- 41. Troubleshooting Tips for Fluorescence Staining [https://biotium.com/tech-tips-protocols/troubleshooting-tips-for-fluorescence-staining/]
- 42. Flow Cytometry Troubleshooting Guide [https://www.cellsignal.com/learn-and-support/troubleshooting/flow-cytometry-troubleshooting-guide?srsltid=AfmBOopU60jfZpivaYLhVM7z0njap3pW0MRok7tqOsH1cRAHkP9Iy8YS]
- 43. Western Blotting Troubleshooting Guide [https://www.cellsignal.com/learn-and-support/troubleshooting/western-blot-troubleshooting-guide?srsltid=AfmBOop0arqKFmeO-VAMZmXQGlFD2r1nIQXoKpmGhRDzYOwdnud7PyII]
- 44. Six Tips for Efficient Transfer of Your Proteins [https://www.bioradiations.com/six-tips-for-efficient-transfer-of-your-proteins/]
- 45. Ubiquitination detection techniques - PMC - PubMed Central [https://pmc.ncbi.nlm.nih.gov/articles/PMC10625345/]
- 46. Highly specific intracellular ubiquitination of a small molecule [https://www.nature.com/articles/s41589-025-02011-1]
- 47. Blocking Buffers for Western Blot and ELISA [https://www.thermofisher.com/us/en/home/life-science/protein-biology/protein-biology-learning-center/protein-biology-resource-library/pierce-protein-methods/blocking-buffers-western-blot-elisa.html]
- 48. Western blotting guide: Part 4, Membrane blocking [https://www.jacksonimmuno.com/secondary-antibody-resource/immuno-techniques/western-blotting-guide-part-4/]
- 49. Western blot blocking: Best practices [https://www.abcam.com/en-us/knowledge-center/western-blot/western-blot-blocking-methods]
- 50. Alexa Fluor Plus Secondary Antibody Development & ... [https://www.thermofisher.com/us/en/home/references/newsletters-and-journals/bioprobes-journal-of-cell-biology-applications/bioprobes-80/alexa-fluor-plus-secondary-antibodies-development-optimization.html]
- 51. Western Blot Troubleshooting: Why Does The Observed ... [https://www.ptglab.com/support/western-blot-protocol/western-blot-troubleshooting-why-does-the-observed-protein-molecular-weight-mw-differ-from-the-calculated-one/?srsltid=AfmBOorlOVG6Dppa00rFOdyoifAlq7A5H4LrcvxQIEJUGvIuWIcV3N74]
- 52. Proteostasis Disruption by Proteasome Inhibitor MG132 and ... [https://pmc.ncbi.nlm.nih.gov/articles/PMC12256276/]
- 53. Proteomics-Based Identification of DUB Substrates Using ... [https://pmc.ncbi.nlm.nih.gov/articles/PMC7855594/]
- 54. Screening of DUB activity and specificity by MALDI-TOF ... [https://www.nature.com/articles/ncomms5763]
- 55. Successful Transfer High Molecular Weight Proteins during ... [https://www.thermofisher.com/mx/en/home/life-science/protein-biology/protein-biology-learning-center/protein-biology-resource-library/protein-biology-application-notes/successful-transfer-high-mw-proteins-western-blotting.html]
- 56. Western Blot: The Complete Guide [https://www.antibodies.com/applications/western-blotting]
- 57. Western blot protocol [https://www.abcam.com/en-us/technical-resources/protocols/western-blot]
- 58. Western Blotting: Products, Protocols, & Applications [https://www.thermofisher.com/us/en/home/life-science/protein-biology/protein-biology-learning-center/protein-biology-resource-library/pierce-protein-methods/overview-western-blotting.html]
- 59. Western Blotting (Immunoblotting): History, Theory, Uses ... [https://pmc.ncbi.nlm.nih.gov/articles/PMC12303220/]
- 60. Time-resolved in vivo ubiquitinome profiling by DIA-MS ... [https://www.nature.com/articles/s41467-021-25454-1]
- 61. Proteomic approaches to study ubiquitinomics - PMC [https://pmc.ncbi.nlm.nih.gov/articles/PMC10612121/]
- 62. Current methodologies in protein ubiquitination characterization [https://cellandbioscience.biomedcentral.com/articles/10.1186/s13578-022-00870-y]
- 63. Western Blot (WB) Protocol for High Molecular Weight ... [https://www.alomone.com/info/western-blot-protocol-for-high-molecular-weight-hmw-proteins?srsltid=AfmBOop3iKAKYV8CbXGc3MFBw6m3amO9W31PD80zSqEGhMdxUGS1FbIj]
- 64. Protein transfer and visualization in western blot [https://www.abcam.com/en-us/technical-resources/guides/western-blot-guide/protein-transfer-and-visualization-in-western-blot]
- 65. What went wrong? A Western Blot Troubleshooting Guide [https://precisionbiosystems.com/western-blot-troubleshooting-guide/]
- 66. Analysis of the topology of ubiquitin chains - PMC [https://pmc.ncbi.nlm.nih.gov/articles/PMC6989142/]
- 67. Western Blot Troubleshooting: Why Does The Observed ... [https://www.ptglab.com/support/western-blot-protocol/western-blot-troubleshooting-why-does-the-observed-protein-molecular-weight-mw-differ-from-the-calculated-one/?srsltid=AfmBOopbCAPgwFpU6FCrl0Gi4UzURMabJuJlGEv_qApY1k8CyCgto98g]
- 68. Detection of Protein Ubiquitination - PMC [https://pmc.ncbi.nlm.nih.gov/articles/PMC3149903/]
- 69. Precautions and Challenges in Protein Ubiquitination ... [https://www.mtoz-biolabs.com/precautions-and-challenges-in-protein-ubiquitination-detection-experiments.html]
- 70. Western Blotting Troubleshooting Guide [https://www.cellsignal.com/learn-and-support/troubleshooting/western-blot-troubleshooting-guide?srsltid=AfmBOopL4IQ0mT3B5XUxxWuNcn1jnxbm8tSmuCdAL71pGceCXqF6fTg9]
- 71. Ubiquiton—An inducible, linkage-specific ... [https://www.sciencedirect.com/science/article/pii/S1097276523009619]
- 72. Accelerating PROTAC drug discovery: Establishing a ... [https://www.sciencedirect.com/science/article/pii/S0006291X22011792]
- 73. A brief guide to good practices in pharmacological ... [https://www.nature.com/articles/s41401-020-00539-7]
- 74. Assessment of Proteasome Impairment and Accumulation ... [https://pmc.ncbi.nlm.nih.gov/articles/PMC3408317/]
- 75. A Perturbed Ubiquitin Landscape Distinguishes Between ... [https://pmc.ncbi.nlm.nih.gov/articles/PMC3098606/]
- 76. Western Blot Troubleshooting: Why Does The Observed ... [https://www.ptglab.com/support/western-blot-protocol/western-blot-troubleshooting-why-does-the-observed-protein-molecular-weight-mw-differ-from-the-calculated-one/?srsltid=AfmBOorN0NJS4nAg8iJsly-Fd4TTd-6HpsukcjWbh2V5YZgY5JrI8hFa]
- 77. Western blotting of high and low molecular weight proteins ... [https://pmc.ncbi.nlm.nih.gov/articles/PMC7337971/]
- 78. Immunoblot [https://www.svarlifescience.com/knowledge/technologies/immunoblot]
- 79. Specificity of Immunostaining methods: How to choose a ... [https://info.gbiosciences.com/blog/specificity-of-immunostaining-methods-how-to-choose-a-control]